> ## Documentation Index
> Fetch the complete documentation index at: https://docs.openlayer.com/llms.txt
> Use this file to discover all available pages before exploring further.
# Push and poll using the Openlayer CLI
> Learn how to push and poll your artifacts using the Openlayer CLI
As discussed in the [development mode overview](/development/overview),
to make Openlayer part of your pipeline, you must set up a way to push your artifacts
to the Openlayer platform after each development cycle.
This guide shows how to use the **Openlayer CLI** to **push artifacts**
and **retrieve test results**.
To follow this guide, feel free to use one of the template projects from the [Template gallery](https://github.com/openlayer-ai/templates).
We use the [OpenAI in Python](https://github.com/openlayer-ai/templates/tree/main/python/llms/openai-chatbot) as an example.
## Directory structure
Before you start, make sure that the directory you want to push to Openlayer adheres to one of the
options below.
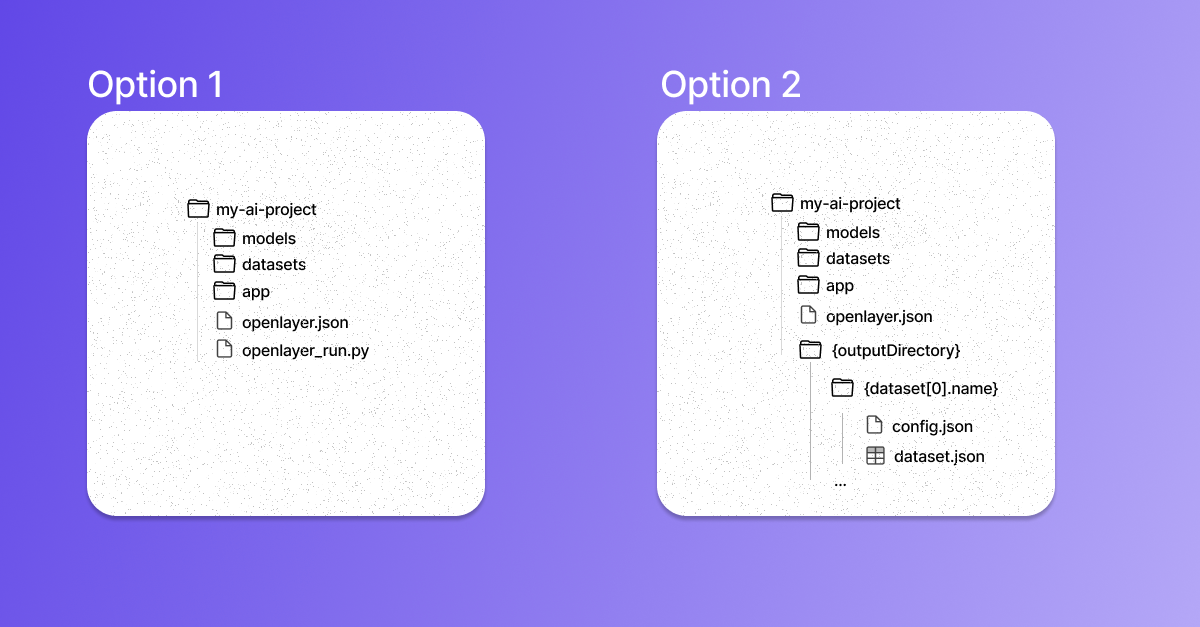 In the first option, besides the `openlayer.json`, there is a run script (`openlayer_run.py`).
This option represents the scenario where Openlayer will use your script to get your model
outputs for your datasets.
On the other hand, option 2 illustrates the situation when
you already provide your model's outputs for your datasets. Refer to the [Configuring
output generation](/development/configuring-output-generation) page for details.
Option 1 is more common. However, option 2 is suitable for users who don't
want to give Openlayer access to their source code and for users whose
execution runtime is not supported by Openlayer.
## Pushing to Openlayer
To push the directory to Openlayer, you must:
Inside your directory, run the command:
```bash theme={null}
openlayer login
```
This will prompt you for the Openlayer API URL (which should be kept as `https://api.openlayer.com`
if you are using app.openlayer.com) and for your API key (which you can [find here](/workspace-and-projects/find-your-api-key)).
```bash theme={null}
> Enter the Openlayer API URL: https://api.openlayer.com
> Enter your API key: ********************************
> Done! The Openlayer CLI is configured for under the workspace
```
Refer to the [login command reference](/api-reference/cli/commands/login) for more information.
Then, run the command:
```bash theme={null}
openlayer link
```
You must answer a few questions, such as whether to create a new project on Openlayer,
the project directory, and others.
```bash theme={null}
? Set up “~/Desktop/openai-chatbot”? Yes
? Link to existing project? No
? What's your project's name? openai-chatbot
? What's the directory of your project? ./
✅ Linked to openlayer/openai-chatbot (created .openlayer)
```
Refer to the [link command reference](/api-reference/cli/commands/link) for more information.
Finally, run:
```bash theme={null}
openlayer push
```
This command creates and pushes a new commit to your Openlayer project. It then waits
for the evaluation of your tests to display the results:
```bash theme={null}
Running "openlayer validate"
Config is valid
Running "openlayer bundle"
Bundle completed [9ms]
Running "openlayer upload"
Uploading bundle [0.29 MB]...
Upload completed [5.904s]
Push completed [7.423s]
⠇ Waiting for results
```
Refer to the [push command reference](/api-reference/cli/commands/push) for more information.
## Poll the results
After following the steps above, you should see a new commit in your Openlayer project.
You can view the test results using the `openlayer inspect` CLI command:
```bash theme={null}
Version Information:
-------------------
Version ID: 5979c341-fa08-4a72-9bc9-c7e6296ee9dc
More Details: https://app.openlayer.com/openlayer/7dd13019-5bba-4138-aeb0-6a60226c31d1?mode=development&projectVersionId=5979c341-fa08-4a72-9bc9-c7e6296ee9dc
Date Created: April 29, 2024 at 3:54 PM
Commit Message: Pushed from Openlayer CLI
Source of Commit: cli
Status: completed
Status Message: Generated insights
Test Result Summary:
-------------------
| TYPE | COUNT |
|---------------|-------|
| Passing Tests | 4 |
| Failing Tests | 1 |
| Total Tests | 7 |
|---------------|-------|
Failing / Errored Tests:
-------------
| # | TEST NAME | DETAILS |
+----+--------------------------------+---------+
| 01 | Validation answer relevancy >= | failing |
| | 0.8 | |
+----+--------------------------------+---------+
```
If the push fails (status `failed`), you can check the logs on the Openlayer platform to debug the issue.
Refer to the [inspect command reference](/api-reference/cli/commands/inspect) for more information.
In the first option, besides the `openlayer.json`, there is a run script (`openlayer_run.py`).
This option represents the scenario where Openlayer will use your script to get your model
outputs for your datasets.
On the other hand, option 2 illustrates the situation when
you already provide your model's outputs for your datasets. Refer to the [Configuring
output generation](/development/configuring-output-generation) page for details.
Option 1 is more common. However, option 2 is suitable for users who don't
want to give Openlayer access to their source code and for users whose
execution runtime is not supported by Openlayer.
## Pushing to Openlayer
To push the directory to Openlayer, you must:
Inside your directory, run the command:
```bash theme={null}
openlayer login
```
This will prompt you for the Openlayer API URL (which should be kept as `https://api.openlayer.com`
if you are using app.openlayer.com) and for your API key (which you can [find here](/workspace-and-projects/find-your-api-key)).
```bash theme={null}
> Enter the Openlayer API URL: https://api.openlayer.com
> Enter your API key: ********************************
> Done! The Openlayer CLI is configured for under the workspace
```
Refer to the [login command reference](/api-reference/cli/commands/login) for more information.
Then, run the command:
```bash theme={null}
openlayer link
```
You must answer a few questions, such as whether to create a new project on Openlayer,
the project directory, and others.
```bash theme={null}
? Set up “~/Desktop/openai-chatbot”? Yes
? Link to existing project? No
? What's your project's name? openai-chatbot
? What's the directory of your project? ./
✅ Linked to openlayer/openai-chatbot (created .openlayer)
```
Refer to the [link command reference](/api-reference/cli/commands/link) for more information.
Finally, run:
```bash theme={null}
openlayer push
```
This command creates and pushes a new commit to your Openlayer project. It then waits
for the evaluation of your tests to display the results:
```bash theme={null}
Running "openlayer validate"
Config is valid
Running "openlayer bundle"
Bundle completed [9ms]
Running "openlayer upload"
Uploading bundle [0.29 MB]...
Upload completed [5.904s]
Push completed [7.423s]
⠇ Waiting for results
```
Refer to the [push command reference](/api-reference/cli/commands/push) for more information.
## Poll the results
After following the steps above, you should see a new commit in your Openlayer project.
You can view the test results using the `openlayer inspect` CLI command:
```bash theme={null}
Version Information:
-------------------
Version ID: 5979c341-fa08-4a72-9bc9-c7e6296ee9dc
More Details: https://app.openlayer.com/openlayer/7dd13019-5bba-4138-aeb0-6a60226c31d1?mode=development&projectVersionId=5979c341-fa08-4a72-9bc9-c7e6296ee9dc
Date Created: April 29, 2024 at 3:54 PM
Commit Message: Pushed from Openlayer CLI
Source of Commit: cli
Status: completed
Status Message: Generated insights
Test Result Summary:
-------------------
| TYPE | COUNT |
|---------------|-------|
| Passing Tests | 4 |
| Failing Tests | 1 |
| Total Tests | 7 |
|---------------|-------|
Failing / Errored Tests:
-------------
| # | TEST NAME | DETAILS |
+----+--------------------------------+---------+
| 01 | Validation answer relevancy >= | failing |
| | 0.8 | |
+----+--------------------------------+---------+
```
If the push fails (status `failed`), you can check the logs on the Openlayer platform to debug the issue.
Refer to the [inspect command reference](/api-reference/cli/commands/inspect) for more information.