> ## Documentation Index
> Fetch the complete documentation index at: https://docs.openlayer.com/llms.txt
> Use this file to discover all available pages before exploring further.
# Microsoft Copilot Studio
> Integrate Microsoft Copilot Studio with Openlayer for comprehensive conversation tracing and evaluation
 Openlayer integrates with [Microsoft Copilot Studio](https://www.microsoft.com/en-us/microsoft-copilot/microsoft-copilot-studio) to help you trace, evaluate, and monitor your Copilot conversations.
The integration works by consuming conversation transcripts directly from Dataverse, automatically parsing them into structured trace data that includes LLM calls, tool executions, plan steps, latency, token usage, and RAG citations.
## How it works
Copilot Studio stores conversation transcripts in the `ConversationTranscript` table in Dataverse. Openlayer reads these transcripts and automatically:
* Parses conversations into structured trace data
* Extracts LLM calls, tool executions, and plan steps
* Captures latency, token usage, and cost estimates
* Logs RAG citations and retrieved documents
* Auto-creates projects and pipelines per bot
***
## Prerequisites
### Enable enhanced transcripts
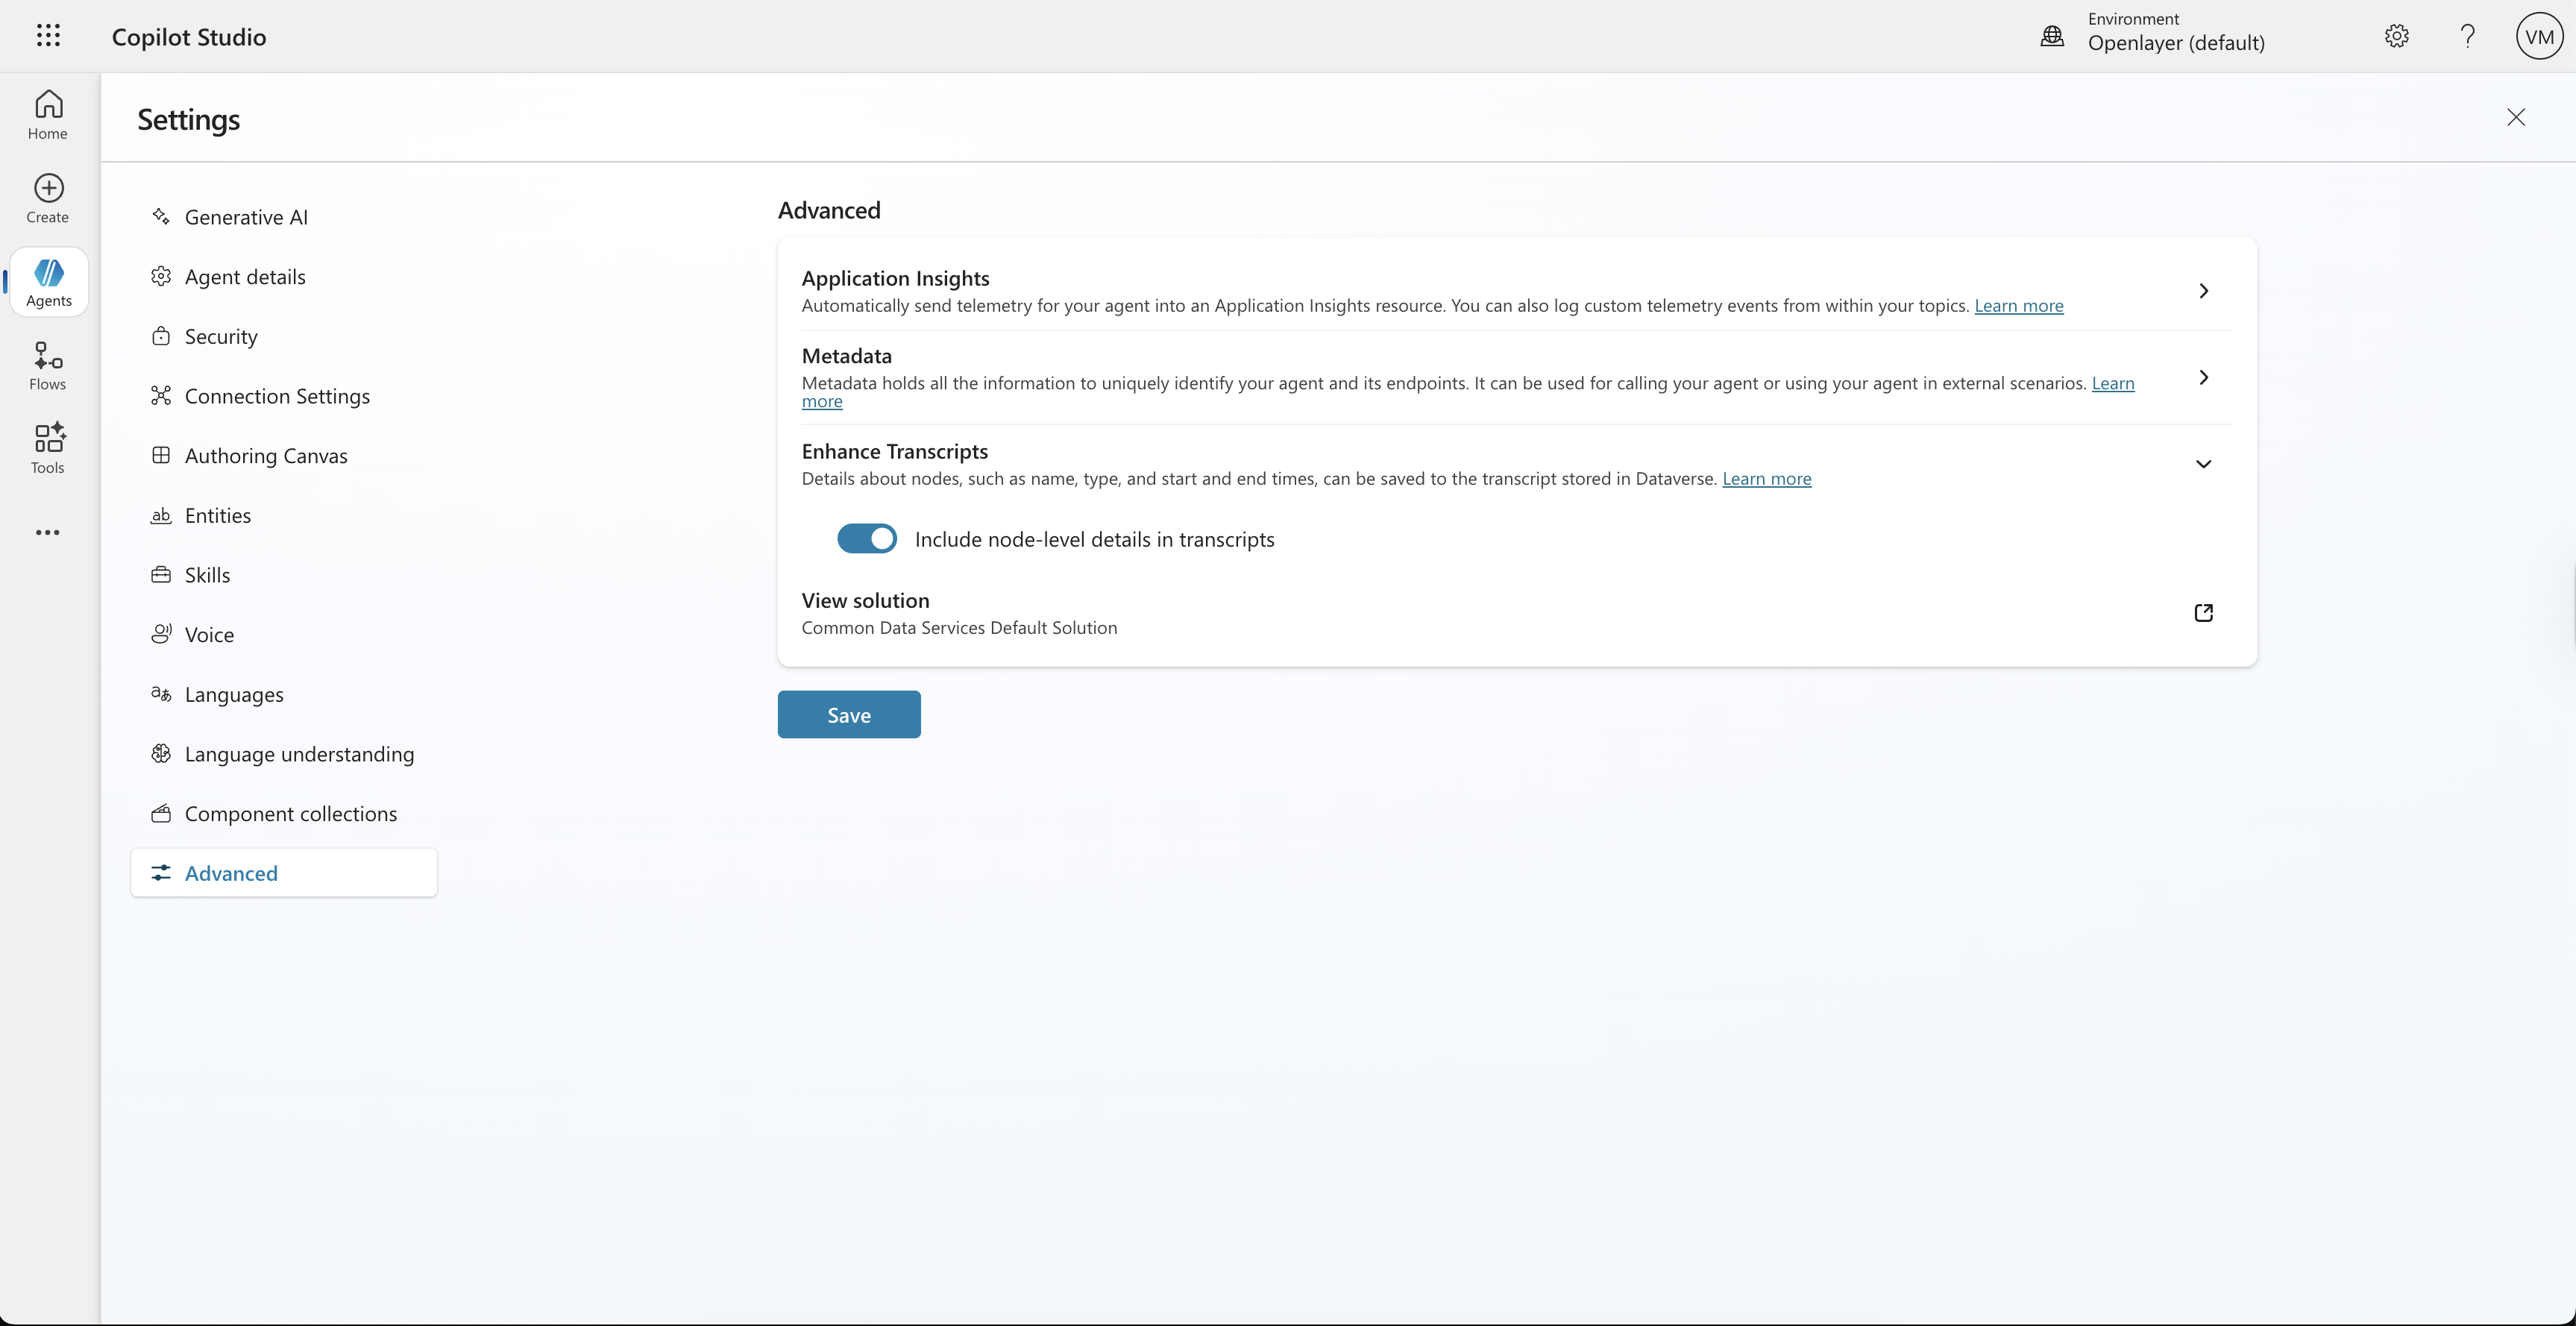
To get the most detailed traces in Openlayer, you must enable **Enhanced Transcripts** in your Copilot Studio agent settings. This setting allows Openlayer to capture node-level details such as name, type, and start and end times.
To enable it:
1. In Copilot Studio, navigate to **Settings** → **Advanced**
2. Expand the **Enhance Transcripts** section
3. Toggle on **Include node-level details in transcripts**
4. Click **Save**
Openlayer integrates with [Microsoft Copilot Studio](https://www.microsoft.com/en-us/microsoft-copilot/microsoft-copilot-studio) to help you trace, evaluate, and monitor your Copilot conversations.
The integration works by consuming conversation transcripts directly from Dataverse, automatically parsing them into structured trace data that includes LLM calls, tool executions, plan steps, latency, token usage, and RAG citations.
## How it works
Copilot Studio stores conversation transcripts in the `ConversationTranscript` table in Dataverse. Openlayer reads these transcripts and automatically:
* Parses conversations into structured trace data
* Extracts LLM calls, tool executions, and plan steps
* Captures latency, token usage, and cost estimates
* Logs RAG citations and retrieved documents
* Auto-creates projects and pipelines per bot
***
## Prerequisites
### Enable enhanced transcripts
To get the most detailed traces in Openlayer, you must enable **Enhanced Transcripts** in your Copilot Studio agent settings. This setting allows Openlayer to capture node-level details such as name, type, and start and end times.
To enable it:
1. In Copilot Studio, navigate to **Settings** → **Advanced**
2. Expand the **Enhance Transcripts** section
3. Toggle on **Include node-level details in transcripts**
4. Click **Save**
 Without this setting enabled, Openlayer will still capture basic conversation
data, but you won't get the full execution traces showing individual node
executions and timing information.
### Register an Azure AD app
The native integration requires an Azure AD (Entra ID) app registration so
that Openlayer can read conversation transcripts from Dataverse on your behalf.
1. In the [Azure Portal](https://portal.azure.com), go to **Microsoft Entra ID** → **App registrations** → **New registration**.
2. Give the app a name (e.g., `Openlayer Copilot Studio`) and register it.
3. Under **Certificates & secrets**, create a new **Client secret** and copy its value.
4. Under **API permissions**, add the following **Application** permission:
* `Dataverse` → `user_impersonation`
5. Grant **admin consent** for the permission.
Take note of the following values — you will need them when connecting in Openlayer:
| Value | Where to find it |
| ------------------- | ----------------------------------------------------------------------- |
| **Tenant ID** | **Overview** page of your Entra ID tenant |
| **Client ID** | **Overview** page of the app registration |
| **Client secret** | **Certificates & secrets** page (copy immediately after creation) |
| **Environment URL** | Your Dataverse environment URL, e.g. `https://yourorg.crm.dynamics.com` |
You can find your Dataverse environment URL in the [Power Platform admin
center](https://admin.powerplatform.microsoft.com/) under **Environments** →
your environment → **Environment URL**.
### Create a custom security role in Power Platform
By default, Dataverse restricts table access to the owning user or business
unit. Openlayer needs **Organization-level Read** access to the `Bot` and
`ConversationTranscript` tables so it can discover all agents and pull
transcripts across your entire environment.
To set this up, create a custom security role and assign it to the
application user:
#### Step 1: Create the security role
1. Go to the [Power Platform admin center](https://admin.powerplatform.microsoft.com/) → **Environments** → select your environment → **Settings**.
2. Under **Users + permissions**, click **Security roles**.
3. Click **New role** and give it a name (e.g., `Openlayer Dataverse Reader`).
4. On the **Custom Entities** tab, find the following tables and set **Read**
access to **Organization** (the globe icon) for each:
| Table | Read access level |
| --------------------------- | ----------------- |
| **Bot** | Organization |
| **Conversation Transcript** | Organization |
5. Click **Save and Close**.
The "Organization" access level means the app can read records owned by any
user or business unit in the environment. This is required because
conversation transcripts are owned by the bot's business unit, not the
application user.
#### Step 2: Create an application user
1. In the Power Platform admin center, go to **Environments** → your environment → **Settings**.
2. Under **Users + permissions**, click **Application users**.
3. Click **New app user** and select the Azure AD app you registered earlier.
4. Assign the **Business unit** for your environment.
5. Under **Security roles**, add the custom role you just created (e.g.,
`Openlayer Dataverse Reader`).
6. Click **Create**.
If the application user does not have Organization-level Read on the `Bot`
table, Openlayer will connect successfully but return zero agents during
discovery. If it lacks Read on `ConversationTranscript`, syncs will return no
data.
***
## Integration options
There are three ways to connect Copilot Studio to Openlayer:
| Option | Best for | Setup |
| ------------------------------------ | --------------------------------------- | ----------- |
| **Native integration** (Recommended) | Most teams — fully managed by Openlayer | UI-based |
| **Azure Logic App** (Deprecated) | Push-based, near real-time | Azure setup |
| **Batch API script** (Deprecated) | Historical backfills, restricted envs | Code |
The Azure Logic App and Batch API script integration paths will be
**deprecated on June 1, 2026**. Please migrate to the native integration
before that date. Existing projects created via those paths will continue to
work with the native integration — simply connect your environment in
Openlayer and enable the corresponding agents.
***
## Option 1: Native integration (Recommended)
The native integration connects Openlayer directly to your Dataverse environment.
Openlayer discovers your bots, pulls conversation transcripts on a schedule, and
auto-creates projects — all managed from the Openlayer UI.
### Step 1: Connect your environment
1. In Openlayer, navigate to **Settings** → **Integrations**.
2. Click **Microsoft Copilot Studio**.
3. Fill in your Azure AD credentials:
* **Tenant ID**
* **Client ID**
* **Client secret**
* **Environment URL** (e.g. `https://yourorg.crm.dynamics.com`)
4. Click **Connect**.
Openlayer verifies the credentials by requesting a token from Azure AD. If
successful, the connection status changes to **Connected**.
### Step 2: Discover your agents
Once connected, click **Discover agents** to scan your Dataverse environment.
Openlayer queries the `bot` table and lists every Copilot Studio agent in
your environment.
Each discovered agent shows:
* **Name** and **schema name**
* **Status** in Dataverse (active or inactive)
* **Monitoring status** (enabled, disabled, or error)
### Step 3: Enable monitoring
For each agent you want to monitor, click **Enable**. You have two options:
* **Auto-create a new project** — Openlayer creates a project named
`Copilot Studio - ` with a default data source. This is the
fastest way to get started.
* **Map to an existing project** — Choose an existing Openlayer project and
data source. Use this when you already have a project set up for the agent.
Turn on **Auto-enable new agents** in the connection settings to automatically
enable monitoring for every agent Openlayer discovers. This is useful for
organizations with many agents that should all be monitored.
### Step 4: Configure sync settings
After enabling at least one agent, configure how often Openlayer pulls new
transcripts:
* **Sync enabled** — Toggle periodic syncing on or off.
* **Sync frequency** — How often Openlayer checks for new transcripts
(default: every 60 minutes).
* **Sync range** — Choose between:
* **All available data** — Sync all historical transcripts.
* **Last 7 days** — Only sync recent conversations.
* **Custom date** — Specify a start date.
You can also trigger a **manual sync** at any time by clicking **Sync now**.
### Backfilling historical data
To re-sync historical data for a specific agent (e.g., after adjusting
evaluation tests), click the three-dot menu on the agent row and select
**Backfill**. You can backfill:
* **All available data** — Re-process every transcript for this agent.
* **Since a specific date** — Only re-process transcripts from the given date
onward.
Copilot Studio only writes conversation data to Dataverse after the session
finishes, with an additional delay of up to 30 minutes. This means traces will
not appear in Openlayer in real-time during an active conversation, but will
be available shortly after the conversation ends.
***
## Option 2: Azure Logic App (Deprecated)
This integration path will be **deprecated on June 1, 2026**. Please use the
[native integration](#option-1-native-integration-recommended) instead.
Use an Azure Logic App with a Dataverse trigger for near real-time, push-based
integration. This option is useful when you want Dataverse to push each
transcript to Openlayer as soon as it is written, rather than waiting for
Openlayer's periodic pull.
### Architecture overview
Without this setting enabled, Openlayer will still capture basic conversation
data, but you won't get the full execution traces showing individual node
executions and timing information.
### Register an Azure AD app
The native integration requires an Azure AD (Entra ID) app registration so
that Openlayer can read conversation transcripts from Dataverse on your behalf.
1. In the [Azure Portal](https://portal.azure.com), go to **Microsoft Entra ID** → **App registrations** → **New registration**.
2. Give the app a name (e.g., `Openlayer Copilot Studio`) and register it.
3. Under **Certificates & secrets**, create a new **Client secret** and copy its value.
4. Under **API permissions**, add the following **Application** permission:
* `Dataverse` → `user_impersonation`
5. Grant **admin consent** for the permission.
Take note of the following values — you will need them when connecting in Openlayer:
| Value | Where to find it |
| ------------------- | ----------------------------------------------------------------------- |
| **Tenant ID** | **Overview** page of your Entra ID tenant |
| **Client ID** | **Overview** page of the app registration |
| **Client secret** | **Certificates & secrets** page (copy immediately after creation) |
| **Environment URL** | Your Dataverse environment URL, e.g. `https://yourorg.crm.dynamics.com` |
You can find your Dataverse environment URL in the [Power Platform admin
center](https://admin.powerplatform.microsoft.com/) under **Environments** →
your environment → **Environment URL**.
### Create a custom security role in Power Platform
By default, Dataverse restricts table access to the owning user or business
unit. Openlayer needs **Organization-level Read** access to the `Bot` and
`ConversationTranscript` tables so it can discover all agents and pull
transcripts across your entire environment.
To set this up, create a custom security role and assign it to the
application user:
#### Step 1: Create the security role
1. Go to the [Power Platform admin center](https://admin.powerplatform.microsoft.com/) → **Environments** → select your environment → **Settings**.
2. Under **Users + permissions**, click **Security roles**.
3. Click **New role** and give it a name (e.g., `Openlayer Dataverse Reader`).
4. On the **Custom Entities** tab, find the following tables and set **Read**
access to **Organization** (the globe icon) for each:
| Table | Read access level |
| --------------------------- | ----------------- |
| **Bot** | Organization |
| **Conversation Transcript** | Organization |
5. Click **Save and Close**.
The "Organization" access level means the app can read records owned by any
user or business unit in the environment. This is required because
conversation transcripts are owned by the bot's business unit, not the
application user.
#### Step 2: Create an application user
1. In the Power Platform admin center, go to **Environments** → your environment → **Settings**.
2. Under **Users + permissions**, click **Application users**.
3. Click **New app user** and select the Azure AD app you registered earlier.
4. Assign the **Business unit** for your environment.
5. Under **Security roles**, add the custom role you just created (e.g.,
`Openlayer Dataverse Reader`).
6. Click **Create**.
If the application user does not have Organization-level Read on the `Bot`
table, Openlayer will connect successfully but return zero agents during
discovery. If it lacks Read on `ConversationTranscript`, syncs will return no
data.
***
## Integration options
There are three ways to connect Copilot Studio to Openlayer:
| Option | Best for | Setup |
| ------------------------------------ | --------------------------------------- | ----------- |
| **Native integration** (Recommended) | Most teams — fully managed by Openlayer | UI-based |
| **Azure Logic App** (Deprecated) | Push-based, near real-time | Azure setup |
| **Batch API script** (Deprecated) | Historical backfills, restricted envs | Code |
The Azure Logic App and Batch API script integration paths will be
**deprecated on June 1, 2026**. Please migrate to the native integration
before that date. Existing projects created via those paths will continue to
work with the native integration — simply connect your environment in
Openlayer and enable the corresponding agents.
***
## Option 1: Native integration (Recommended)
The native integration connects Openlayer directly to your Dataverse environment.
Openlayer discovers your bots, pulls conversation transcripts on a schedule, and
auto-creates projects — all managed from the Openlayer UI.
### Step 1: Connect your environment
1. In Openlayer, navigate to **Settings** → **Integrations**.
2. Click **Microsoft Copilot Studio**.
3. Fill in your Azure AD credentials:
* **Tenant ID**
* **Client ID**
* **Client secret**
* **Environment URL** (e.g. `https://yourorg.crm.dynamics.com`)
4. Click **Connect**.
Openlayer verifies the credentials by requesting a token from Azure AD. If
successful, the connection status changes to **Connected**.
### Step 2: Discover your agents
Once connected, click **Discover agents** to scan your Dataverse environment.
Openlayer queries the `bot` table and lists every Copilot Studio agent in
your environment.
Each discovered agent shows:
* **Name** and **schema name**
* **Status** in Dataverse (active or inactive)
* **Monitoring status** (enabled, disabled, or error)
### Step 3: Enable monitoring
For each agent you want to monitor, click **Enable**. You have two options:
* **Auto-create a new project** — Openlayer creates a project named
`Copilot Studio - ` with a default data source. This is the
fastest way to get started.
* **Map to an existing project** — Choose an existing Openlayer project and
data source. Use this when you already have a project set up for the agent.
Turn on **Auto-enable new agents** in the connection settings to automatically
enable monitoring for every agent Openlayer discovers. This is useful for
organizations with many agents that should all be monitored.
### Step 4: Configure sync settings
After enabling at least one agent, configure how often Openlayer pulls new
transcripts:
* **Sync enabled** — Toggle periodic syncing on or off.
* **Sync frequency** — How often Openlayer checks for new transcripts
(default: every 60 minutes).
* **Sync range** — Choose between:
* **All available data** — Sync all historical transcripts.
* **Last 7 days** — Only sync recent conversations.
* **Custom date** — Specify a start date.
You can also trigger a **manual sync** at any time by clicking **Sync now**.
### Backfilling historical data
To re-sync historical data for a specific agent (e.g., after adjusting
evaluation tests), click the three-dot menu on the agent row and select
**Backfill**. You can backfill:
* **All available data** — Re-process every transcript for this agent.
* **Since a specific date** — Only re-process transcripts from the given date
onward.
Copilot Studio only writes conversation data to Dataverse after the session
finishes, with an additional delay of up to 30 minutes. This means traces will
not appear in Openlayer in real-time during an active conversation, but will
be available shortly after the conversation ends.
***
## Option 2: Azure Logic App (Deprecated)
This integration path will be **deprecated on June 1, 2026**. Please use the
[native integration](#option-1-native-integration-recommended) instead.
Use an Azure Logic App with a Dataverse trigger for near real-time, push-based
integration. This option is useful when you want Dataverse to push each
transcript to Openlayer as soon as it is written, rather than waiting for
Openlayer's periodic pull.
### Architecture overview
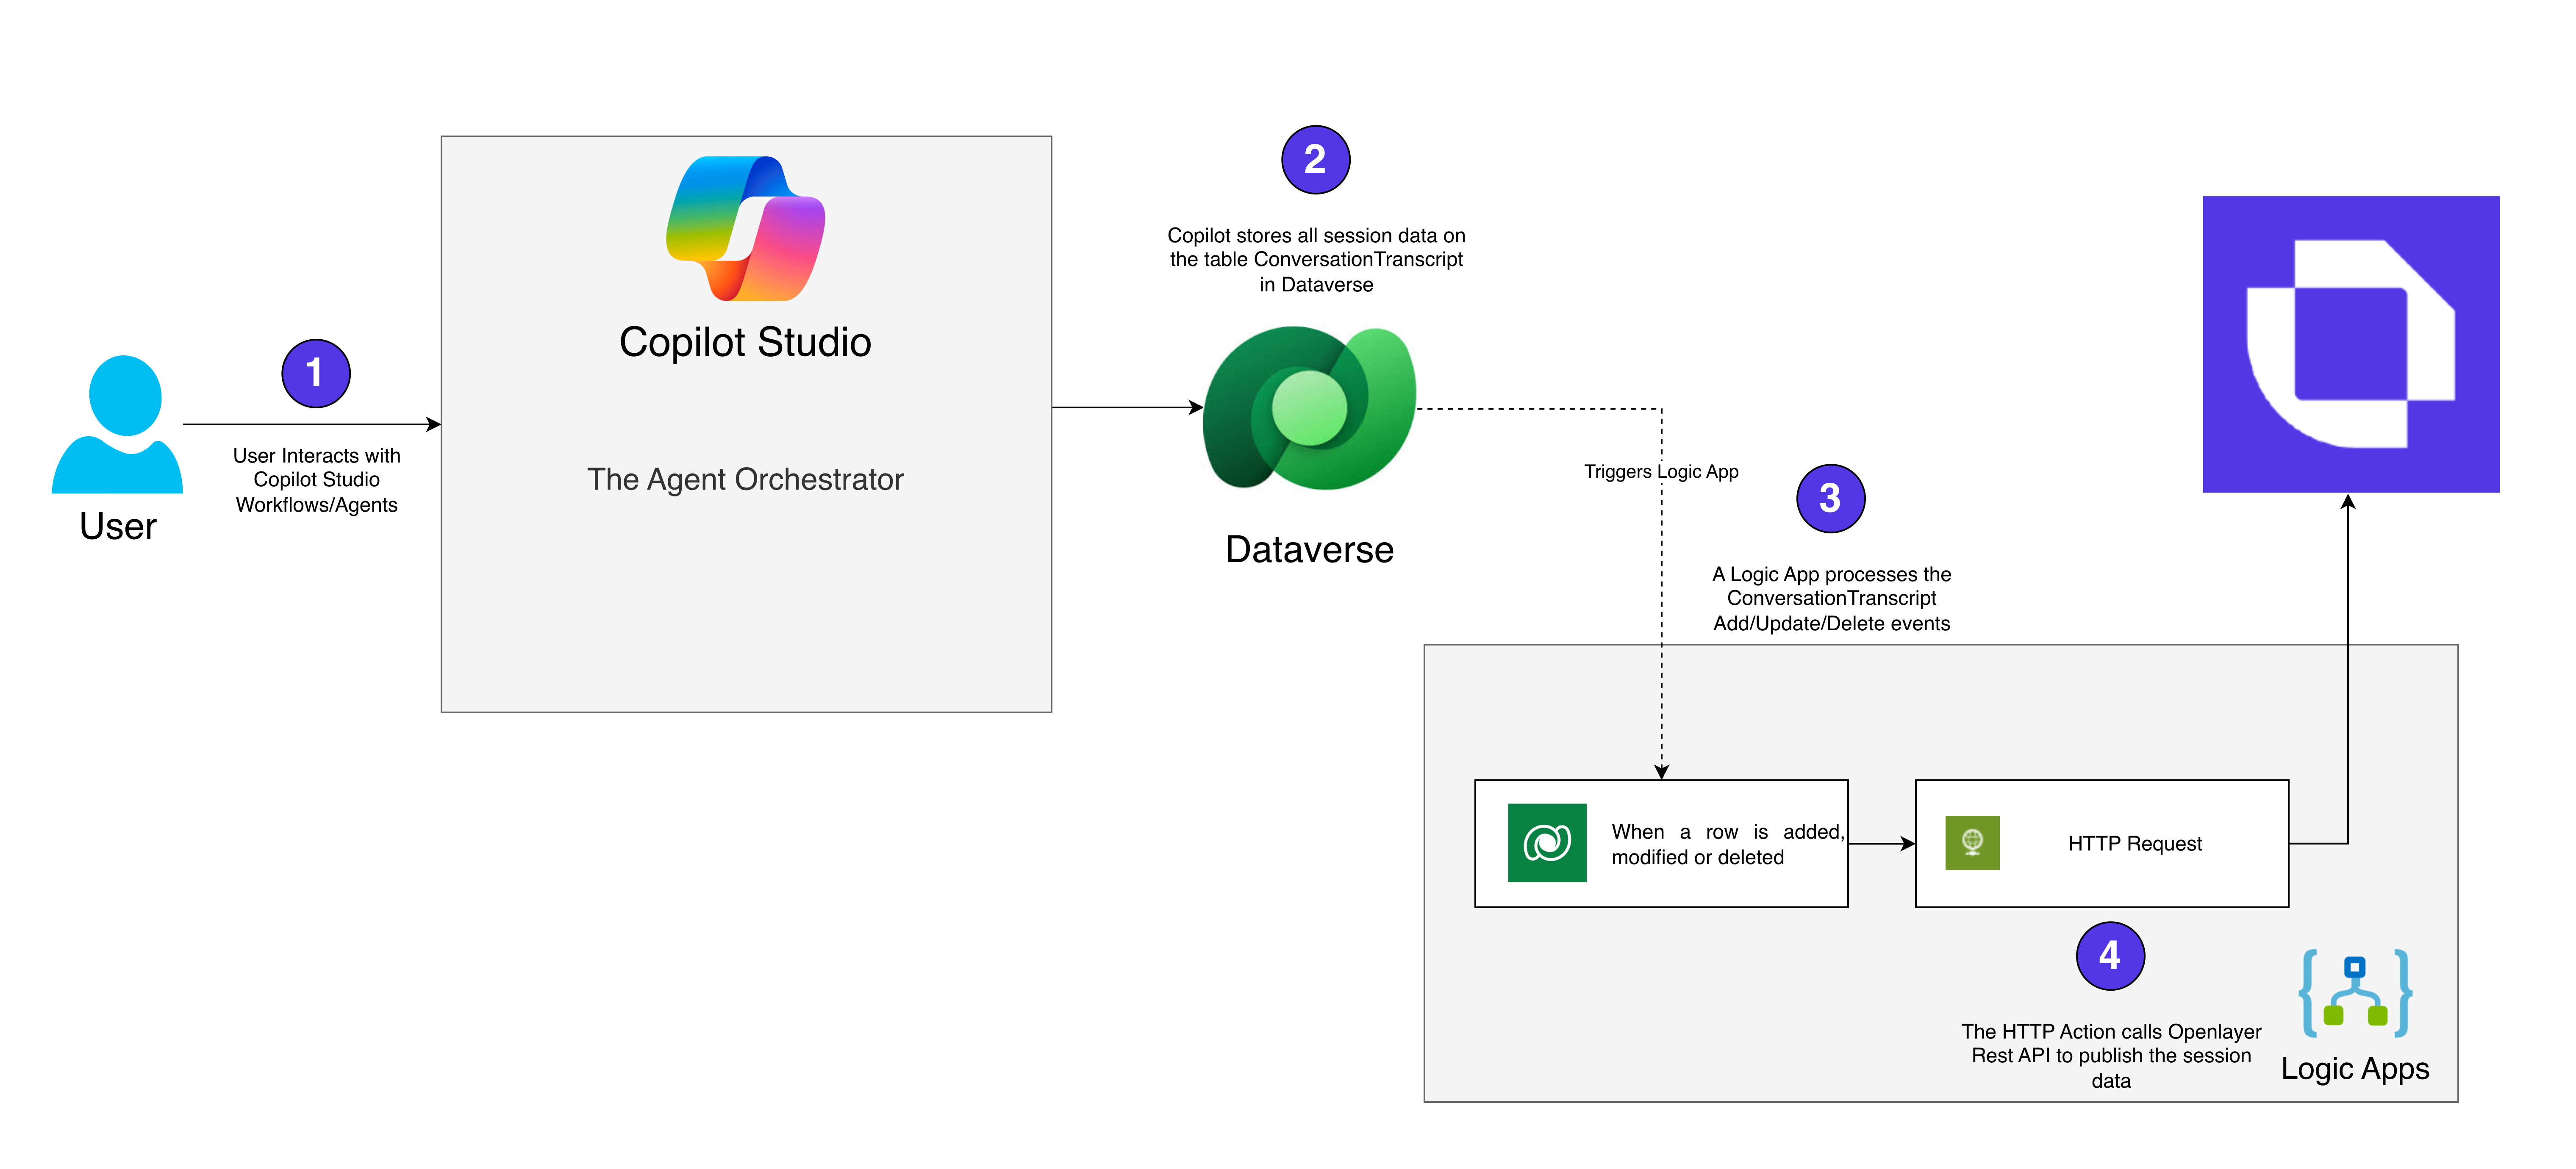 1. User interacts with Copilot Studio workflows/agents
2. Copilot Studio stores session data in the `ConversationTranscript` table in Dataverse
3. A Logic App triggers on Add/Update/Delete events in the `ConversationTranscript` table
4. The Logic App's HTTP action sends the transcript data to Openlayer's REST API
### Step 1: Create the Logic App
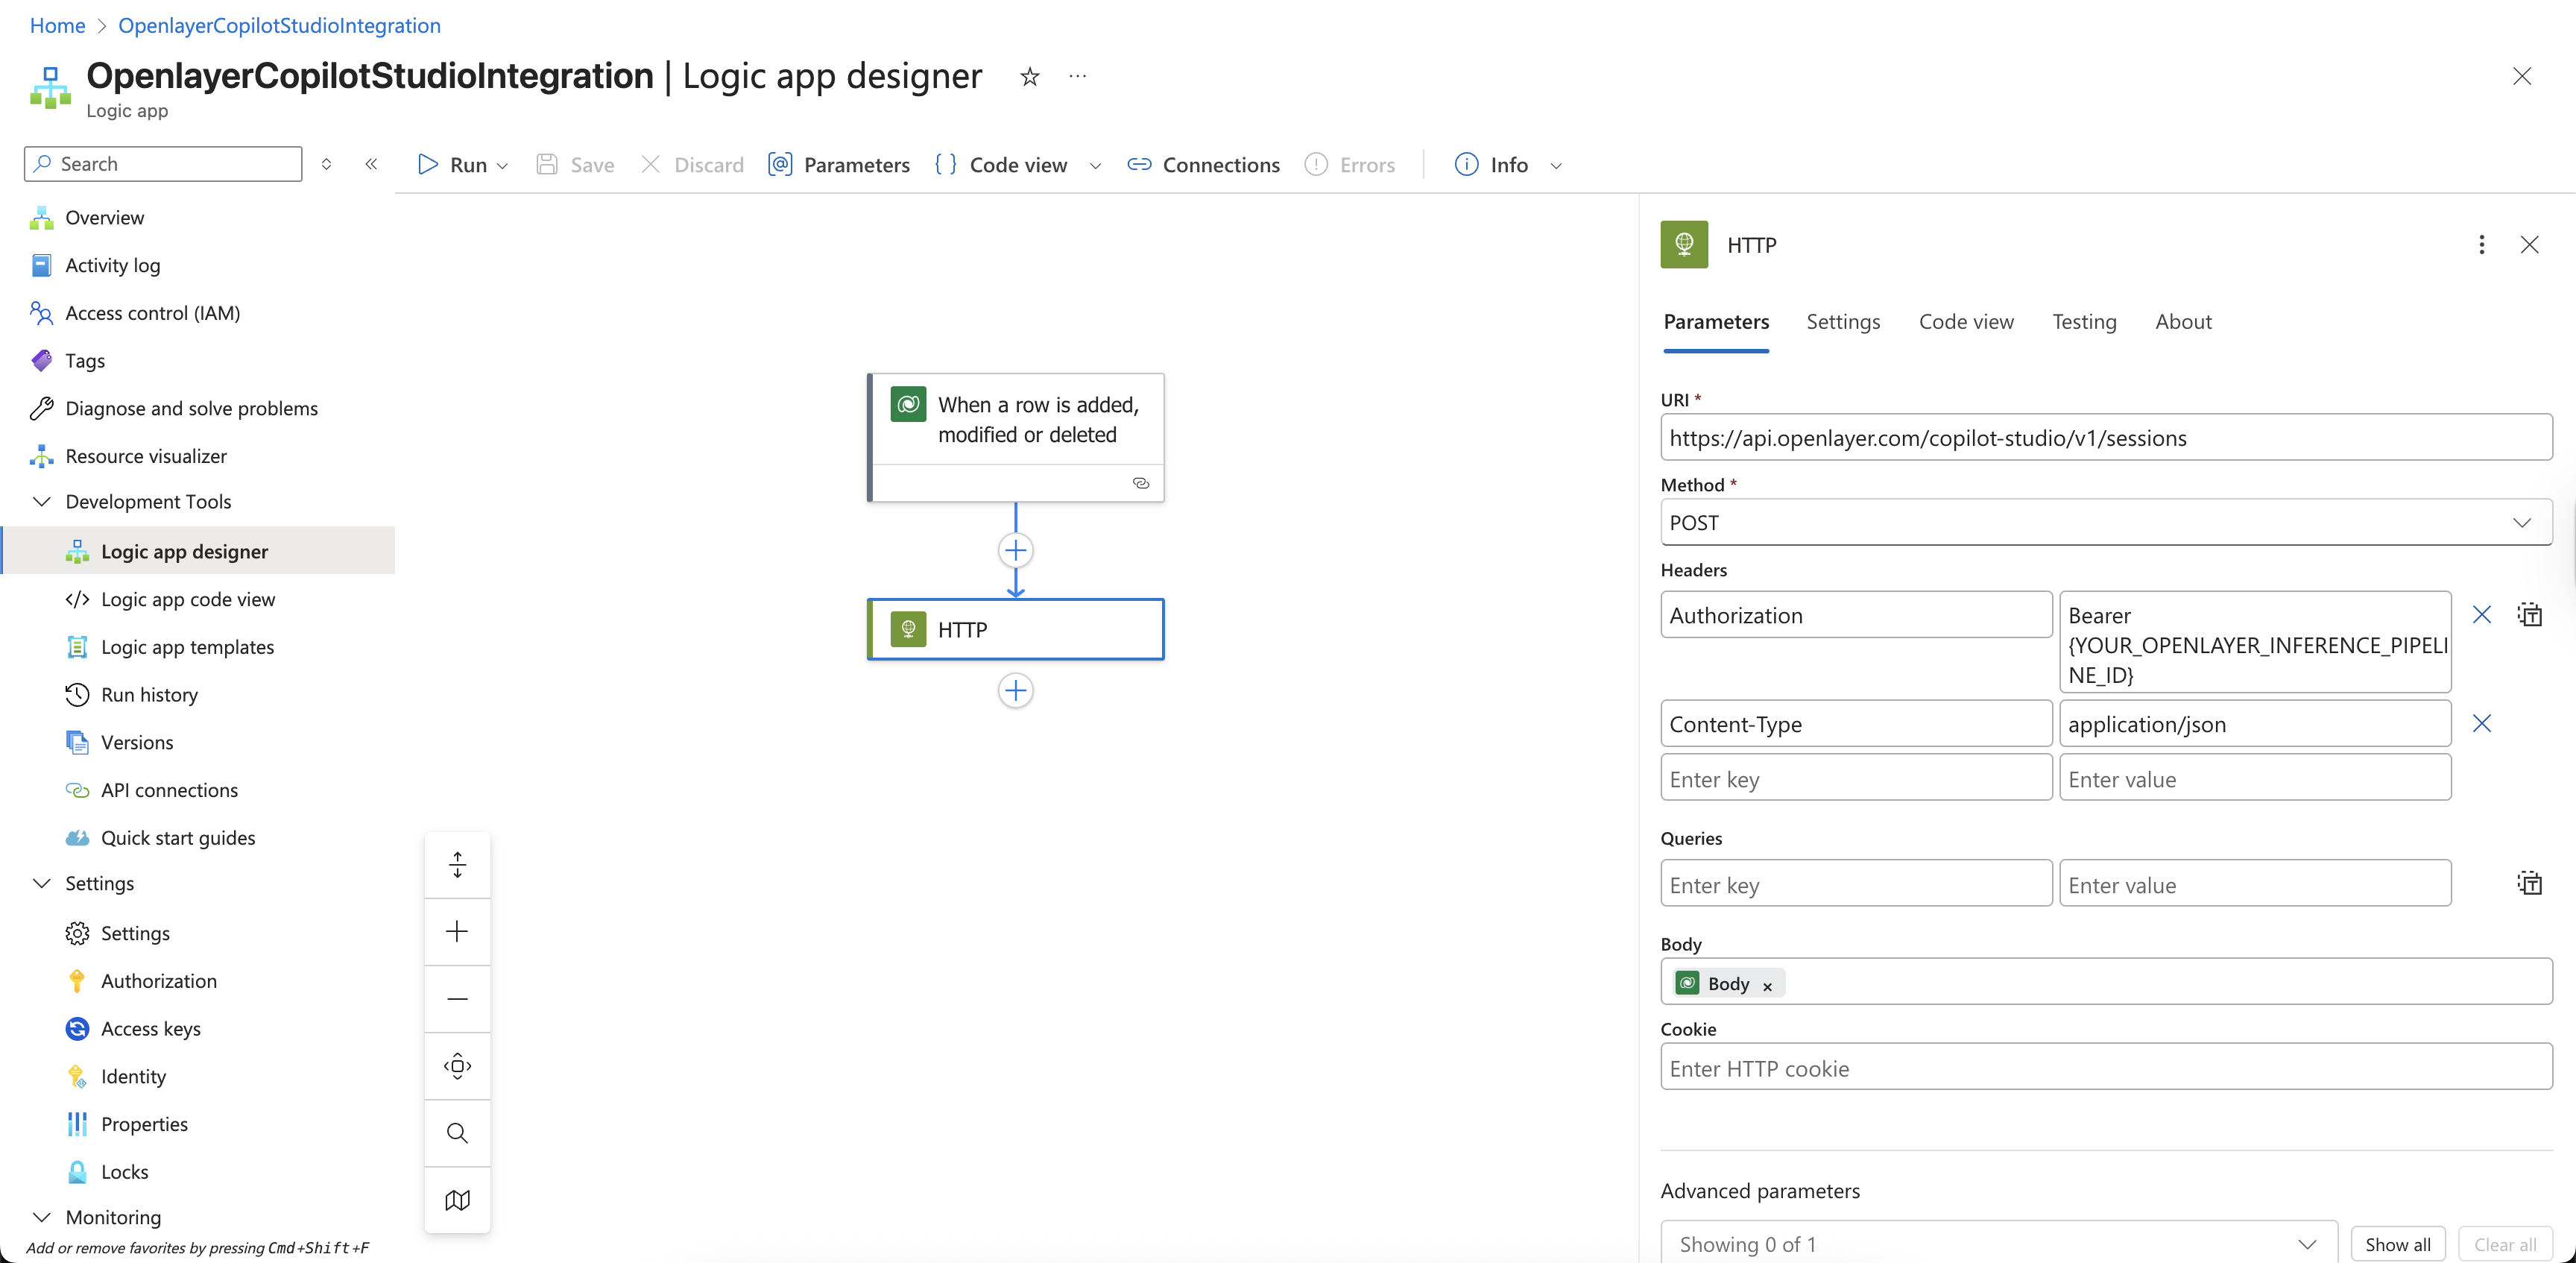
1. In the Azure Portal, create a new **Logic App (Consumption)**.
2. In the Logic App designer, search for **Dataverse** in the triggers.
3. Select the **When a row is added, modified or deleted** trigger.
4. Configure the trigger:
* **Table name**: `ConversationTranscript`
* **Scope**: `Organization`
* **Filter rows**: (Optional) Add filters to exclude test/design mode conversations
1. User interacts with Copilot Studio workflows/agents
2. Copilot Studio stores session data in the `ConversationTranscript` table in Dataverse
3. A Logic App triggers on Add/Update/Delete events in the `ConversationTranscript` table
4. The Logic App's HTTP action sends the transcript data to Openlayer's REST API
### Step 1: Create the Logic App
1. In the Azure Portal, create a new **Logic App (Consumption)**.
2. In the Logic App designer, search for **Dataverse** in the triggers.
3. Select the **When a row is added, modified or deleted** trigger.
4. Configure the trigger:
* **Table name**: `ConversationTranscript`
* **Scope**: `Organization`
* **Filter rows**: (Optional) Add filters to exclude test/design mode conversations
 ### Step 2: Configure the HTTP action
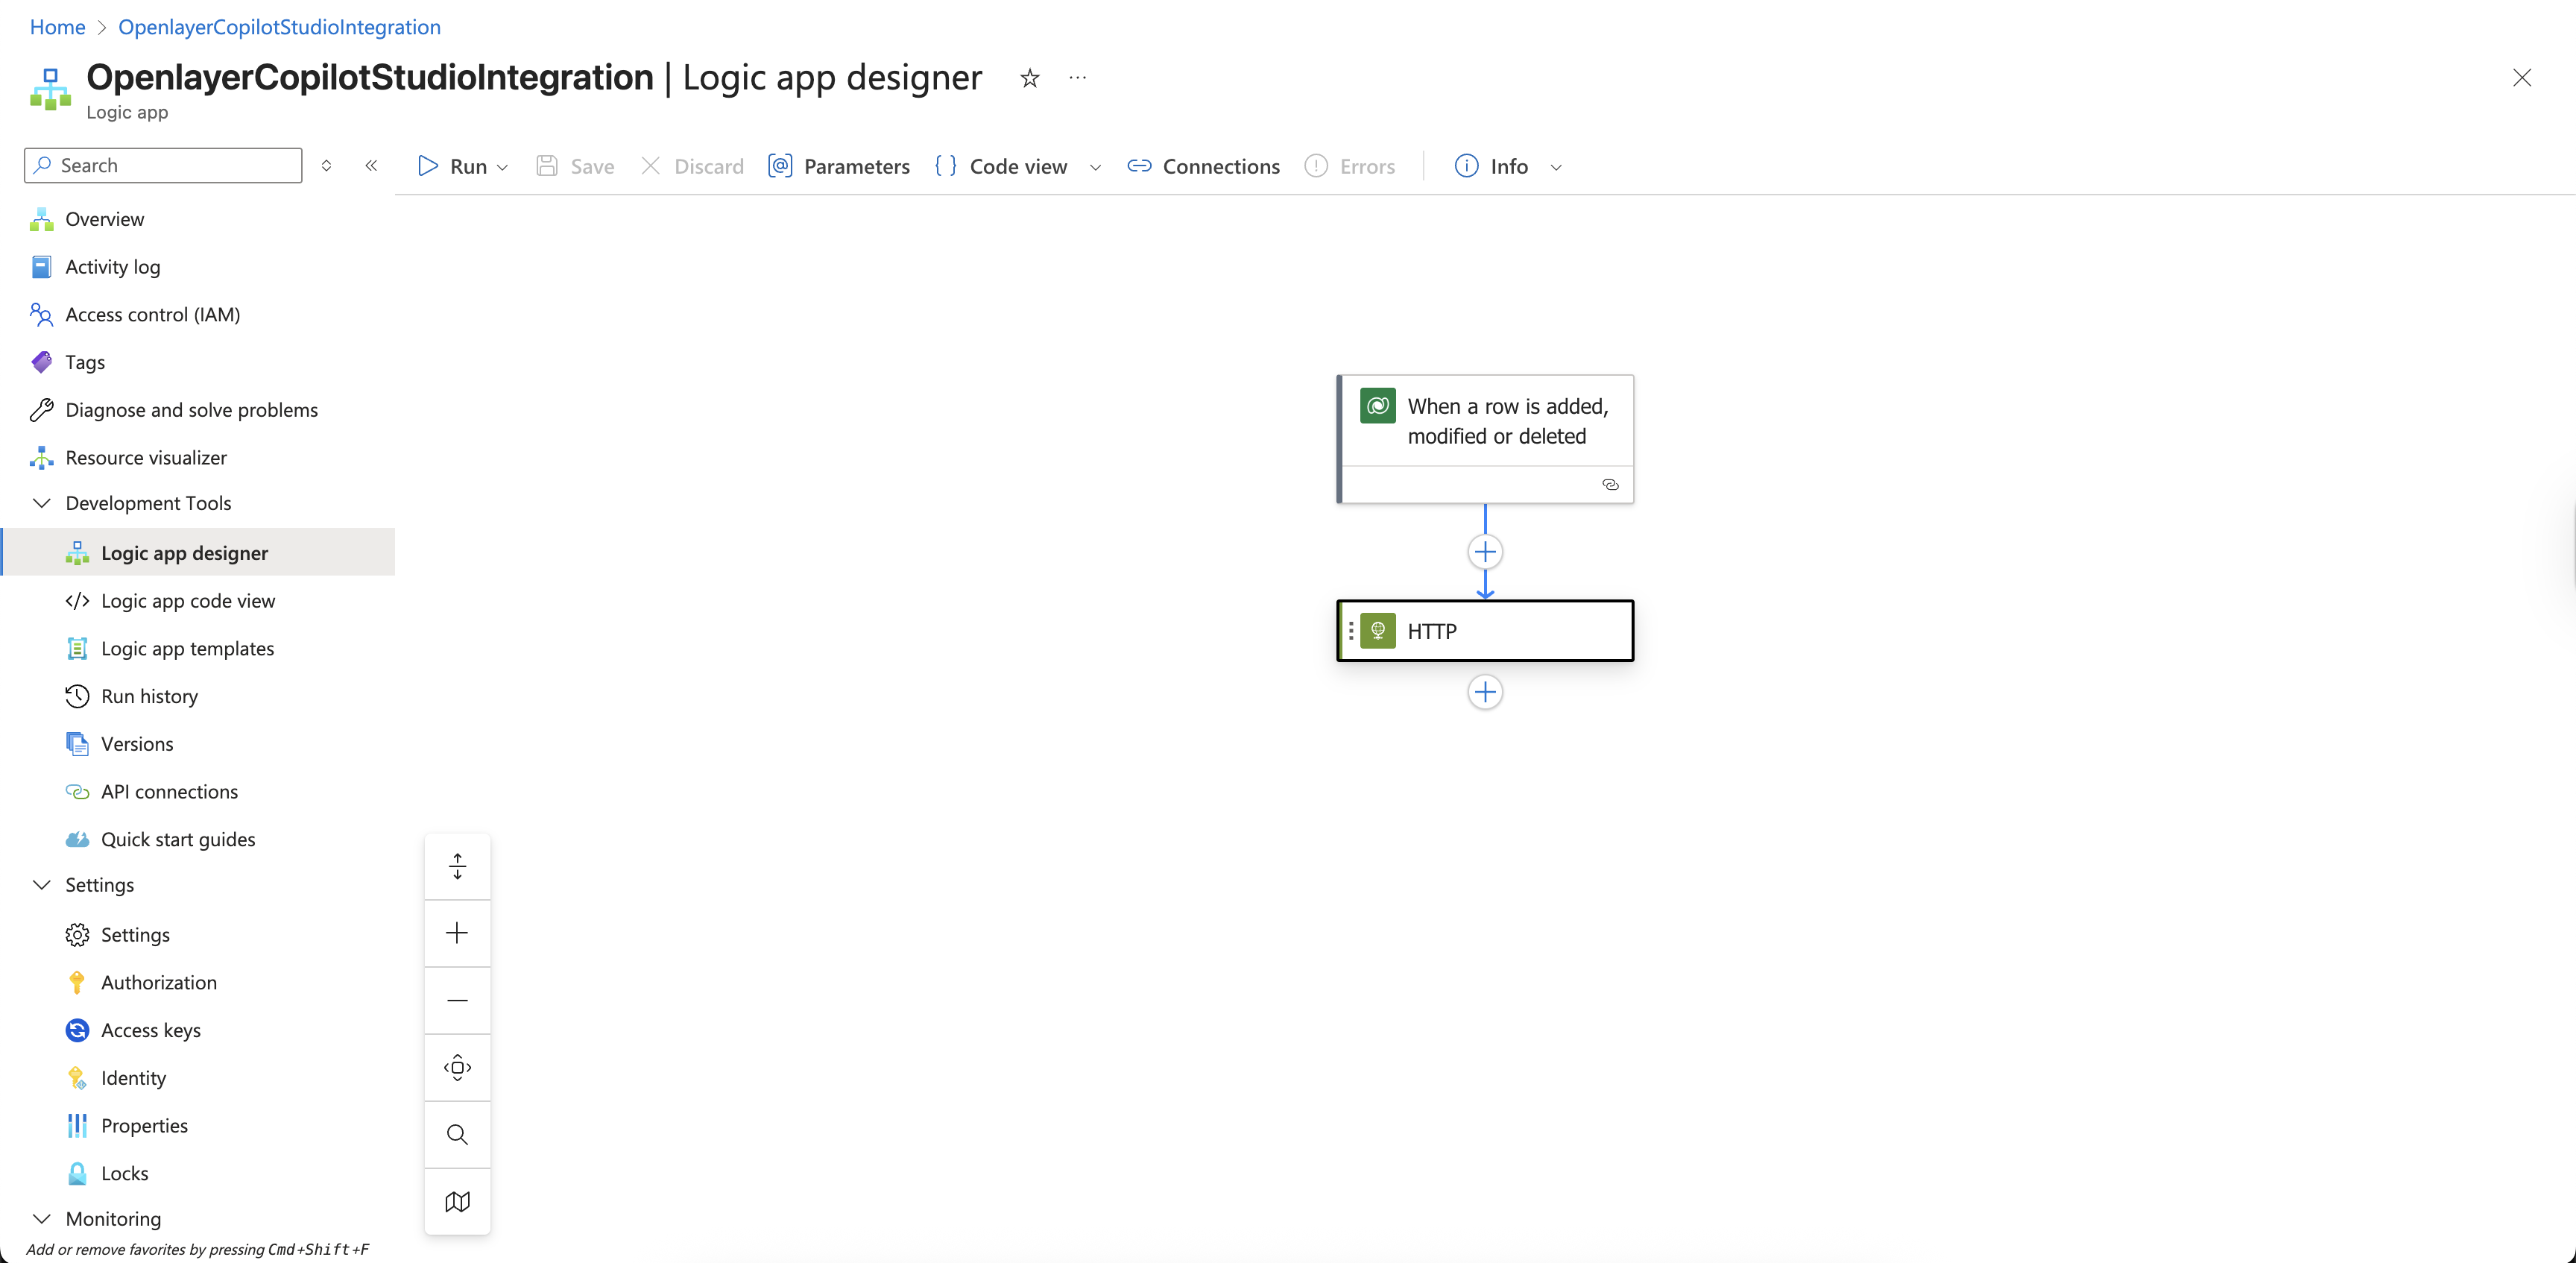
Add an **HTTP** action after the trigger with the following configuration:
* **Method**: `POST`
* **URI**: `https://api.openlayer.com/copilot-studio/sessions`
* **Headers**:
* `Authorization`: `Bearer `
* `Content-Type`: `application/json`
* **Body**: `@{triggerBody()}`
### Step 2: Configure the HTTP action
Add an **HTTP** action after the trigger with the following configuration:
* **Method**: `POST`
* **URI**: `https://api.openlayer.com/copilot-studio/sessions`
* **Headers**:
* `Authorization`: `Bearer `
* `Content-Type`: `application/json`
* **Body**: `@{triggerBody()}`
 The Logic App passes the entire Dataverse row directly to Openlayer — no
transformation needed.
**On-premise deployments**: If you're using a self-hosted Openlayer instance,
replace `api.openlayer.com` with your deployment's base URL (e.g.,
`openlayer.yourcompany.com`).
### Step 3: (Optional) Add error handling
Add a **Scope** action around the HTTP call and configure **Run after** settings to handle failures:
* Send alerts to a Teams channel or email on failure
* Use a dead-letter queue for failed transcripts
### Automatic project creation
When using the Logic App or batch API, Openlayer automatically creates a new
project for each unique Copilot Studio agent the first time it receives
conversation data. Each unique combination of `BotName` + `AADTenantId` maps
to a dedicated Openlayer project and data source.
You can also pre-create projects by navigating to your workspace and creating
a new project configured for Microsoft Copilot Studio. See
[Finding your bot name and tenant ID](#finding-your-bot-name-and-tenant-id)
below.
***
## Option 3: Batch integration via Python (Deprecated)
This integration path will be **deprecated on June 1, 2026**. Please use the
[native integration](#option-1-native-integration-recommended) instead. The
native integration includes built-in backfill support that replaces batch
scripts.
For teams that prefer a code-first approach or need scheduled batch syncs.
### Prerequisites
```bash theme={null}
pip install PowerPlatform-Dataverse-Client azure-identity requests
```
### Example script
```python theme={null}
"""Sync Copilot Studio transcripts to Openlayer."""
import os
import requests
from datetime import datetime, timedelta
from PowerPlatform.Dataverse.client import DataverseClient
from azure.identity import InteractiveBrowserCredential
# Configuration
DATAVERSE_URL = os.environ["DATAVERSE_URL"] # e.g., https://yourorg.crm.dynamics.com
OPENLAYER_API_KEY = os.environ["OPENLAYER_API_KEY"]
# Initialize Dataverse client with authentication
credential = InteractiveBrowserCredential()
client = DataverseClient(DATAVERSE_URL, credential)
# Query recent transcripts from Dataverse using SQL
# Get transcripts modified in the last 24 hours
yesterday = (datetime.utcnow() - timedelta(days=1)).strftime("%Y-%m-%d %H:%M:%S")
query = f"""
SELECT TOP 100
conversationtranscriptid,
name,
content,
metadata,
conversationstarttime,
createdon,
modifiedon,
schemaversion,
schematype,
statecode,
statuscode
FROM conversationtranscript
WHERE modifiedon > '{yesterday}'
AND statecode = 0
ORDER BY modifiedon DESC
"""
transcripts = client.query_sql(query)
# Send each transcript to Openlayer
for transcript in transcripts:
resp = requests.post(
"https://api.openlayer.com/copilot-studio/sessions",
headers={
"Authorization": f"Bearer {OPENLAYER_API_KEY}",
"Content-Type": "application/json",
},
json=transcript,
)
if resp.ok:
result = resp.json()
print(f"Processed transcript {transcript['name']}: "
f"{result['requestsProcessed']} requests")
else:
print(f"Error processing {transcript['name']}: "
f"{resp.status_code} - {resp.text}")
```
### Use cases for batch integration
* Nightly or hourly jobs that backfill conversations
* Historical analysis with new evaluation pipelines
* Environments where Logic Apps are restricted
**On-premise deployments**: If you're using a self-hosted Openlayer instance,
replace `api.openlayer.com` in the script with your deployment's base URL.
***
## Finding your bot name and tenant ID
If you are using the Logic App or batch API integration (Options 2 and 3) and
want to pre-create projects, you will need the bot's schema name and tenant ID.
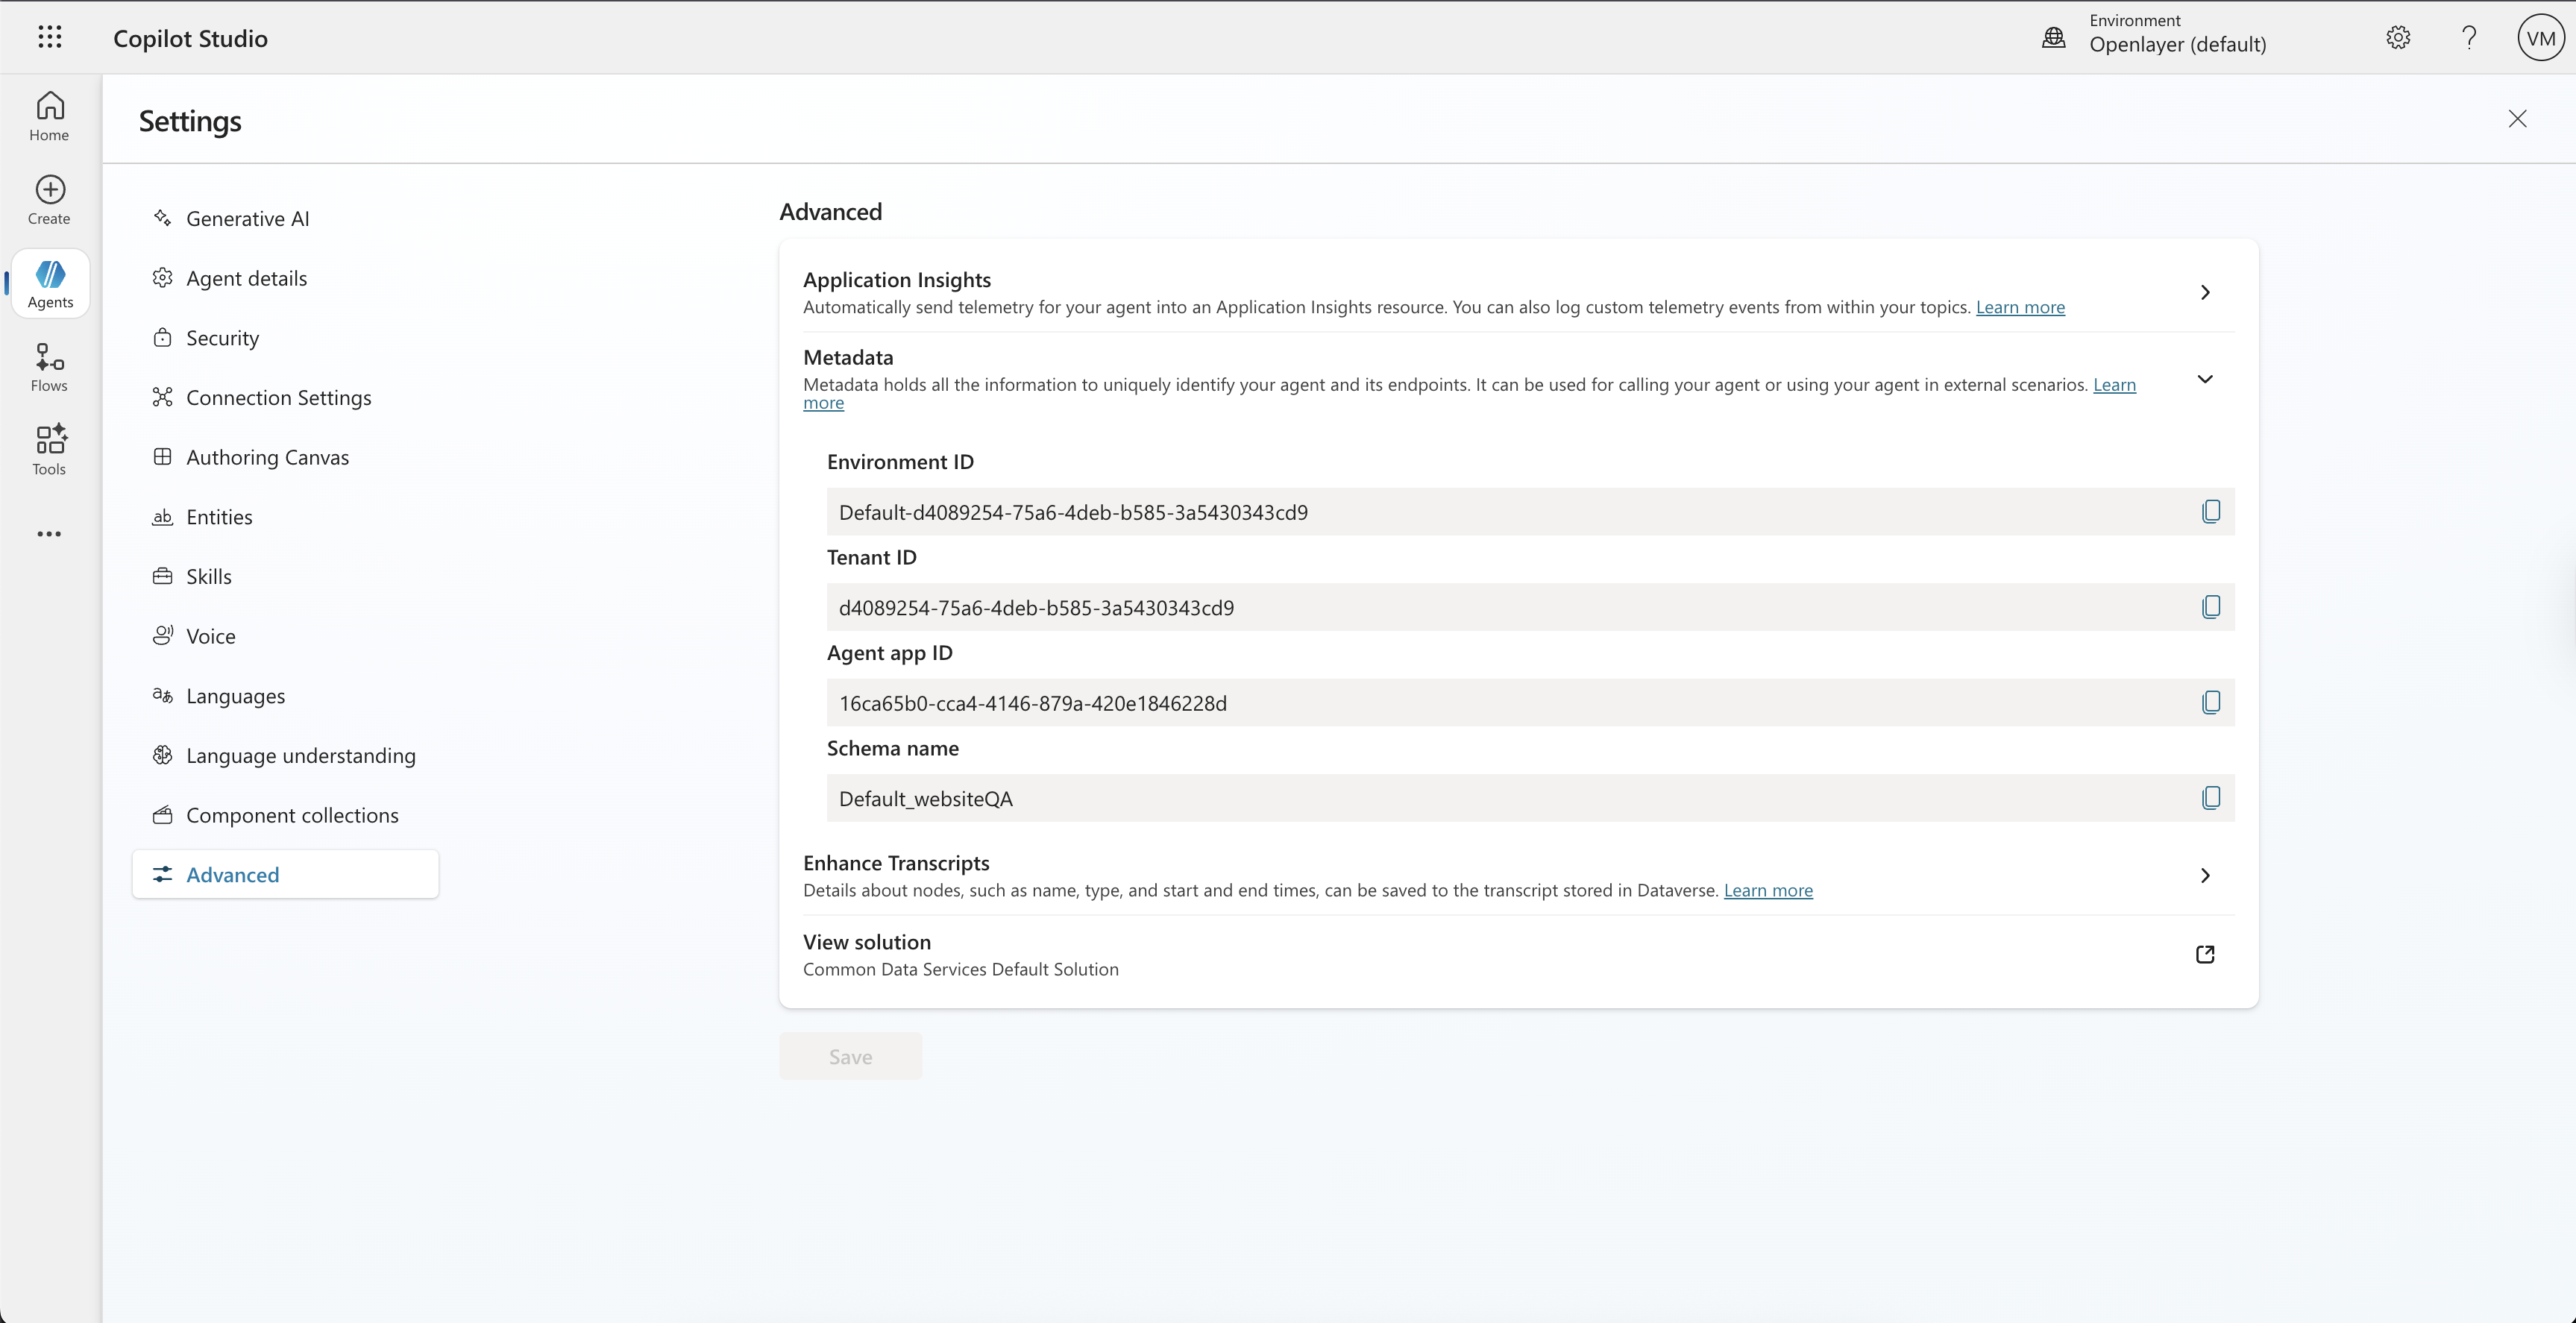
1. In Copilot Studio, navigate to **Settings** → **Advanced**
2. Expand the **Metadata** section
3. Copy the **Schema name** (this is your bot name)
4. Copy the **Tenant ID**
The Logic App passes the entire Dataverse row directly to Openlayer — no
transformation needed.
**On-premise deployments**: If you're using a self-hosted Openlayer instance,
replace `api.openlayer.com` with your deployment's base URL (e.g.,
`openlayer.yourcompany.com`).
### Step 3: (Optional) Add error handling
Add a **Scope** action around the HTTP call and configure **Run after** settings to handle failures:
* Send alerts to a Teams channel or email on failure
* Use a dead-letter queue for failed transcripts
### Automatic project creation
When using the Logic App or batch API, Openlayer automatically creates a new
project for each unique Copilot Studio agent the first time it receives
conversation data. Each unique combination of `BotName` + `AADTenantId` maps
to a dedicated Openlayer project and data source.
You can also pre-create projects by navigating to your workspace and creating
a new project configured for Microsoft Copilot Studio. See
[Finding your bot name and tenant ID](#finding-your-bot-name-and-tenant-id)
below.
***
## Option 3: Batch integration via Python (Deprecated)
This integration path will be **deprecated on June 1, 2026**. Please use the
[native integration](#option-1-native-integration-recommended) instead. The
native integration includes built-in backfill support that replaces batch
scripts.
For teams that prefer a code-first approach or need scheduled batch syncs.
### Prerequisites
```bash theme={null}
pip install PowerPlatform-Dataverse-Client azure-identity requests
```
### Example script
```python theme={null}
"""Sync Copilot Studio transcripts to Openlayer."""
import os
import requests
from datetime import datetime, timedelta
from PowerPlatform.Dataverse.client import DataverseClient
from azure.identity import InteractiveBrowserCredential
# Configuration
DATAVERSE_URL = os.environ["DATAVERSE_URL"] # e.g., https://yourorg.crm.dynamics.com
OPENLAYER_API_KEY = os.environ["OPENLAYER_API_KEY"]
# Initialize Dataverse client with authentication
credential = InteractiveBrowserCredential()
client = DataverseClient(DATAVERSE_URL, credential)
# Query recent transcripts from Dataverse using SQL
# Get transcripts modified in the last 24 hours
yesterday = (datetime.utcnow() - timedelta(days=1)).strftime("%Y-%m-%d %H:%M:%S")
query = f"""
SELECT TOP 100
conversationtranscriptid,
name,
content,
metadata,
conversationstarttime,
createdon,
modifiedon,
schemaversion,
schematype,
statecode,
statuscode
FROM conversationtranscript
WHERE modifiedon > '{yesterday}'
AND statecode = 0
ORDER BY modifiedon DESC
"""
transcripts = client.query_sql(query)
# Send each transcript to Openlayer
for transcript in transcripts:
resp = requests.post(
"https://api.openlayer.com/copilot-studio/sessions",
headers={
"Authorization": f"Bearer {OPENLAYER_API_KEY}",
"Content-Type": "application/json",
},
json=transcript,
)
if resp.ok:
result = resp.json()
print(f"Processed transcript {transcript['name']}: "
f"{result['requestsProcessed']} requests")
else:
print(f"Error processing {transcript['name']}: "
f"{resp.status_code} - {resp.text}")
```
### Use cases for batch integration
* Nightly or hourly jobs that backfill conversations
* Historical analysis with new evaluation pipelines
* Environments where Logic Apps are restricted
**On-premise deployments**: If you're using a self-hosted Openlayer instance,
replace `api.openlayer.com` in the script with your deployment's base URL.
***
## Finding your bot name and tenant ID
If you are using the Logic App or batch API integration (Options 2 and 3) and
want to pre-create projects, you will need the bot's schema name and tenant ID.
1. In Copilot Studio, navigate to **Settings** → **Advanced**
2. Expand the **Metadata** section
3. Copy the **Schema name** (this is your bot name)
4. Copy the **Tenant ID**
 ***
## Monitoring in Openlayer
Once integrated, Copilot Studio conversations will automatically appear in your Openlayer project.
### View conversation traces
Navigate to your project's **Records** tab to see detailed conversation traces:
***
## Monitoring in Openlayer
Once integrated, Copilot Studio conversations will automatically appear in your Openlayer project.
### View conversation traces
Navigate to your project's **Records** tab to see detailed conversation traces:
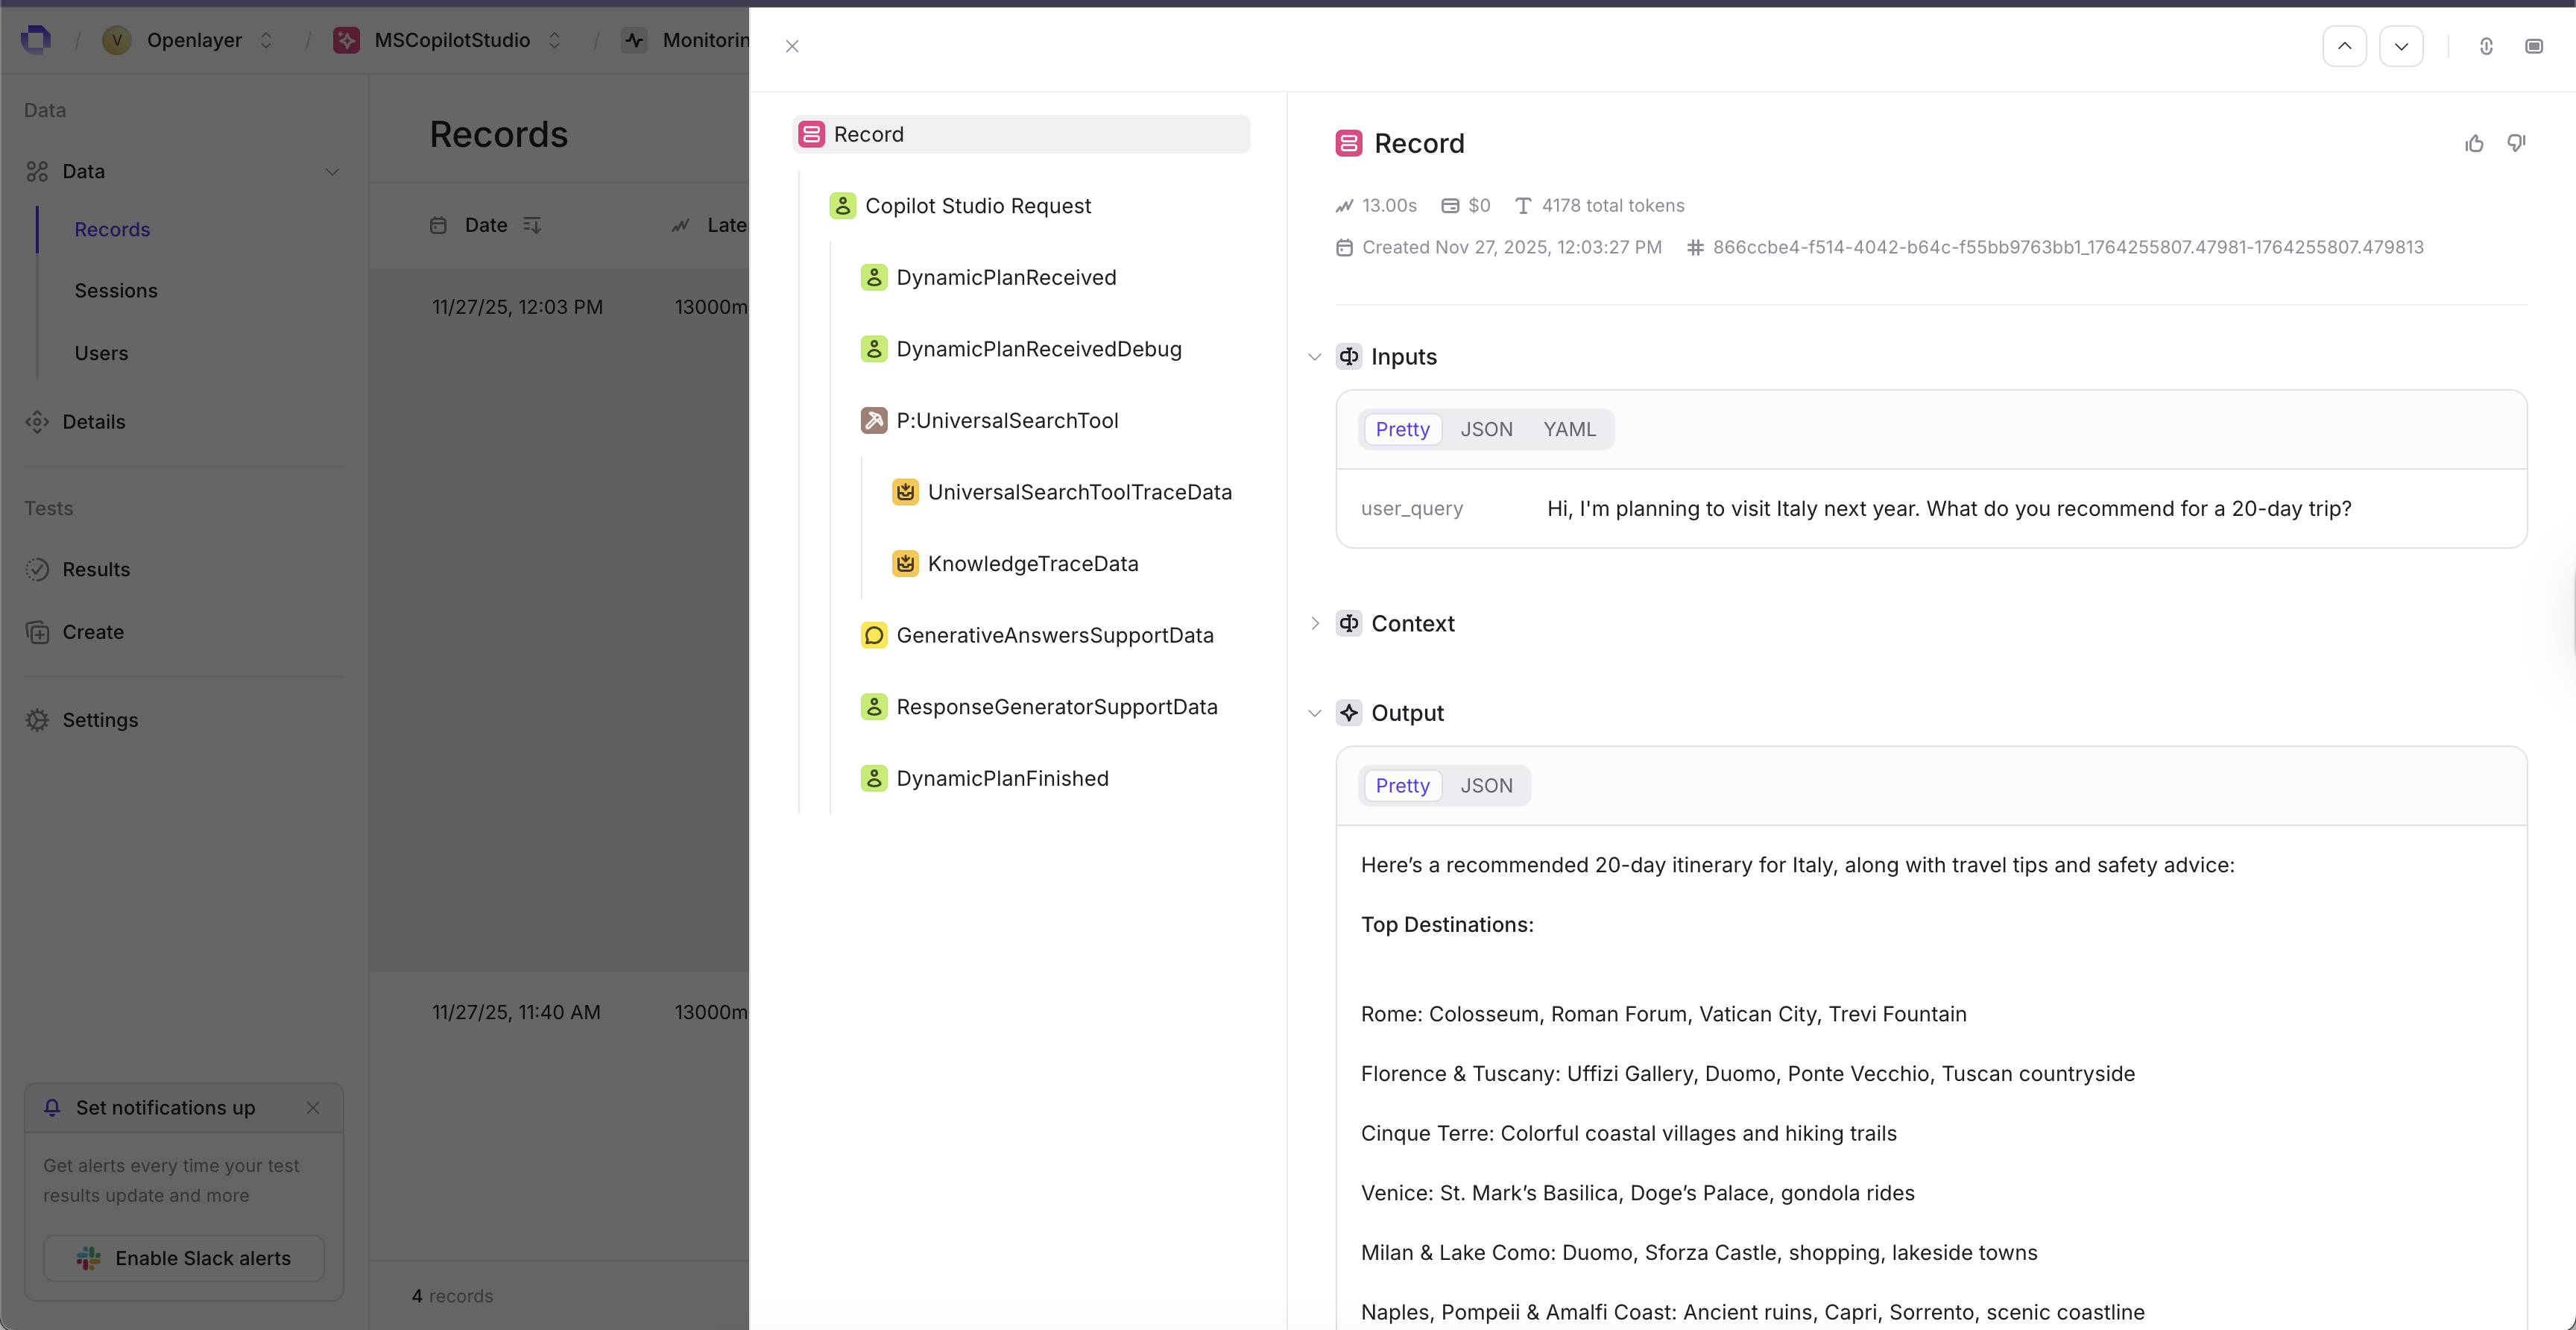 Each trace captures:
* User queries and bot responses
* Latency and token usage per turn
* Nested execution steps (LLM calls, tool executions, plan steps)
* RAG citations and knowledge source references
### Analyze RAG quality
For bots using knowledge sources:
* View retrieved citations per response
* Evaluate relevance of retrieved documents
* Track knowledge source utilization
### Monitor session outcomes
Track conversation-level metrics:
* Resolution rates (`session_outcome`)
* CSAT scores
* Turn counts and engagement
### Run evaluations
Create evaluation pipelines to:
* Score response quality
* Detect hallucinations
* Measure citation accuracy
* Track safety and compliance
Each trace captures:
* User queries and bot responses
* Latency and token usage per turn
* Nested execution steps (LLM calls, tool executions, plan steps)
* RAG citations and knowledge source references
### Analyze RAG quality
For bots using knowledge sources:
* View retrieved citations per response
* Evaluate relevance of retrieved documents
* Track knowledge source utilization
### Monitor session outcomes
Track conversation-level metrics:
* Resolution rates (`session_outcome`)
* CSAT scores
* Turn counts and engagement
### Run evaluations
Create evaluation pipelines to:
* Score response quality
* Detect hallucinations
* Measure citation accuracy
* Track safety and compliance