> ## Documentation Index
> Fetch the complete documentation index at: https://docs.openlayer.com/llms.txt
> Use this file to discover all available pages before exploring further.
# Salesforce Agentforce
> Connect your Salesforce Agentforce agents to Openlayer for automated monitoring and evaluation
 Openlayer integrates with [Salesforce Agentforce](https://www.salesforce.com/agentforce/) to help you
monitor, evaluate, and improve your Agentforce agents. The integration connects to Salesforce via OAuth,
automatically discovers your agents, and periodically syncs conversation data from the
[Data 360](https://www.salesforce.com/data/) so you can trace every session in Openlayer.
## How it works
Once connected, Openlayer:
1. **Discovers your agents** — automatically fetches all active Agentforce agents from your Salesforce org
2. **Creates projects and data sources** — each agent gets its own Openlayer project and data source, with no manual setup required
3. **Syncs conversations** — periodically pulls agent interactions from Data 360 (via the Data 360 API), converting them into structured traces with sessions, requests, and individual steps
4. **Enriches traces** — extracts LLM model names, providers, token counts, and user IDs from GenAI Gateway data
All access is **read-only** — Openlayer never writes data to your Salesforce
org.
***
## Prerequisites
Before connecting, ensure the following are configured in your Salesforce org:
### 1. Agentforce enabled
You must have at least one active Agentforce agent.
* In Salesforce Setup, go to **Agentforce Agents**
* Turn on Agentforce and create or enable an agent
### 2. Data 360 provisioned with Agent Analytics
Openlayer reads conversation data from Data 360, which requires Agent Analytics to be enabled.
* In Salesforce Setup, go to the **Einstein Feedback and Monitoring** page
* Turn on **Agent Analytics**
Agent Analytics requires Data 360 to already be provisioned in your org. If
Data 360 is not enabled, contact your Salesforce administrator.
### 3. Create a Salesforce Connected App
Openlayer authenticates via OAuth using a Connected App you create in your Salesforce org. This gives you
full control over the scopes and access granted.
1. In Salesforce Setup, search for **App Manager** and click **New Connected App**
2. Fill in the basic information:
* **Connected App Name**: `Openlayer`
* **API Name**: `Openlayer`
* **Contact Email**: your admin email
3. Under **API (Enable OAuth Settings)**, check **Enable OAuth Settings**
4. Set the **Callback URL** to:
```
https://app.openlayer.com/integrations/agentforce/callback
```
**On-premise deployments**: replace `app.openlayer.com` with your
deployment's base URL.
5. Add the following **OAuth Scopes**:
| Scope | Purpose |
| --------------- | ------------------------------------------------- |
| `api` | Read the list of Agentforce agents |
| `cdp_api` | Read agent conversation transcripts from Data 360 |
| `refresh_token` | Keep the connection active for background syncs |
6. Click **Save**, then **Continue**
7. After creation, go to **Manage Consumer Details** to retrieve the **Consumer Key** (Client ID) and **Consumer Secret** (Client Secret)
Store the Consumer Secret securely — you'll need it when connecting in
Openlayer. Salesforce only shows the secret once unless you regenerate it.
### 4. User permissions
System Administrators have all required permissions by default. Non-admin users connecting the integration need:
* **API Enabled** permission
* **Data 360 User** permission set
* Read access to **BotDefinition**
* **Approve Uninstalled Connected Apps** or **Use Any API Client** permission
***
## Setup guide
### Step 1: Navigate to the integration
In your Openlayer workspace, go to **Settings** → **Integrations** and find the **Salesforce Agentforce** card. Click **Enable**.
Openlayer integrates with [Salesforce Agentforce](https://www.salesforce.com/agentforce/) to help you
monitor, evaluate, and improve your Agentforce agents. The integration connects to Salesforce via OAuth,
automatically discovers your agents, and periodically syncs conversation data from the
[Data 360](https://www.salesforce.com/data/) so you can trace every session in Openlayer.
## How it works
Once connected, Openlayer:
1. **Discovers your agents** — automatically fetches all active Agentforce agents from your Salesforce org
2. **Creates projects and data sources** — each agent gets its own Openlayer project and data source, with no manual setup required
3. **Syncs conversations** — periodically pulls agent interactions from Data 360 (via the Data 360 API), converting them into structured traces with sessions, requests, and individual steps
4. **Enriches traces** — extracts LLM model names, providers, token counts, and user IDs from GenAI Gateway data
All access is **read-only** — Openlayer never writes data to your Salesforce
org.
***
## Prerequisites
Before connecting, ensure the following are configured in your Salesforce org:
### 1. Agentforce enabled
You must have at least one active Agentforce agent.
* In Salesforce Setup, go to **Agentforce Agents**
* Turn on Agentforce and create or enable an agent
### 2. Data 360 provisioned with Agent Analytics
Openlayer reads conversation data from Data 360, which requires Agent Analytics to be enabled.
* In Salesforce Setup, go to the **Einstein Feedback and Monitoring** page
* Turn on **Agent Analytics**
Agent Analytics requires Data 360 to already be provisioned in your org. If
Data 360 is not enabled, contact your Salesforce administrator.
### 3. Create a Salesforce Connected App
Openlayer authenticates via OAuth using a Connected App you create in your Salesforce org. This gives you
full control over the scopes and access granted.
1. In Salesforce Setup, search for **App Manager** and click **New Connected App**
2. Fill in the basic information:
* **Connected App Name**: `Openlayer`
* **API Name**: `Openlayer`
* **Contact Email**: your admin email
3. Under **API (Enable OAuth Settings)**, check **Enable OAuth Settings**
4. Set the **Callback URL** to:
```
https://app.openlayer.com/integrations/agentforce/callback
```
**On-premise deployments**: replace `app.openlayer.com` with your
deployment's base URL.
5. Add the following **OAuth Scopes**:
| Scope | Purpose |
| --------------- | ------------------------------------------------- |
| `api` | Read the list of Agentforce agents |
| `cdp_api` | Read agent conversation transcripts from Data 360 |
| `refresh_token` | Keep the connection active for background syncs |
6. Click **Save**, then **Continue**
7. After creation, go to **Manage Consumer Details** to retrieve the **Consumer Key** (Client ID) and **Consumer Secret** (Client Secret)
Store the Consumer Secret securely — you'll need it when connecting in
Openlayer. Salesforce only shows the secret once unless you regenerate it.
### 4. User permissions
System Administrators have all required permissions by default. Non-admin users connecting the integration need:
* **API Enabled** permission
* **Data 360 User** permission set
* Read access to **BotDefinition**
* **Approve Uninstalled Connected Apps** or **Use Any API Client** permission
***
## Setup guide
### Step 1: Navigate to the integration
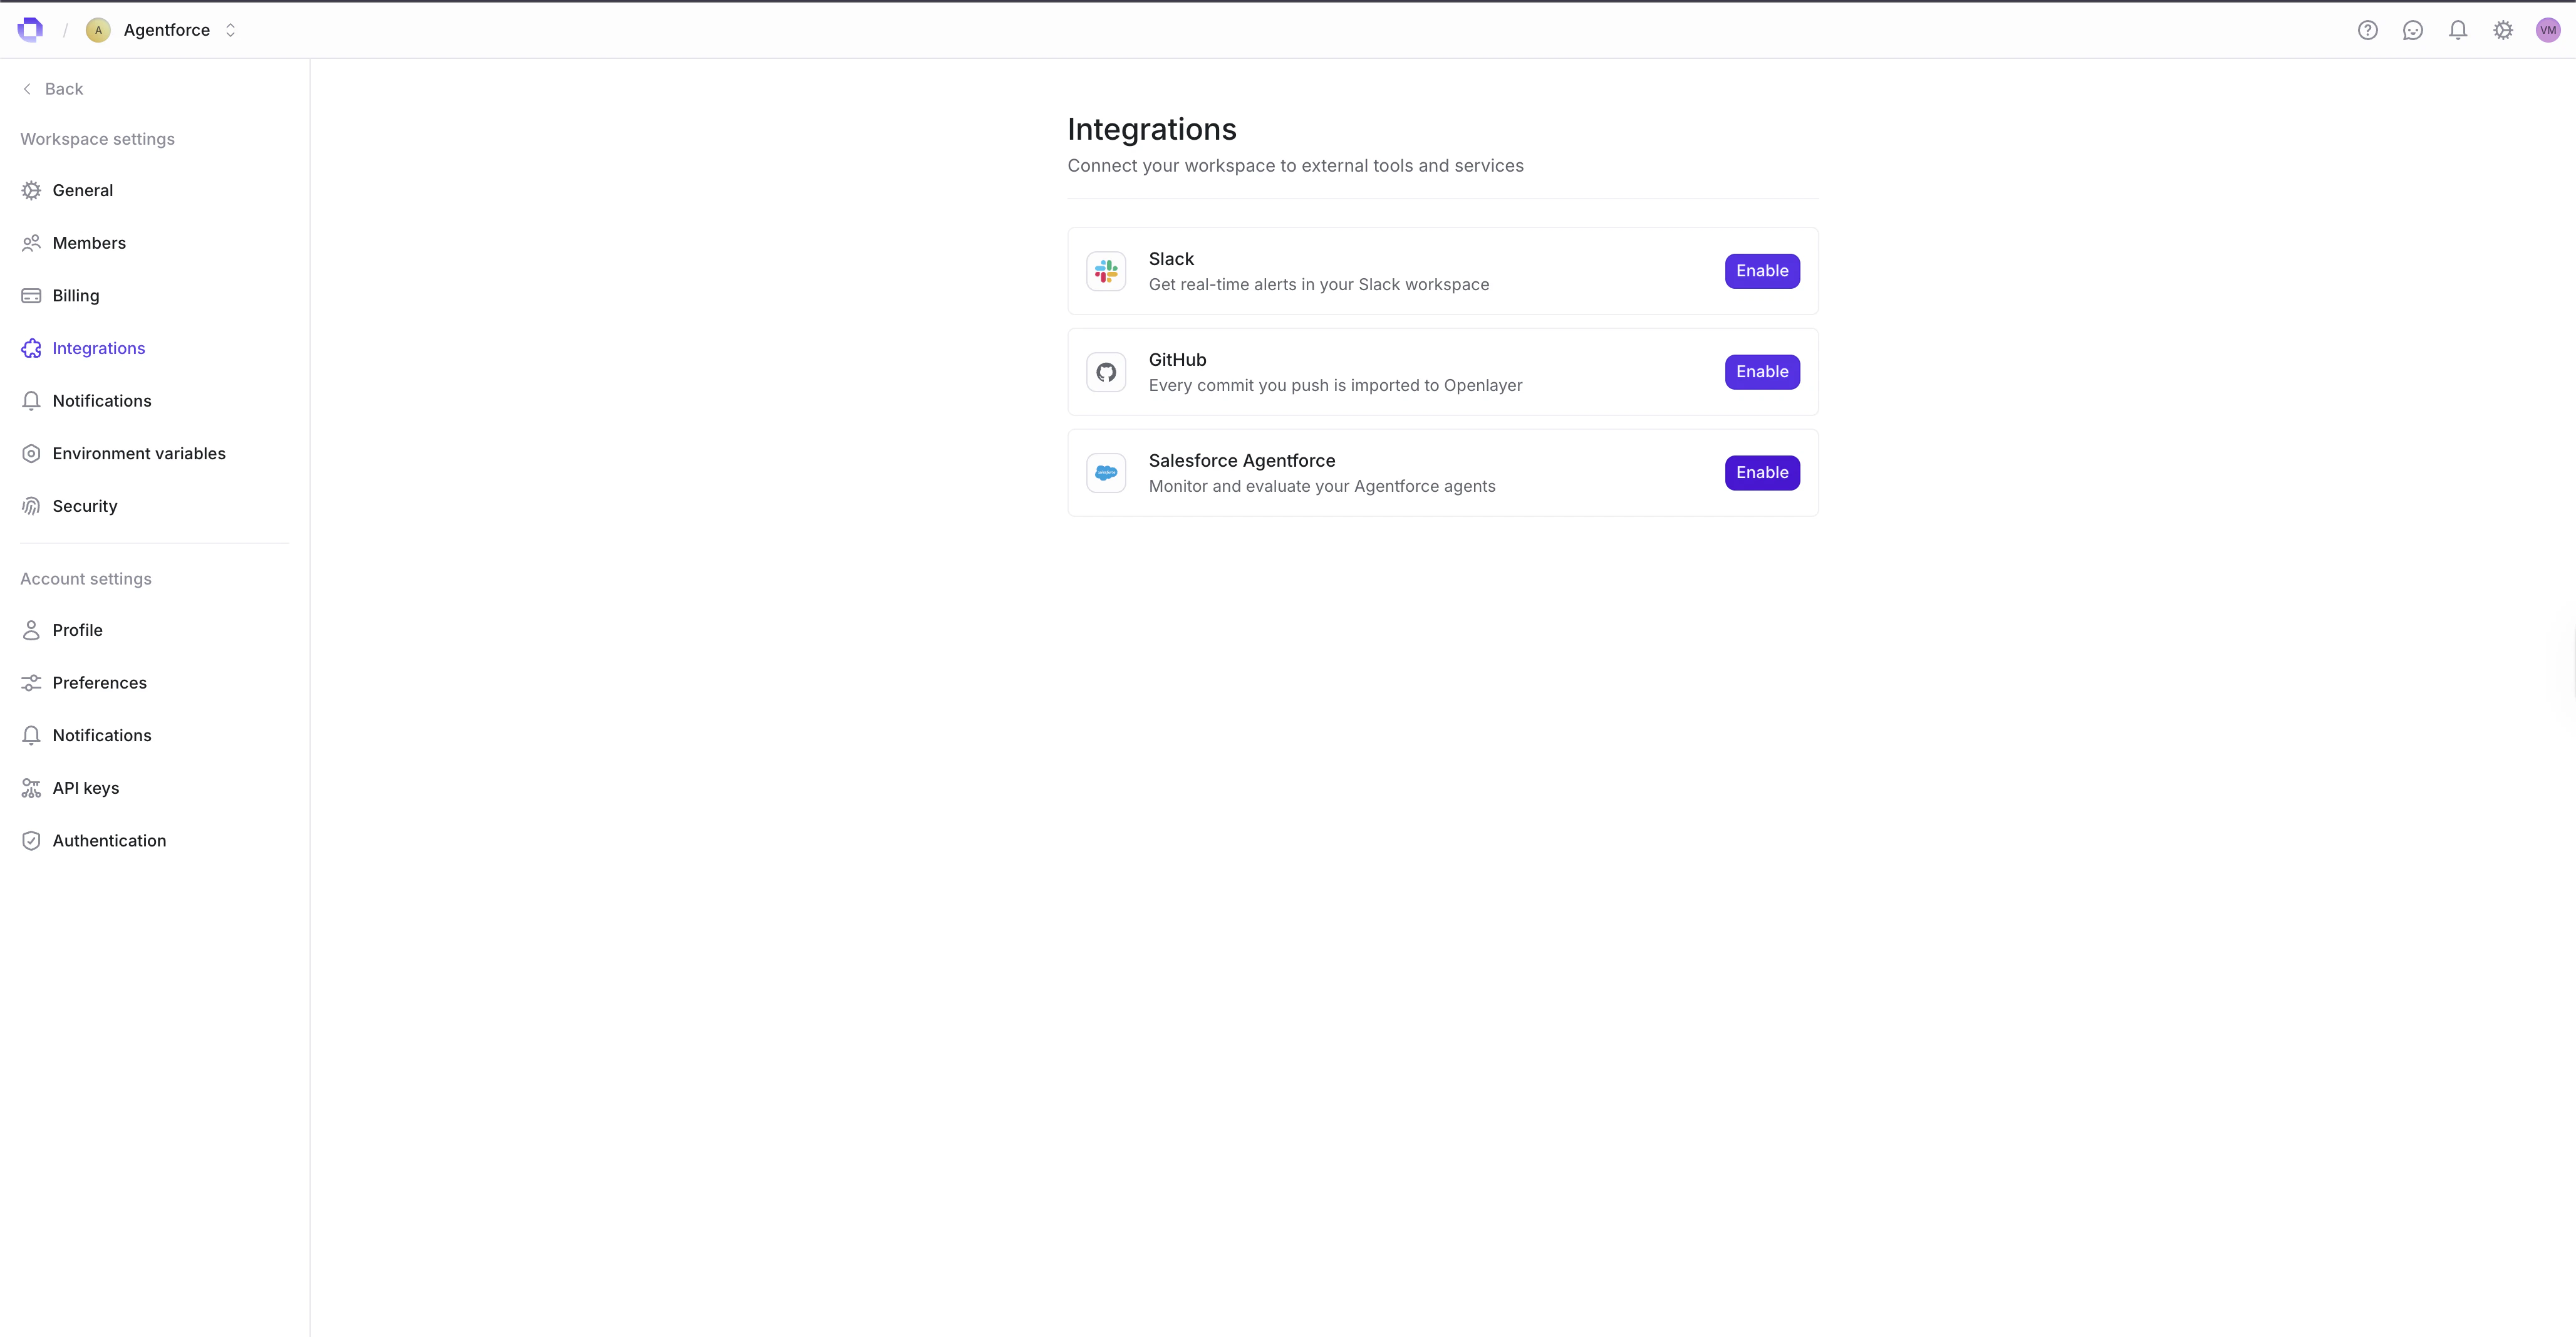
In your Openlayer workspace, go to **Settings** → **Integrations** and find the **Salesforce Agentforce** card. Click **Enable**.
 ### Step 2: Provide your Connected App credentials
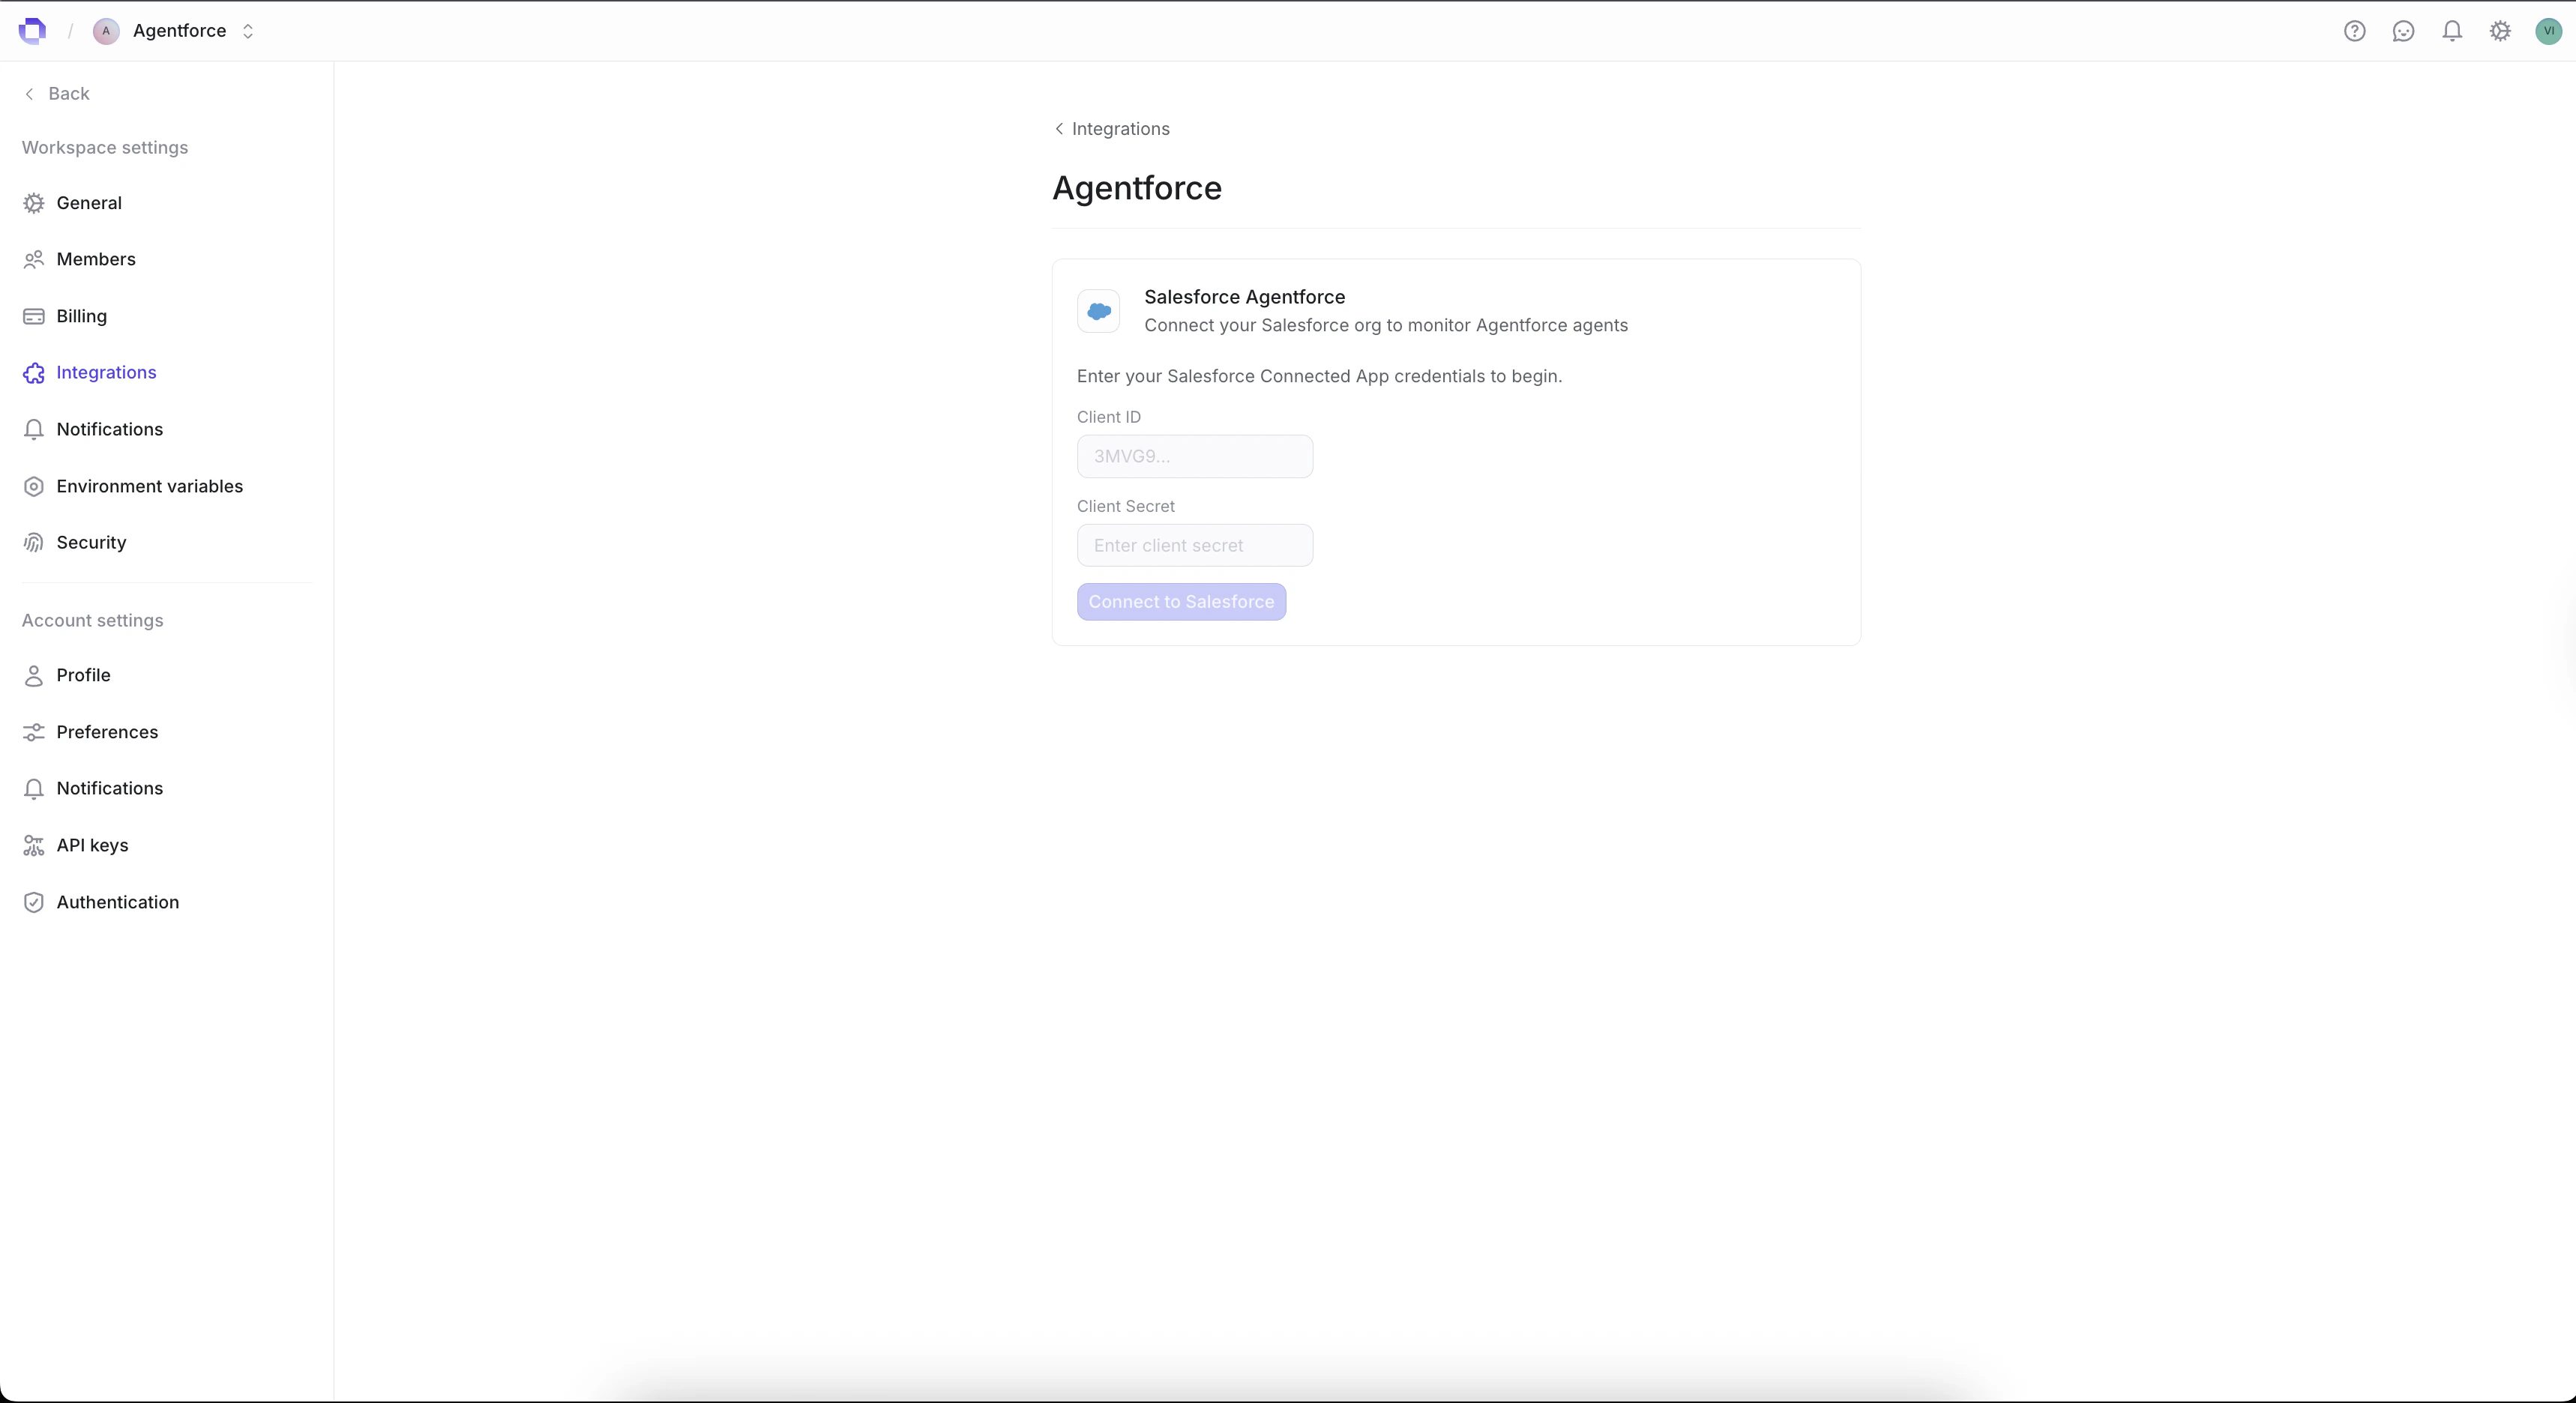
Enter the **Client ID** and **Client Secret** from the Connected App you created in the [prerequisites](#3-create-a-salesforce-connected-app). Then click **Connect to Salesforce**.
* **Client ID**: the Consumer Key from your Connected App
* **Client Secret**: the Consumer Secret from your Connected App
### Step 2: Provide your Connected App credentials
Enter the **Client ID** and **Client Secret** from the Connected App you created in the [prerequisites](#3-create-a-salesforce-connected-app). Then click **Connect to Salesforce**.
* **Client ID**: the Consumer Key from your Connected App
* **Client Secret**: the Consumer Secret from your Connected App
 ### Step 3: Authorize with Salesforce
After clicking **Connect to Salesforce**, you will be redirected to Salesforce to log in and authorize Openlayer. Once authorized, you'll be redirected back to Openlayer and the connection status will show as **Connected**.
Make sure you log in with a Salesforce user that has the [required
permissions](#4-user-permissions).
### Step 4: Configure sync settings
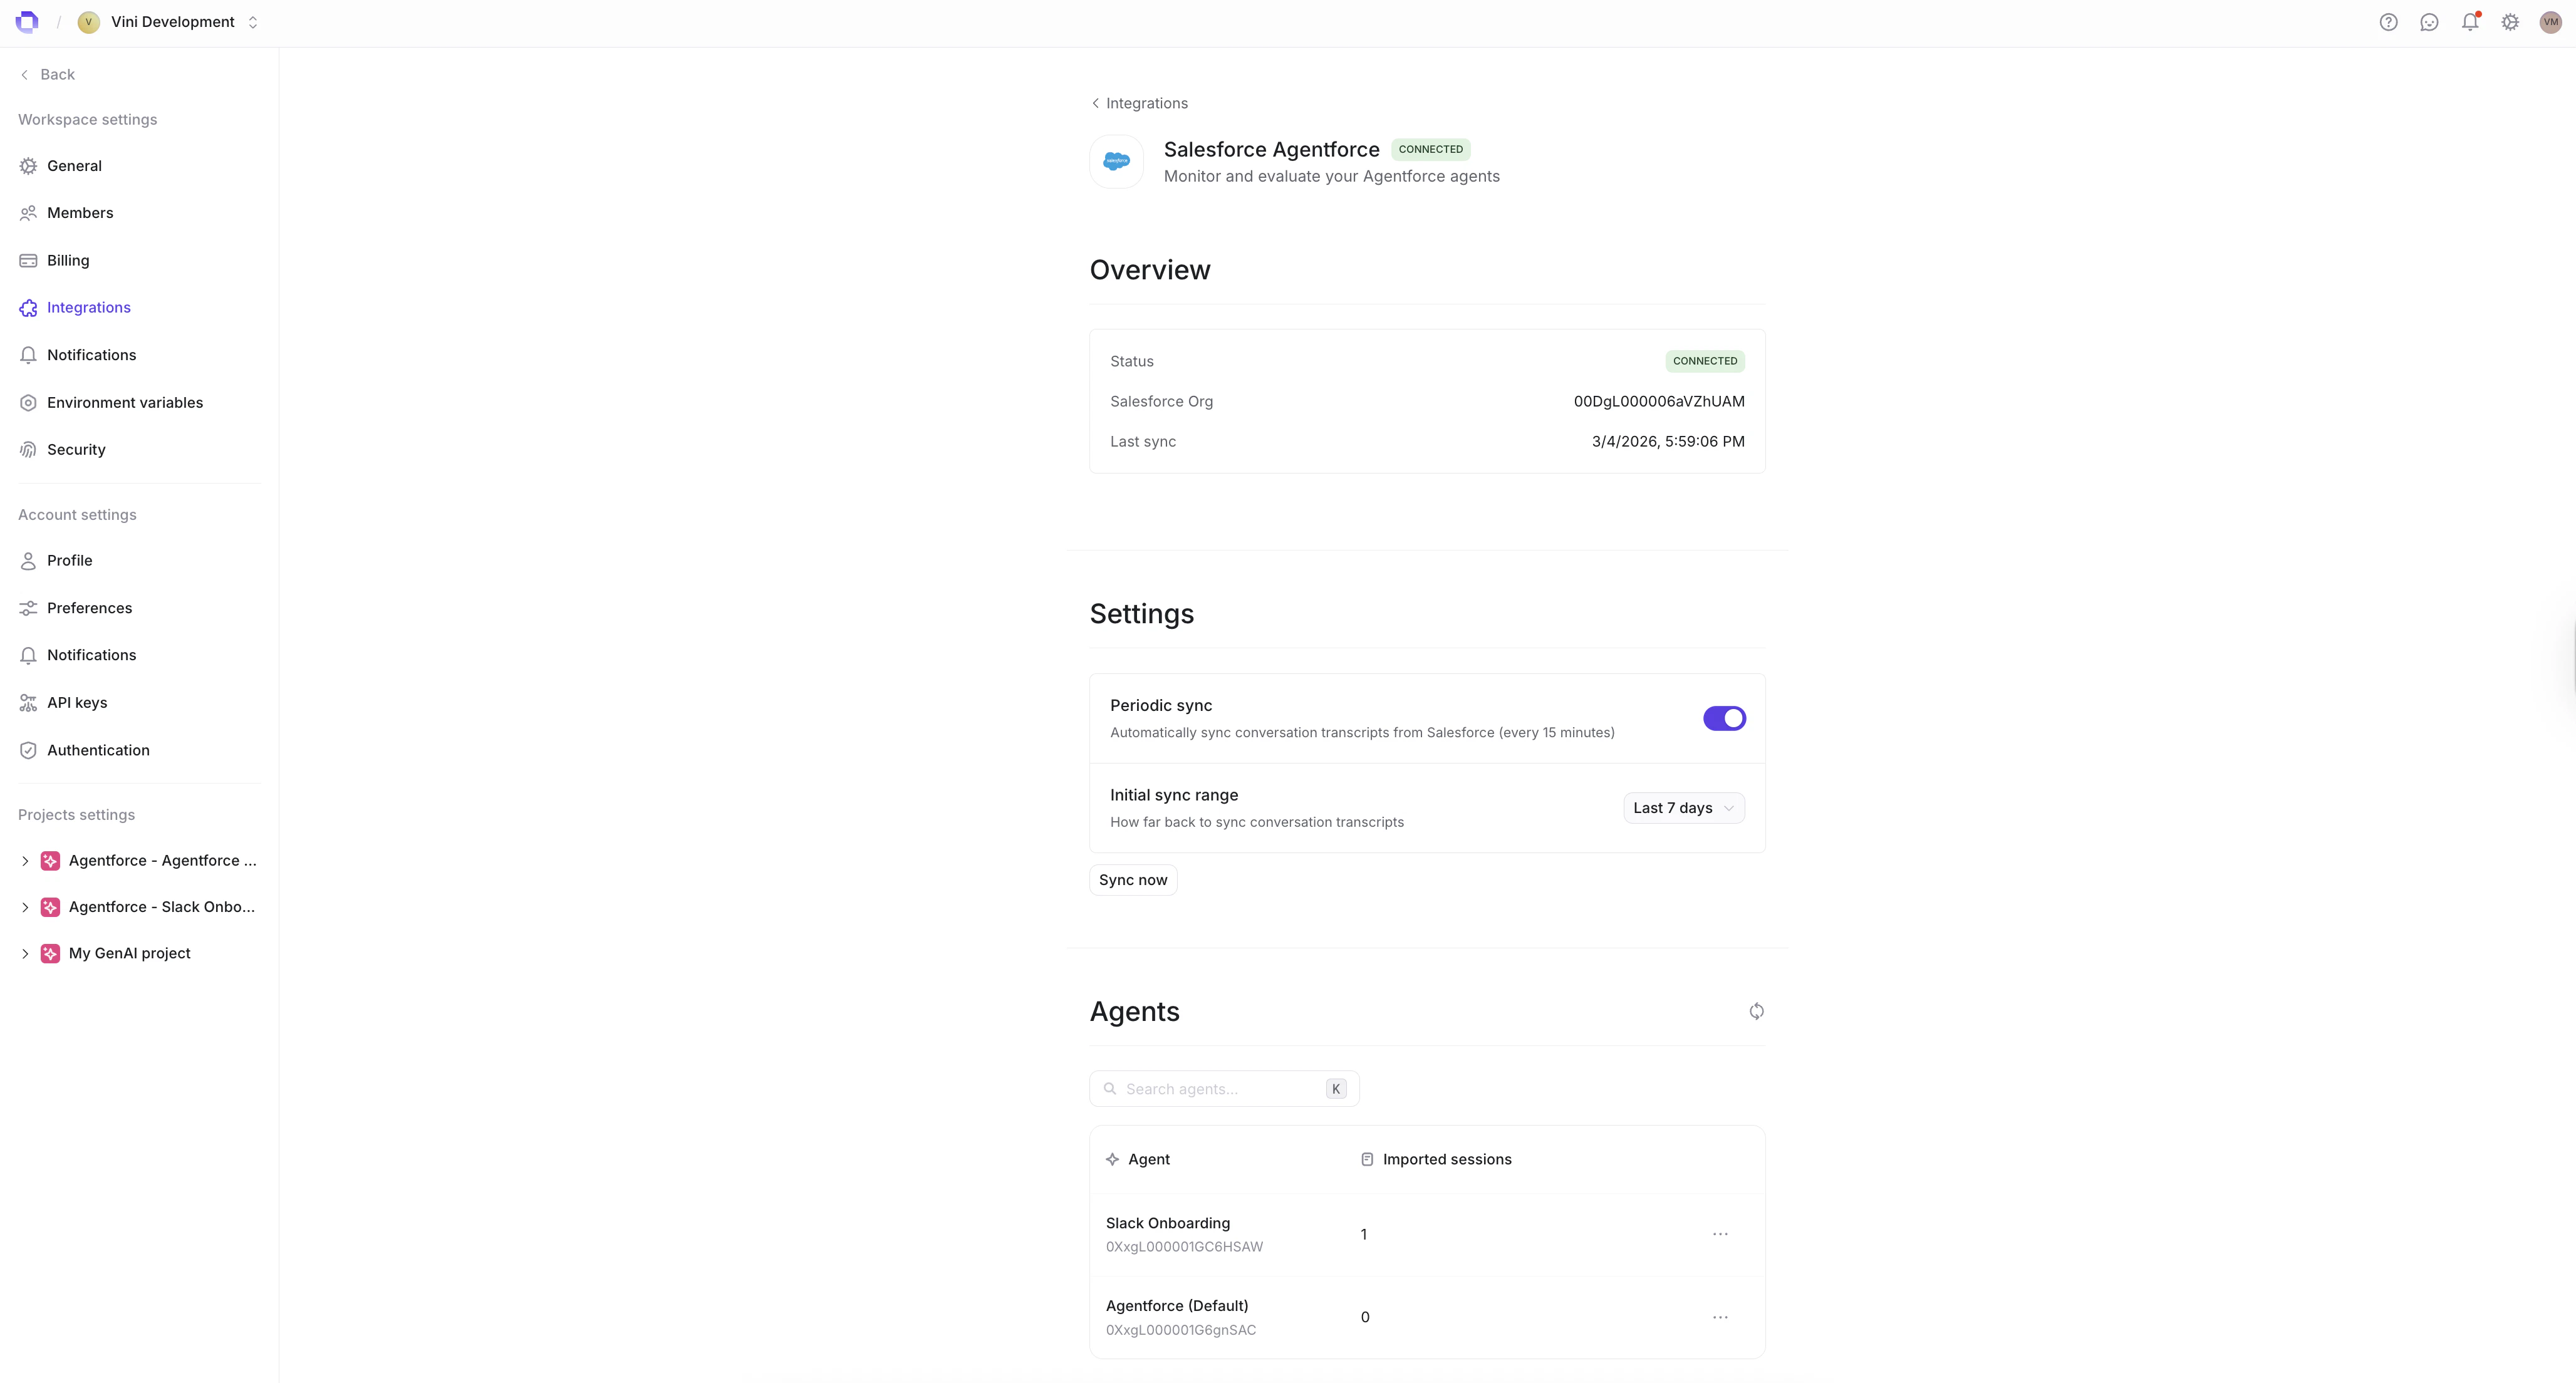
Once connected, configure automatic syncing under the **Sync Settings** section:
* **Periodic sync** — toggle on to enable automatic syncing (every 15 minutes)
* **Initial sync range** — set the start date for the first sync to control how far back Openlayer fetches historical data
You can also click **Sync Now** to trigger an immediate sync at any time.
### Step 3: Authorize with Salesforce
After clicking **Connect to Salesforce**, you will be redirected to Salesforce to log in and authorize Openlayer. Once authorized, you'll be redirected back to Openlayer and the connection status will show as **Connected**.
Make sure you log in with a Salesforce user that has the [required
permissions](#4-user-permissions).
### Step 4: Configure sync settings
Once connected, configure automatic syncing under the **Sync Settings** section:
* **Periodic sync** — toggle on to enable automatic syncing (every 15 minutes)
* **Initial sync range** — set the start date for the first sync to control how far back Openlayer fetches historical data
You can also click **Sync Now** to trigger an immediate sync at any time.
 Initial conversations may take up to one sync cycle to appear, as they must
first be written to Data 360 by Salesforce before Openlayer can retrieve them.
### Step 5: Enable agents
Under the **Agents** section, Openlayer lists all discovered Agentforce agents. For each agent you want to monitor, toggle it on. You can also click **Refresh Agents** to re-discover agents from your Salesforce org.
When an agent is enabled, Openlayer automatically creates a project and data source for it — no additional configuration needed. The agents table shows:
* **Agent** — agent name and Salesforce ID
* **Status** — whether the agent is enabled or disabled
* **Sessions** — number of synced sessions
* **Project** — link to the auto-created Openlayer project
***
## Monitoring in Openlayer
Once agents are enabled and the first sync completes, conversations automatically appear in their respective Openlayer projects.
### Conversation traces
Each Agentforce session is converted into a trace that captures user queries, agent responses, LLM model names, latency, and more.
Initial conversations may take up to one sync cycle to appear, as they must
first be written to Data 360 by Salesforce before Openlayer can retrieve them.
### Step 5: Enable agents
Under the **Agents** section, Openlayer lists all discovered Agentforce agents. For each agent you want to monitor, toggle it on. You can also click **Refresh Agents** to re-discover agents from your Salesforce org.
When an agent is enabled, Openlayer automatically creates a project and data source for it — no additional configuration needed. The agents table shows:
* **Agent** — agent name and Salesforce ID
* **Status** — whether the agent is enabled or disabled
* **Sessions** — number of synced sessions
* **Project** — link to the auto-created Openlayer project
***
## Monitoring in Openlayer
Once agents are enabled and the first sync completes, conversations automatically appear in their respective Openlayer projects.
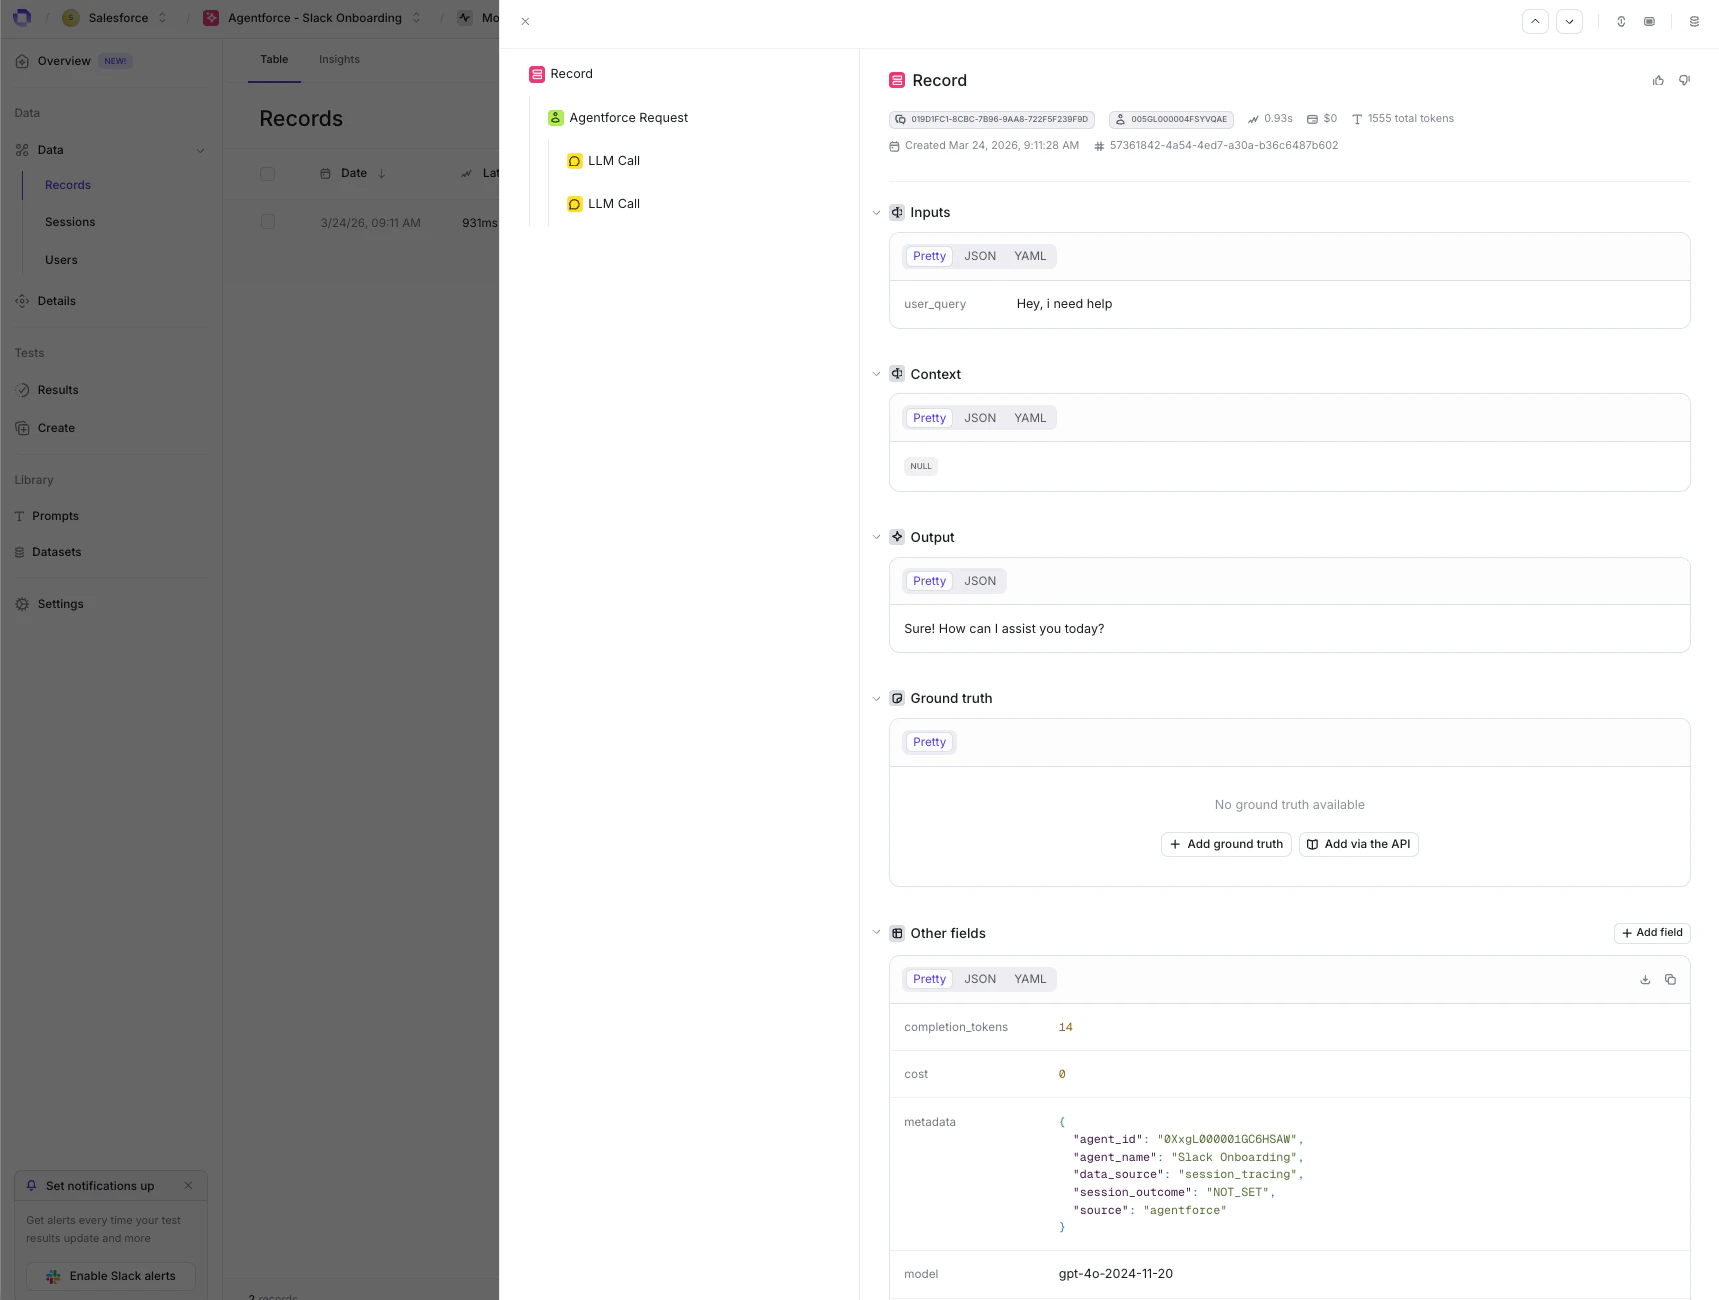
### Conversation traces
Each Agentforce session is converted into a trace that captures user queries, agent responses, LLM model names, latency, and more.
 ### Backfill historical data
To import conversations that occurred before the integration was connected, click the **Backfill** button next to any agent. In the backfill dialog, choose the date range:
* **All available history** — re-fetch all past sessions
* **Custom start date** — fetch sessions from a specific date forward
### Backfill historical data
To import conversations that occurred before the integration was connected, click the **Backfill** button next to any agent. In the backfill dialog, choose the date range:
* **All available history** — re-fetch all past sessions
* **Custom start date** — fetch sessions from a specific date forward
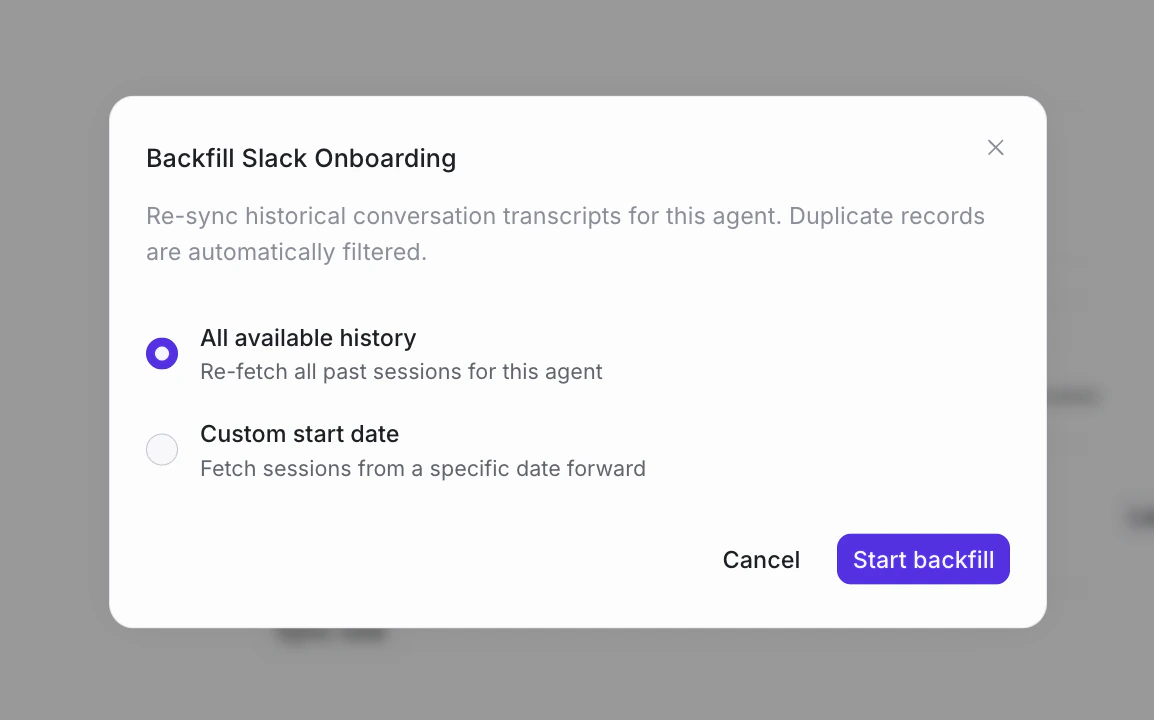 Duplicate sessions are automatically skipped, so it's safe to run a backfill at any time.
### Run evaluations
With conversations flowing into Openlayer, you can:
* [Create tests](/tests/overview) to score response quality
* Detect hallucinations and measure faithfulness
* Track safety and compliance metrics
* Monitor latency and cost trends
* Compare agent performance across versions
***
## Disconnecting
To disconnect the Salesforce Agentforce integration:
1. Go to **Settings** → **Integrations** → **Salesforce Agentforce**
2. Click **Disconnect**
This stops all syncs. Existing data already imported into Openlayer is preserved.
## Troubleshooting
* **OAuth fails** → verify the Callback URL in your Connected App matches `https://app.openlayer.com/integrations/agentforce/callback` exactly.
* **No agents discovered** → confirm you have at least one active Agentforce agent and that Data 360 with Agent Analytics is enabled.
* **Conversations not appearing** → Salesforce writes session data to Data 360 with a delay. Wait for the next sync cycle and ensure Agent Analytics is turned on.
* **Permission errors** → verify the connecting user has the [required permissions](#4-user-permissions), including `API Enabled` and `Data 360 User`.
Duplicate sessions are automatically skipped, so it's safe to run a backfill at any time.
### Run evaluations
With conversations flowing into Openlayer, you can:
* [Create tests](/tests/overview) to score response quality
* Detect hallucinations and measure faithfulness
* Track safety and compliance metrics
* Monitor latency and cost trends
* Compare agent performance across versions
***
## Disconnecting
To disconnect the Salesforce Agentforce integration:
1. Go to **Settings** → **Integrations** → **Salesforce Agentforce**
2. Click **Disconnect**
This stops all syncs. Existing data already imported into Openlayer is preserved.
## Troubleshooting
* **OAuth fails** → verify the Callback URL in your Connected App matches `https://app.openlayer.com/integrations/agentforce/callback` exactly.
* **No agents discovered** → confirm you have at least one active Agentforce agent and that Data 360 with Agent Analytics is enabled.
* **Conversations not appearing** → Salesforce writes session data to Data 360 with a delay. Wait for the next sync cycle and ensure Agent Analytics is turned on.
* **Permission errors** → verify the connecting user has the [required permissions](#4-user-permissions), including `API Enabled` and `Data 360 User`.