> ## Documentation Index
> Fetch the complete documentation index at: https://docs.openlayer.com/llms.txt
> Use this file to discover all available pages before exploring further.
# Snowflake
> Connect your Snowflake tables to Openlayer for data quality monitoring
 Openlayer integrates with [Snowflake](https://www.snowflake.com/) so you
can run data quality tests directly on your Snowflake tables.
The integration uses [**key-pair authentication**](https://docs.snowflake.com/en/user-guide/key-pair-auth), ensuring secure,
auditable access without sharing passwords.
## Prerequisites
To follow this guide, you need:
* A Snowflake account with access to the target tables.
* Permissions to create users and roles in your Snowflake account.
* An [Openlayer project](/workspace-and-projects/creating-and-loading-projects) with monitoring mode enabled.
## Setup Guide
### Step 1: Create a warehouse on your Snowflake account
Navigate to your Snowflake account an create a [new warehouse](https://docs.snowflake.com/en/user-guide/warehouses).
You will use the warehouse name in the next steps.
Openlayer integrates with [Snowflake](https://www.snowflake.com/) so you
can run data quality tests directly on your Snowflake tables.
The integration uses [**key-pair authentication**](https://docs.snowflake.com/en/user-guide/key-pair-auth), ensuring secure,
auditable access without sharing passwords.
## Prerequisites
To follow this guide, you need:
* A Snowflake account with access to the target tables.
* Permissions to create users and roles in your Snowflake account.
* An [Openlayer project](/workspace-and-projects/creating-and-loading-projects) with monitoring mode enabled.
## Setup Guide
### Step 1: Create a warehouse on your Snowflake account
Navigate to your Snowflake account an create a [new warehouse](https://docs.snowflake.com/en/user-guide/warehouses).
You will use the warehouse name in the next steps.
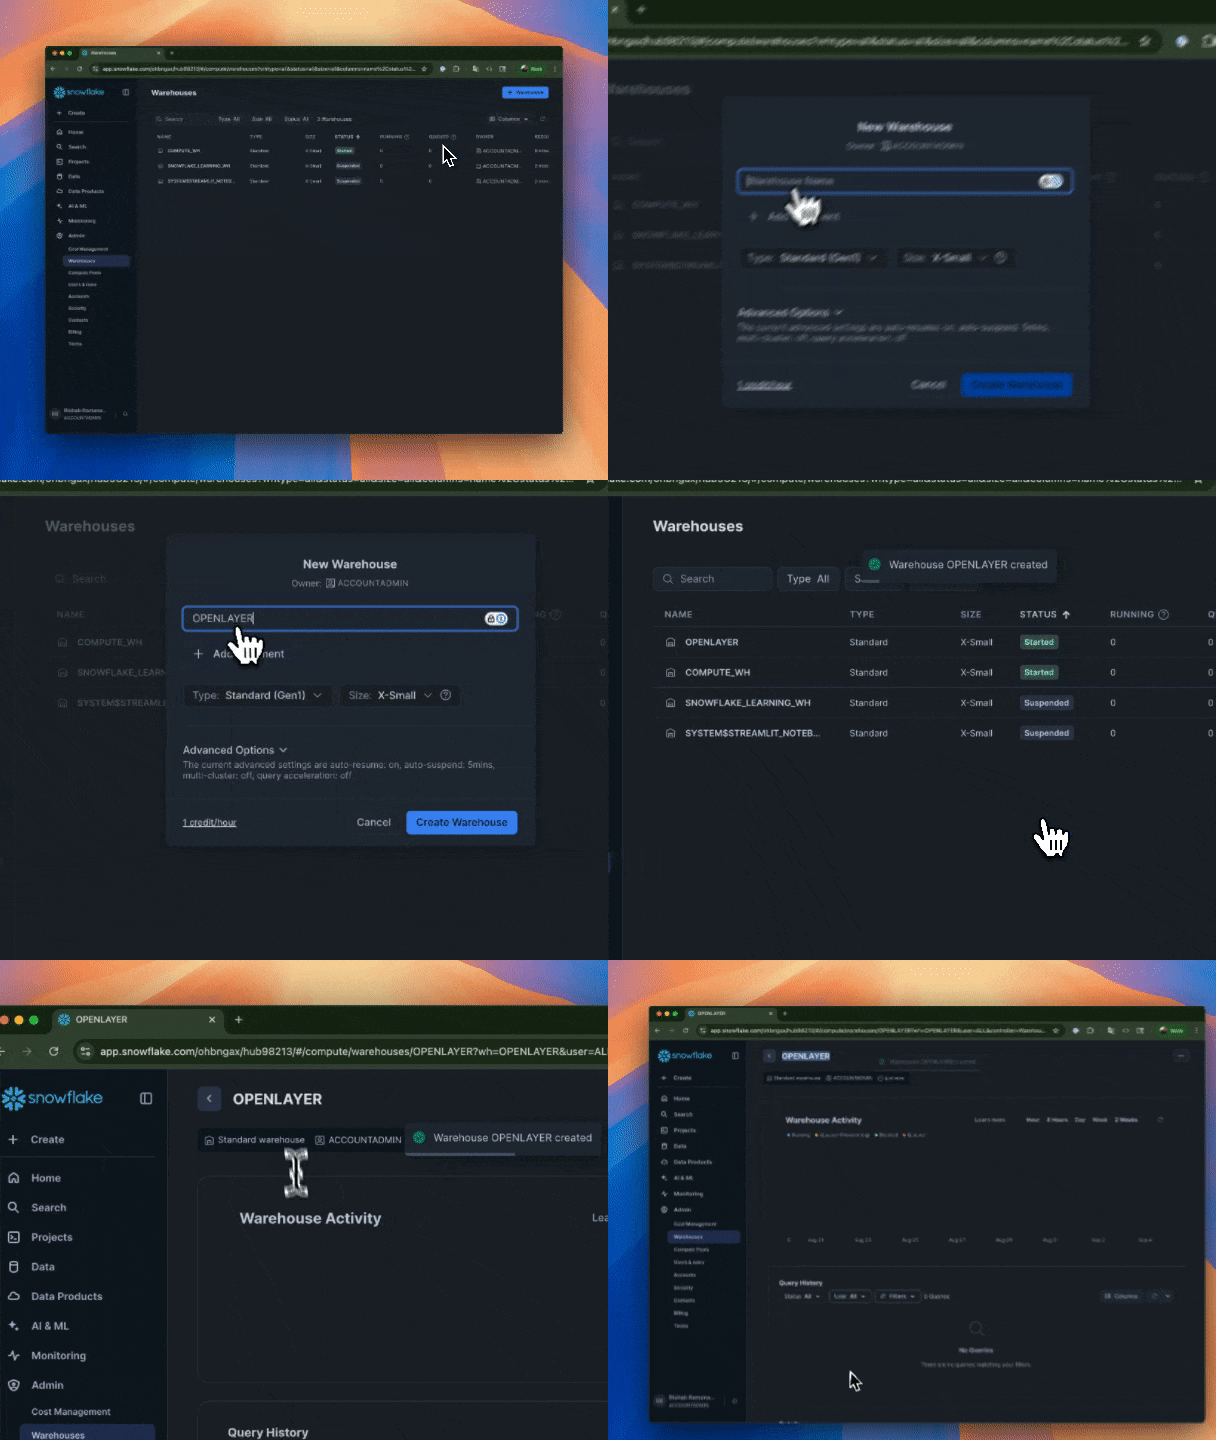 A warehouse is an on-demand, scalable compute cluster used for executing
data processing tasks. Openlayer will connect to a warehouse to
run queries and sync data from the tables you want to monitor.
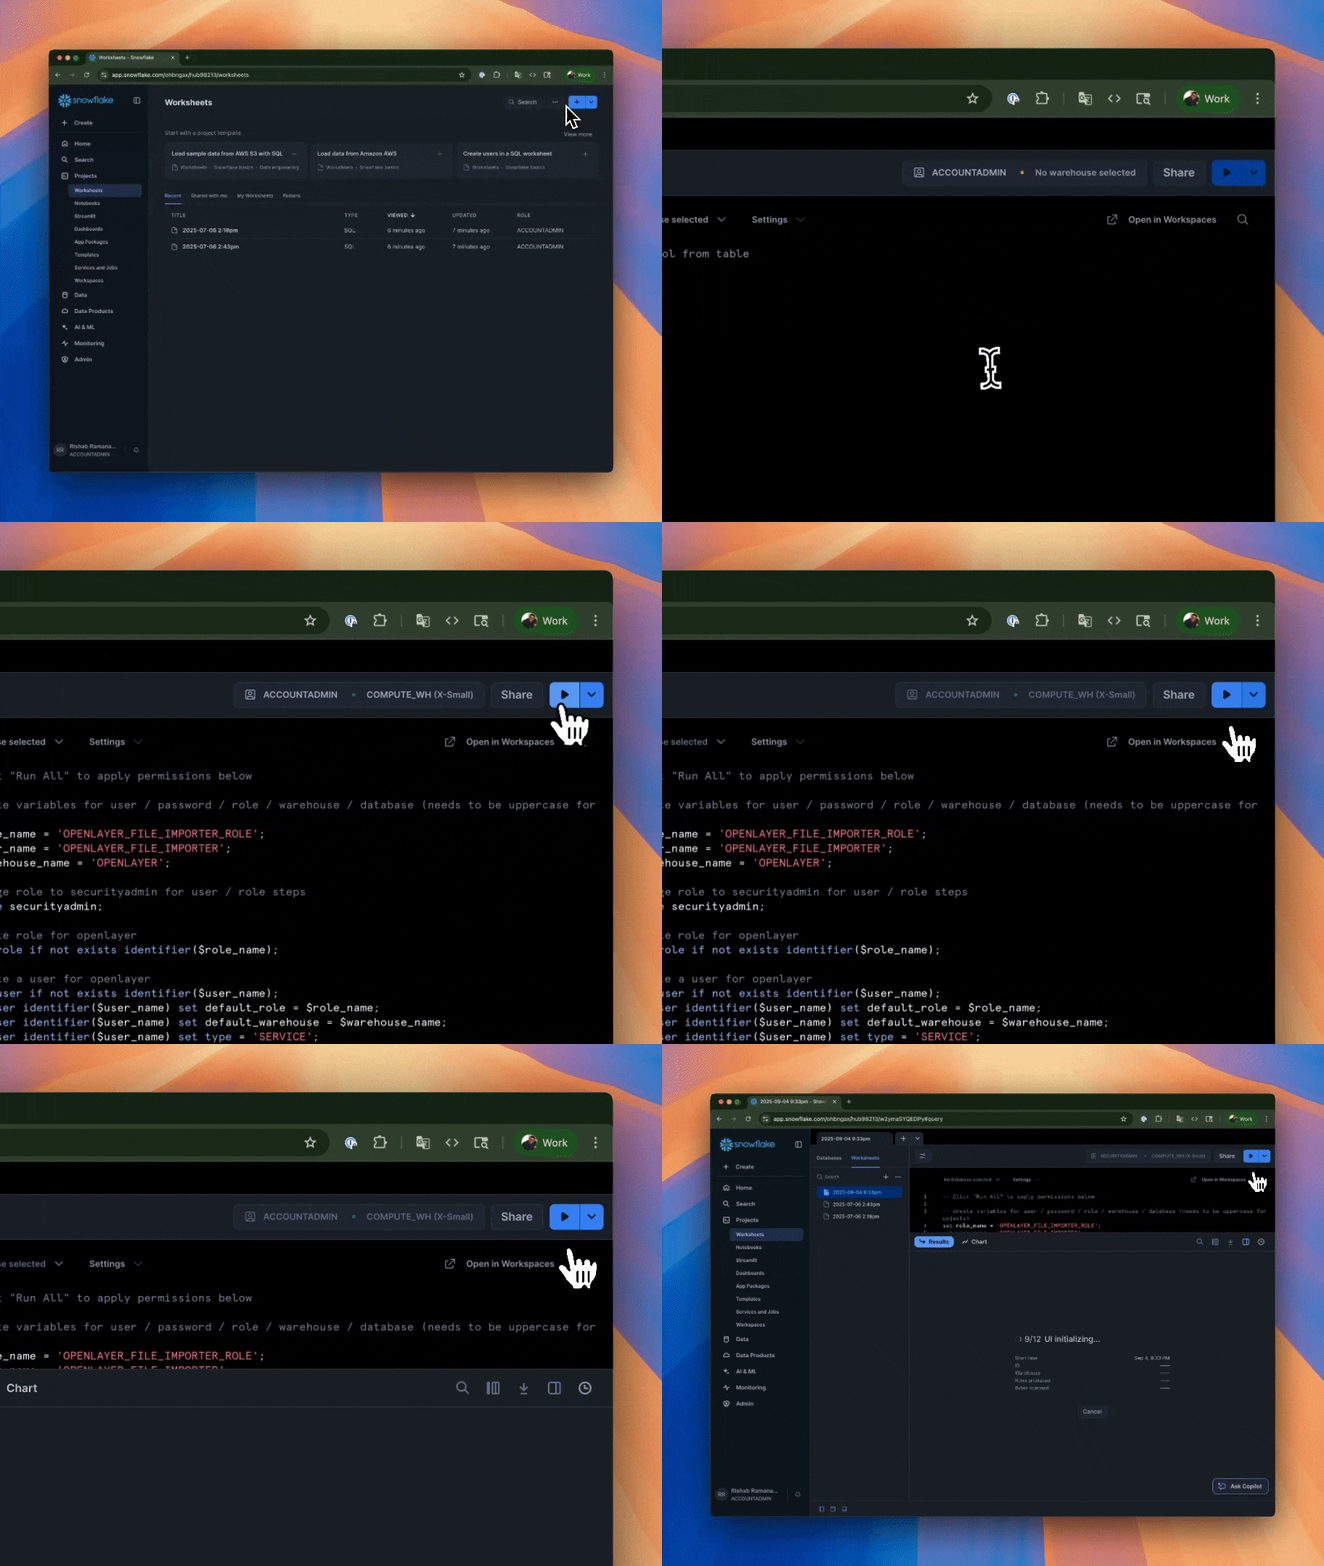
### Step 2: Create a dedicated user and role
Next, in Snowflake, create a service user and role. They will be used to run queries securely.
To do it, run the following commands in a [SQL worksheet](https://docs.snowflake.com/en/user-guide/ui-snowsight-worksheets-gs), replacing placeholders:
Replace `[OPENLAYER_PUBLIC_KEY_HERE]` in the script below with the public RSA
key available in the Openlayer UI when creating a Snowflake connection.
```sql theme={null}
-- Variables
-- Replace the warehouse name with the one you created in Step 1
set role_name = 'OPENLAYER_FILE_IMPORTER_ROLE';
set user_name = 'OPENLAYER_FILE_IMPORTER';
set warehouse_name = '[YOUR_WAREHOUSE_NAME_HERE]';
-- Use Security Admin role for creating users/roles
use role securityadmin;
-- Create role for Openlayer
create role if not exists identifier($role_name);
-- Create a dedicated service user
create user if not exists identifier($user_name);
alter user identifier($user_name) set default_role = $role_name;
alter user identifier($user_name) set default_warehouse = $warehouse_name;
alter user identifier($user_name) set type = 'SERVICE';
-- Assign the role to the user
grant role identifier($role_name) to user identifier($user_name);
-- Associate a public key with the user for key-based authentication
-- Replace the public key with the one available in the Openlayer UI
ALTER USER identifier($user_name) SET RSA_PUBLIC_KEY='[OPENLAYER_PUBLIC_KEY_HERE]';
```
A warehouse is an on-demand, scalable compute cluster used for executing
data processing tasks. Openlayer will connect to a warehouse to
run queries and sync data from the tables you want to monitor.
### Step 2: Create a dedicated user and role
Next, in Snowflake, create a service user and role. They will be used to run queries securely.
To do it, run the following commands in a [SQL worksheet](https://docs.snowflake.com/en/user-guide/ui-snowsight-worksheets-gs), replacing placeholders:
Replace `[OPENLAYER_PUBLIC_KEY_HERE]` in the script below with the public RSA
key available in the Openlayer UI when creating a Snowflake connection.
```sql theme={null}
-- Variables
-- Replace the warehouse name with the one you created in Step 1
set role_name = 'OPENLAYER_FILE_IMPORTER_ROLE';
set user_name = 'OPENLAYER_FILE_IMPORTER';
set warehouse_name = '[YOUR_WAREHOUSE_NAME_HERE]';
-- Use Security Admin role for creating users/roles
use role securityadmin;
-- Create role for Openlayer
create role if not exists identifier($role_name);
-- Create a dedicated service user
create user if not exists identifier($user_name);
alter user identifier($user_name) set default_role = $role_name;
alter user identifier($user_name) set default_warehouse = $warehouse_name;
alter user identifier($user_name) set type = 'SERVICE';
-- Assign the role to the user
grant role identifier($role_name) to user identifier($user_name);
-- Associate a public key with the user for key-based authentication
-- Replace the public key with the one available in the Openlayer UI
ALTER USER identifier($user_name) SET RSA_PUBLIC_KEY='[OPENLAYER_PUBLIC_KEY_HERE]';
```
 ### Step 3: Grant role permissions
The role you created in Step 2 (default to `OPENLAYER_FILE_IMPORTER_ROLE`) must
have `USAGE` rights on the warehouse, database, and schema, and `SELECT` rights on the target tables.
To do it, run the following commands in a [SQL worksheet](https://docs.snowflake.com/en/user-guide/ui-snowsight-worksheets-gs), replacing placeholders:
```sql theme={null}
-- Variables
-- Replace the warehouse, database, schema, and table names with the ones you want to grant permissions to
set role_name = 'OPENLAYER_FILE_IMPORTER_ROLE';
set user_name = 'OPENLAYER_FILE_IMPORTER';
set warehouse_name = '[YOUR_WAREHOUSE_NAME_HERE]';
set database_name = '[YOUR_DATABASE_NAME_HERE]';
set schema_name = '[YOUR_SCHEMA_NAME_HERE]';
set table_name = '[YOUR_TABLE_NAME_HERE]';
-- Grant usage rights to the warehouse
grant USAGE
on warehouse identifier($warehouse_name)
to role identifier($role_name);
-- Grant usage rights to the database
grant USAGE
on database identifier($database_name)
to role identifier($role_name);
-- Grant usage rights to the schema
grant USAGE
on schema identifier($database_name).identifier($schema_name)
to role identifier($role_name);
-- Grant select rights to the table
grant SELECT
on table identifier($database_name).identifier($schema_name).identifier($table_name)
to role identifier($role_name);
```
If you want to connect Openlayer to
[views](https://docs.snowflake.com/en/user-guide/views-introduction), you need
to grant `SELECT` rights on them too. To do it, replace `table_name` with
`view_name` in the script above.
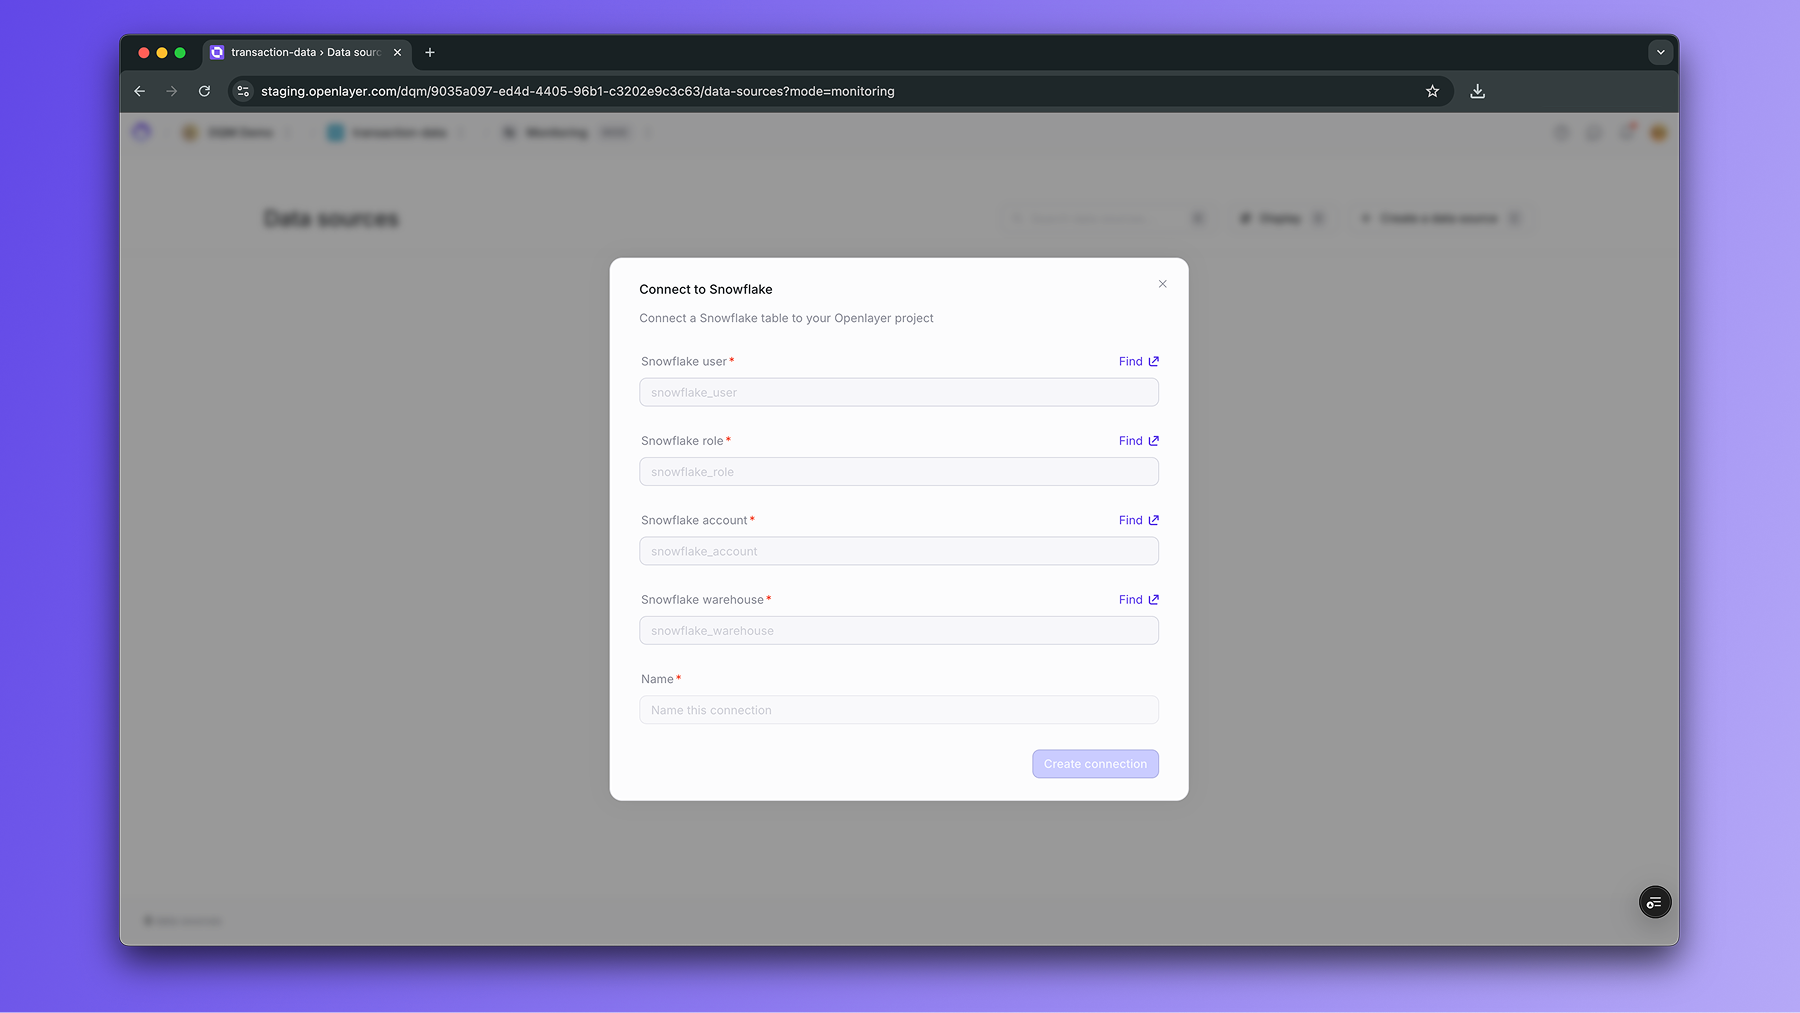
### Step 4: Connect inside Openlayer
In your Openlayer workspace:
1. Go to Data sources and select Snowflake.
2. Click Connect.
3. Fill in the fields:
* Snowflake user: the Snowflake username (default to `OPENLAYER_FILE_IMPORTER`)
* Snowflake role: the role with permissions (default to `OPENLAYER_FILE_IMPORTER_ROLE`)
* Snowflake account: your account identifier (e.g. `ABCDEFG-XYZ123`)
* Snowflake warehouse: the warehouse to run queries (the one you created in Step 1)
* Name: a descriptive name for this connection
### Step 3: Grant role permissions
The role you created in Step 2 (default to `OPENLAYER_FILE_IMPORTER_ROLE`) must
have `USAGE` rights on the warehouse, database, and schema, and `SELECT` rights on the target tables.
To do it, run the following commands in a [SQL worksheet](https://docs.snowflake.com/en/user-guide/ui-snowsight-worksheets-gs), replacing placeholders:
```sql theme={null}
-- Variables
-- Replace the warehouse, database, schema, and table names with the ones you want to grant permissions to
set role_name = 'OPENLAYER_FILE_IMPORTER_ROLE';
set user_name = 'OPENLAYER_FILE_IMPORTER';
set warehouse_name = '[YOUR_WAREHOUSE_NAME_HERE]';
set database_name = '[YOUR_DATABASE_NAME_HERE]';
set schema_name = '[YOUR_SCHEMA_NAME_HERE]';
set table_name = '[YOUR_TABLE_NAME_HERE]';
-- Grant usage rights to the warehouse
grant USAGE
on warehouse identifier($warehouse_name)
to role identifier($role_name);
-- Grant usage rights to the database
grant USAGE
on database identifier($database_name)
to role identifier($role_name);
-- Grant usage rights to the schema
grant USAGE
on schema identifier($database_name).identifier($schema_name)
to role identifier($role_name);
-- Grant select rights to the table
grant SELECT
on table identifier($database_name).identifier($schema_name).identifier($table_name)
to role identifier($role_name);
```
If you want to connect Openlayer to
[views](https://docs.snowflake.com/en/user-guide/views-introduction), you need
to grant `SELECT` rights on them too. To do it, replace `table_name` with
`view_name` in the script above.
### Step 4: Connect inside Openlayer
In your Openlayer workspace:
1. Go to Data sources and select Snowflake.
2. Click Connect.
3. Fill in the fields:
* Snowflake user: the Snowflake username (default to `OPENLAYER_FILE_IMPORTER`)
* Snowflake role: the role with permissions (default to `OPENLAYER_FILE_IMPORTER_ROLE`)
* Snowflake account: your account identifier (e.g. `ABCDEFG-XYZ123`)
* Snowflake warehouse: the warehouse to run queries (the one you created in Step 1)
* Name: a descriptive name for this connection
 ### Step 5: Configure your table
After the connection is created, select the table to monitor:
* Database: name of the database
* Schema: schema containing the table
* Table: table name
* Timestamp column: column used to order/filter data for monitoring windows
* Unique id column: column used to identify unique rows for monitoring windows (recommended)
* Data source name: a descriptive name in Openlayer
#### Optional: ML-specific settings
If the table contains ML outputs, you can provide additional context:
* Class names
* Feature names
* Categorical feature names
This enables Openlayer to run ML-aware tests such as performance monitoring and drift detection.
## Troubleshooting
* Permission errors → verify your role has `USAGE` on the database/schema/warehouse and `SELECT` on the table.
* Key errors → check that your public key is registered to the Snowflake user and that you are providing the correct private key.
* Empty results → confirm the timestamp column is populated and the right table is selected.
### Step 5: Configure your table
After the connection is created, select the table to monitor:
* Database: name of the database
* Schema: schema containing the table
* Table: table name
* Timestamp column: column used to order/filter data for monitoring windows
* Unique id column: column used to identify unique rows for monitoring windows (recommended)
* Data source name: a descriptive name in Openlayer
#### Optional: ML-specific settings
If the table contains ML outputs, you can provide additional context:
* Class names
* Feature names
* Categorical feature names
This enables Openlayer to run ML-aware tests such as performance monitoring and drift detection.
## Troubleshooting
* Permission errors → verify your role has `USAGE` on the database/schema/warehouse and `SELECT` on the table.
* Key errors → check that your public key is registered to the Snowflake user and that you are providing the correct private key.
* Empty results → confirm the timestamp column is populated and the right table is selected.