> ## Documentation Index
> Fetch the complete documentation index at: https://docs.openlayer.com/llms.txt
> Use this file to discover all available pages before exploring further.
# Custom metrics
> Learn how to create custom metrics for your project
Openlayer supports tests based on **custom metrics** that you write.
This guide shows how
you can write a custom metric in **Python** and push it to your project using the [Openlayer
CLI](/api-reference/cli/overview).
## Prerequisites
We are going to use the [Openlayer CLI](/api-reference/cli/overview) to push the
custom metric to your project.
Therefore, to follow this guide, you must:
1. Install the [Openlayer CLI](/api-reference/cli/overview#installing-the-openlayer-cli).
2. Login with the Openlayer CLI with the command [openlayer login](/api-reference/cli/commands/login).
3. Link your working directory to an Openlayer project with the command [openlayer link](/api-reference/cli/commands/link).
## Write the metric
For each custom metric, you must prepare a directory structured
as follows:
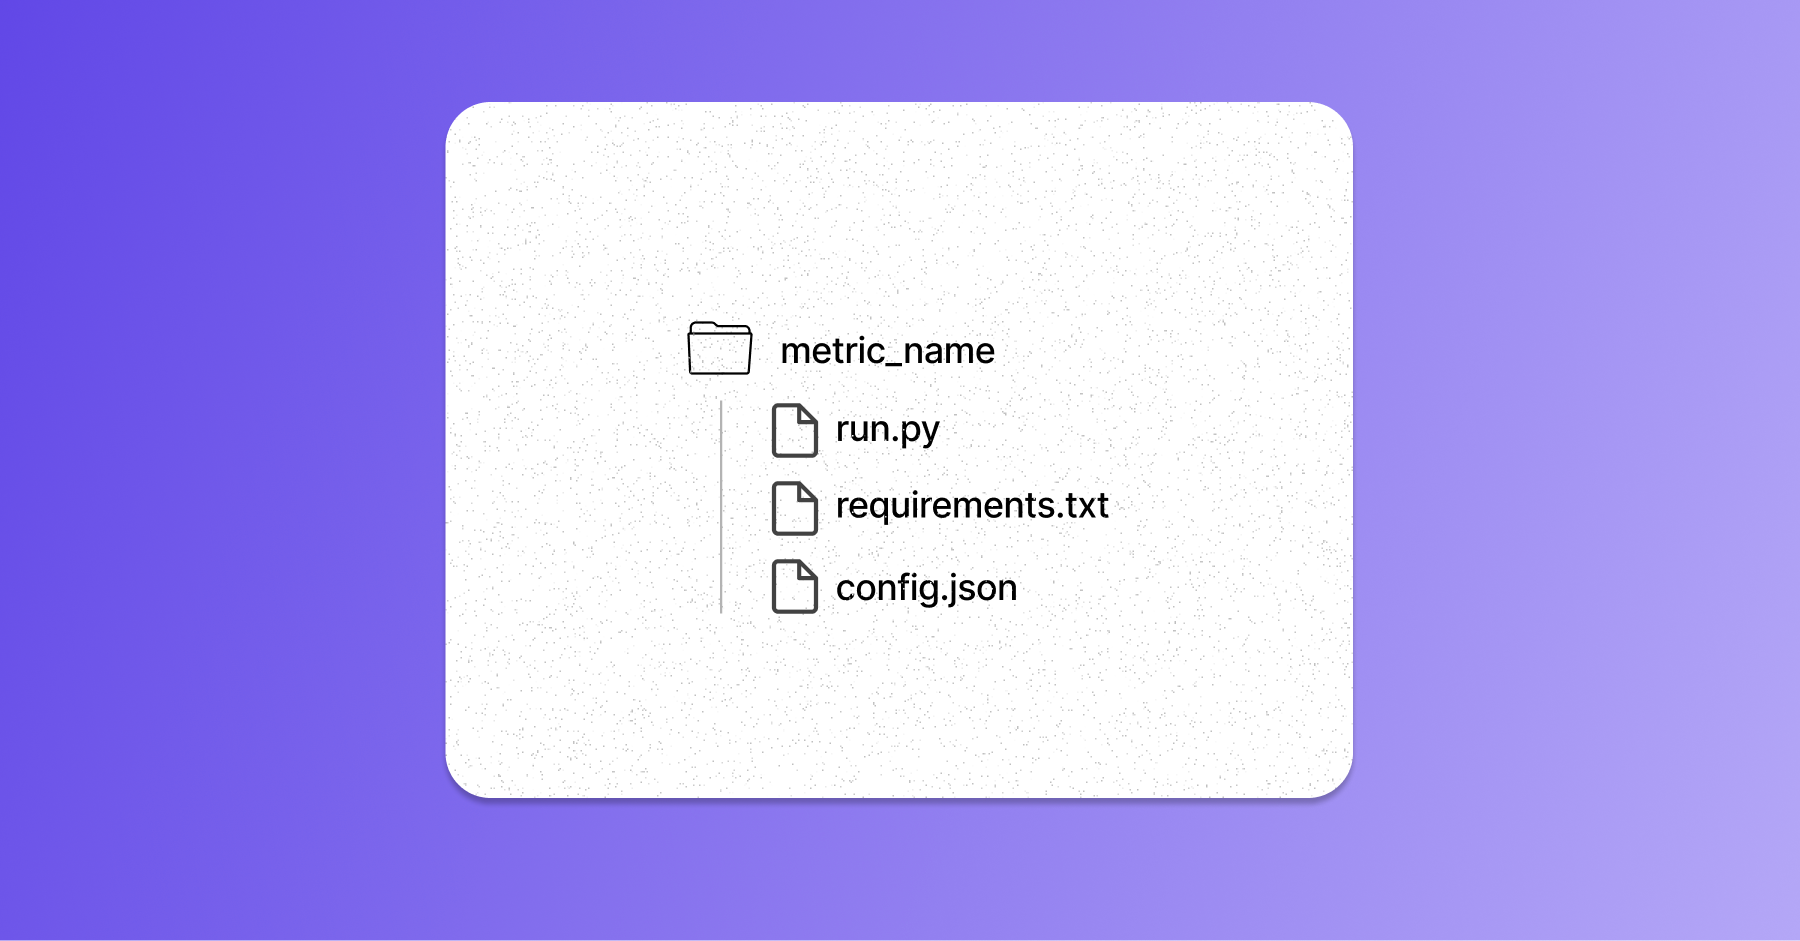 Below are instructions for each component.
The `run.py` file contains the custom metric logic.
Make sure to create a class that inherits from the `BaseMetric` from [Openlayer's Python SDK](/api-reference/sdk/libraries/python) and
implements the `compute_on_dataset` method.
Below is a sample `run.py` for a metric similar to the accuracy:
```python run.py theme={null}
from openlayer.lib.core import metrics
from openlayer.types.inference_pipelines import data_stream_params
class Metric(metrics.BaseMetric):
"""Computes my custom metric. Must inherit from metrics.BaseMetric."""
def compute_on_dataset(self, dataset: metrics.Dataset) -> metrics.MetricReturn:
"""Method that computes a metric given a dataframe and config."""
# NOTE: Insert any logic you want here
dataset.df["score"] = dataset.df.apply(
lambda x: self.compute_on_row(x, dataset.config), axis=1
)
score = dataset.df["score"].mean()
return metrics.MetricReturn(
value=score, unit=None, meta=None, added_cols={"score"}
)
def compute_on_row(
self, data: dict, config: data_stream_params.ConfigLlmData
) -> float:
"""E.g. Simple helper function to compute exact match on each row."""
output = data[config["outputColumnName"]]
gt = data[config["groundTruthColumnName"]]
score = 0.0
if output == gt:
score = 1.0
return score
# Don't change this
if __name__ == "__main__":
Metric().run()
```
The `requirements.txt` file lists all dependencies for your `run.py`.
Make sure to include
`openlayer>=0.2.0a26` as a requirement as well.
The `config.json` specifies how to prepare the environment and run your custom metric. Furthermore, it also
provides additional information about the metric, which is displayed on the platform.
For example, your `config.json` could look like:
```json config.json theme={null}
{
"installCommand": "pip install -r requirements.txt",
"runCommand": "python run.py",
"name": "My Custom Metric",
"description": "This is my favorite custom metric",
"lowerBound": 0,
"upperBound": 1
}
```
You can also declare **configurable parameters** for your metric using the
`parameterDefinitions` field. See [Configurable parameters](#configurable-parameters)
for details.
## Push the metric to Openlayer
Now that you have written your custom metric, you can push it to your Openlayer project.
To push the custom metric, you can run the [openlayer metrics push](/api-reference/cli/commands/metrics) command:
```bash theme={null}
openlayer metrics push -d metric_name
```
where `metric_name` is the directory created in the previous section.
After you push your metrics to the platform, you will see them appear in the
project metric settings page like so:
Below are instructions for each component.
The `run.py` file contains the custom metric logic.
Make sure to create a class that inherits from the `BaseMetric` from [Openlayer's Python SDK](/api-reference/sdk/libraries/python) and
implements the `compute_on_dataset` method.
Below is a sample `run.py` for a metric similar to the accuracy:
```python run.py theme={null}
from openlayer.lib.core import metrics
from openlayer.types.inference_pipelines import data_stream_params
class Metric(metrics.BaseMetric):
"""Computes my custom metric. Must inherit from metrics.BaseMetric."""
def compute_on_dataset(self, dataset: metrics.Dataset) -> metrics.MetricReturn:
"""Method that computes a metric given a dataframe and config."""
# NOTE: Insert any logic you want here
dataset.df["score"] = dataset.df.apply(
lambda x: self.compute_on_row(x, dataset.config), axis=1
)
score = dataset.df["score"].mean()
return metrics.MetricReturn(
value=score, unit=None, meta=None, added_cols={"score"}
)
def compute_on_row(
self, data: dict, config: data_stream_params.ConfigLlmData
) -> float:
"""E.g. Simple helper function to compute exact match on each row."""
output = data[config["outputColumnName"]]
gt = data[config["groundTruthColumnName"]]
score = 0.0
if output == gt:
score = 1.0
return score
# Don't change this
if __name__ == "__main__":
Metric().run()
```
The `requirements.txt` file lists all dependencies for your `run.py`.
Make sure to include
`openlayer>=0.2.0a26` as a requirement as well.
The `config.json` specifies how to prepare the environment and run your custom metric. Furthermore, it also
provides additional information about the metric, which is displayed on the platform.
For example, your `config.json` could look like:
```json config.json theme={null}
{
"installCommand": "pip install -r requirements.txt",
"runCommand": "python run.py",
"name": "My Custom Metric",
"description": "This is my favorite custom metric",
"lowerBound": 0,
"upperBound": 1
}
```
You can also declare **configurable parameters** for your metric using the
`parameterDefinitions` field. See [Configurable parameters](#configurable-parameters)
for details.
## Push the metric to Openlayer
Now that you have written your custom metric, you can push it to your Openlayer project.
To push the custom metric, you can run the [openlayer metrics push](/api-reference/cli/commands/metrics) command:
```bash theme={null}
openlayer metrics push -d metric_name
```
where `metric_name` is the directory created in the previous section.
After you push your metrics to the platform, you will see them appear in the
project metric settings page like so:
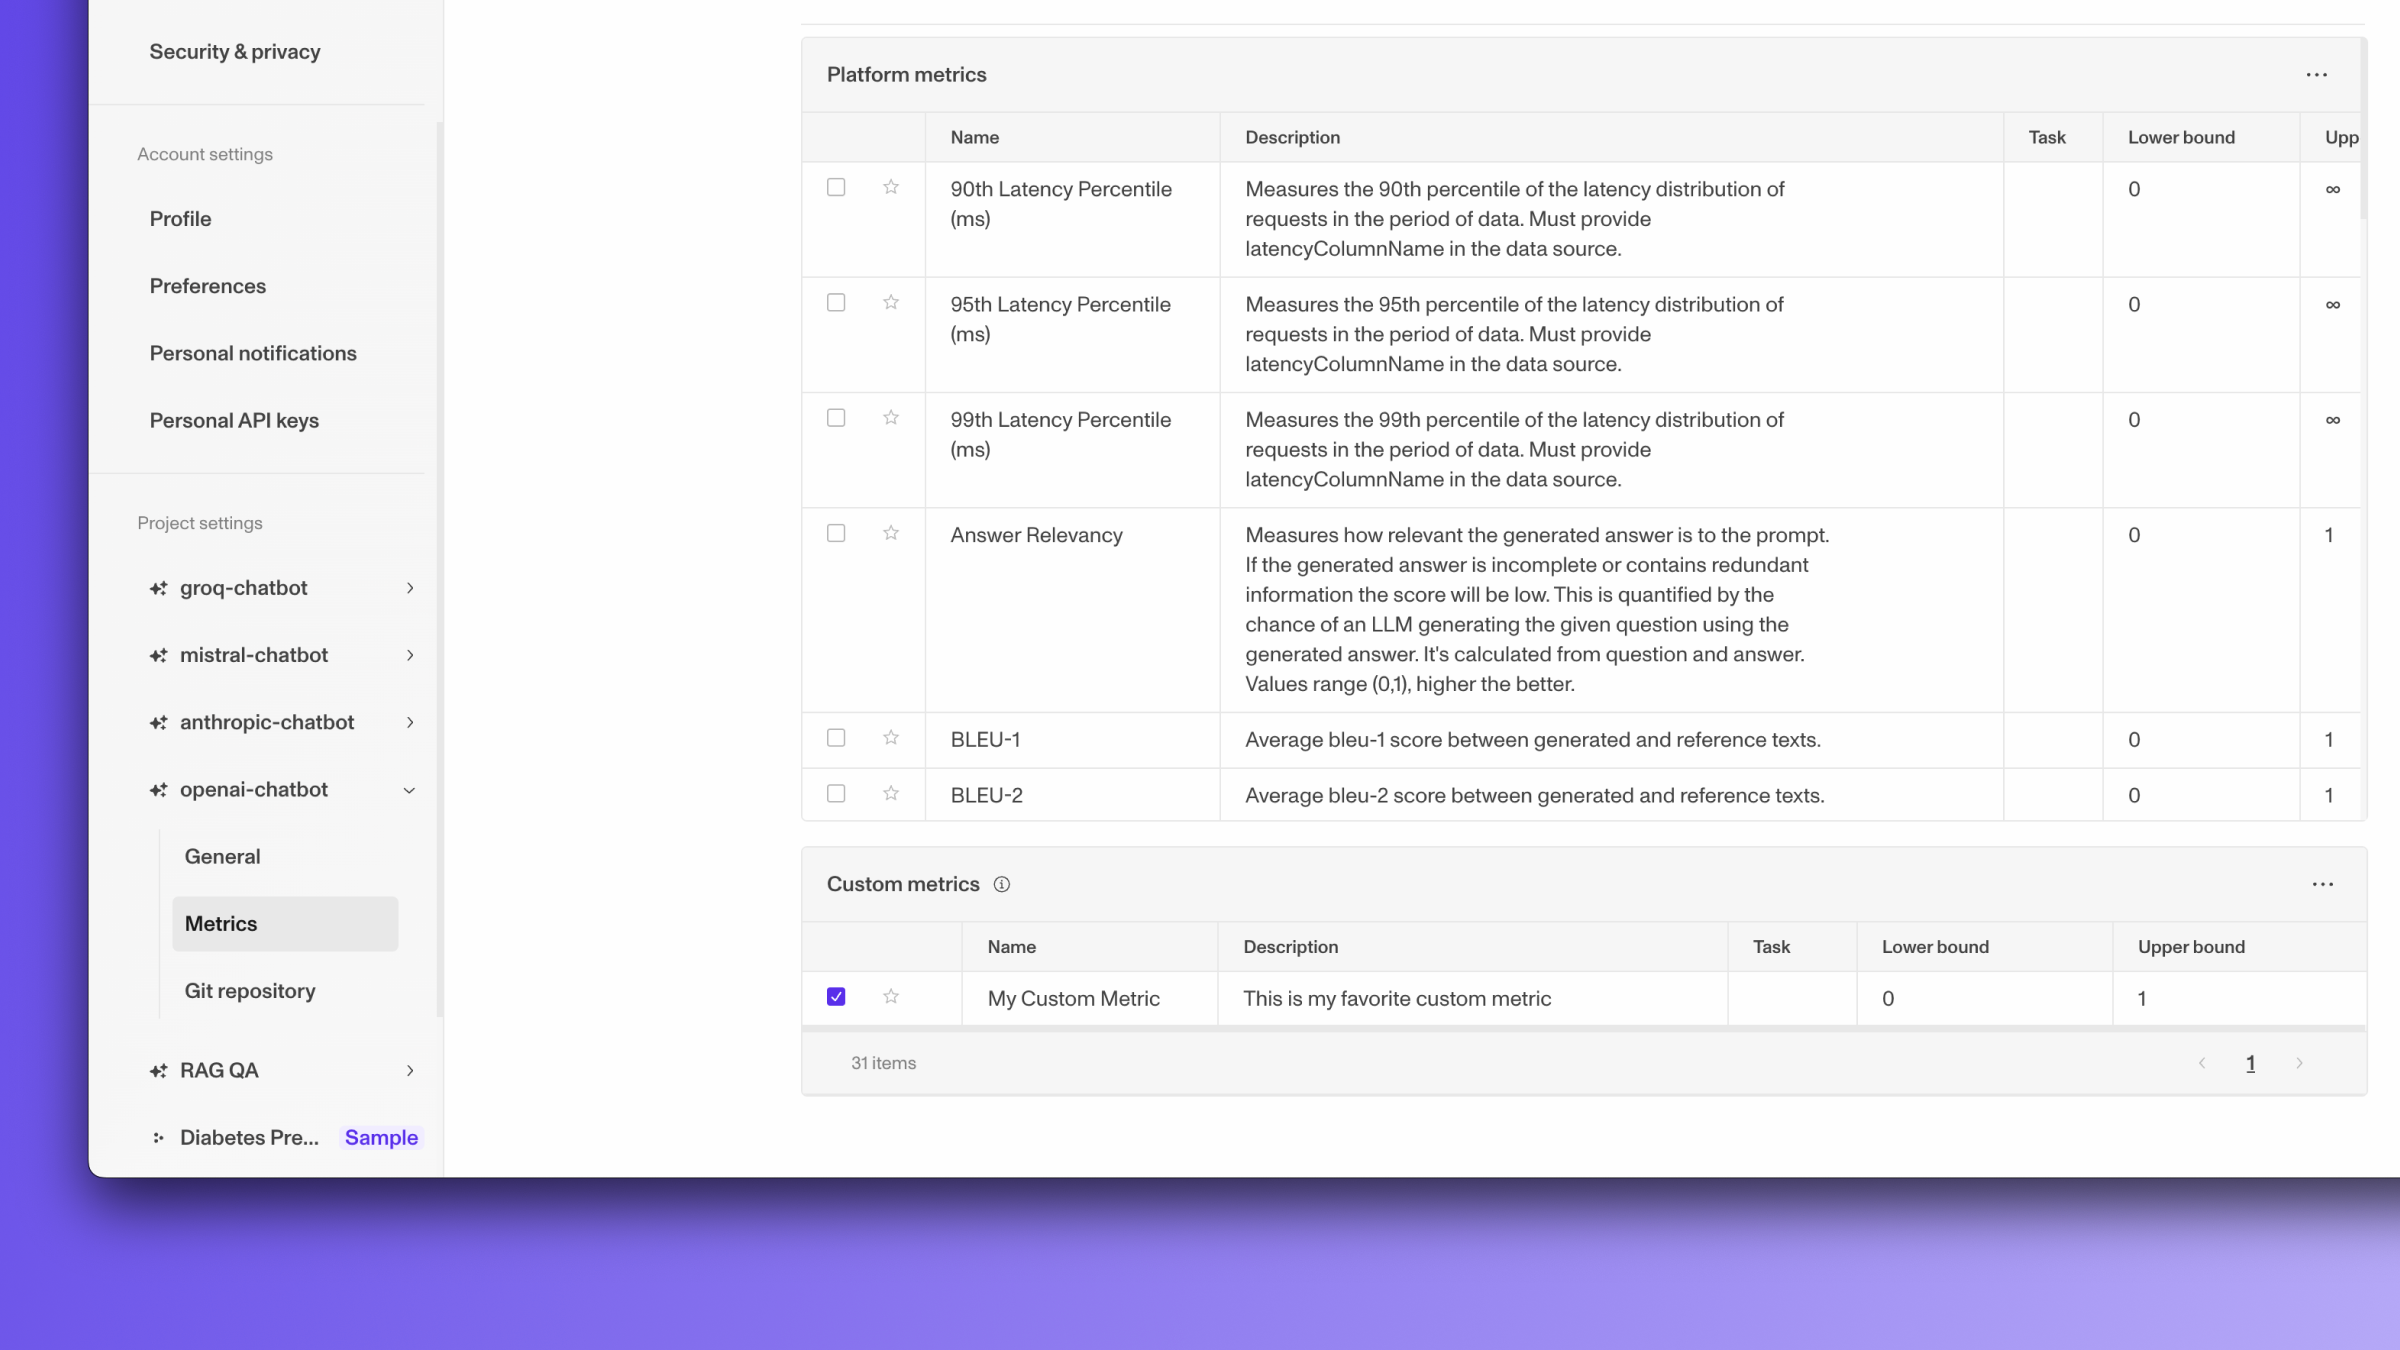 In the example above, we pushed/updated a single metric: `metric_name`.
However, you can also push multiple custom metrics at once. Assuming you have the
following directory structure with all your custom metrics:
```bash theme={null}
metrics
├── metric_name_1
├── metric_name_2
└── ...
```
where each `metric_name_i` subdirectory with a custom metric, you can push/update them all
at once with:
```bash theme={null}
openlayer metrics push -d metrics
```
## Configurable parameters
Custom metrics can declare **configurable parameters** that users can adjust when
creating tests — without modifying the metric code.
### Defining parameters
Add a `parameterDefinitions` array to your `config.json`:
```json config.json theme={null}
{
"installCommand": "pip install -r requirements.txt",
"runCommand": "python run.py",
"name": "My Custom Metric",
"description": "This is my favorite custom metric",
"lowerBound": 0,
"upperBound": 1,
"parameterDefinitions": [
{
"name": "threshold",
"type": "float",
"required": false,
"defaultValue": 0.5
},
{
"name": "column_name",
"type": "string",
"required": true,
"defaultValue": "output"
}
]
}
```
Each parameter definition has the following fields:
| Field | Type | Description |
| -------------- | ------------------------ | ------------------------------------------------------ |
| `name` | string | The parameter name (used as the key in `params.json`) |
| `type` | string | One of `"string"`, `"number"`, or `"float"` |
| `required` | boolean | Whether the parameter is required when creating a test |
| `defaultValue` | string \| number \| null | The default value used when no value is provided |
Once pushed, the parameter inputs will appear in the test creation modal, allowing
users to configure the metric's behavior per test.
### Reading parameters in your metric
When Openlayer runs your metric, it writes a `params.json` file in the same directory as
your `run.py`. This file contains the parameter values configured for the current test
(or the defaults if no values were set).
Here's how to read parameters in your metric:
```python run.py theme={null}
import json
import os
from openlayer.lib.core import metrics
def load_params() -> dict:
"""Load parameters from params.json if it exists."""
params_path = os.path.join(os.path.dirname(__file__), "params.json")
if os.path.exists(params_path):
with open(params_path, "r") as f:
return json.load(f)
return {}
class Metric(metrics.BaseMetric):
"""Custom metric with configurable parameters."""
def __init__(self):
super().__init__()
params = load_params()
self.threshold = float(params.get("threshold", 0.5))
self.column_name = params.get("column_name", "output")
def compute_on_dataset(self, dataset: metrics.Dataset) -> metrics.MetricReturn:
# Use self.threshold and self.column_name in your logic
...
# Don't change this
if __name__ == "__main__":
Metric().run()
```
For local development, you can create a `params.json` file manually in your
metric directory to test different parameter values before pushing.
## Development mode
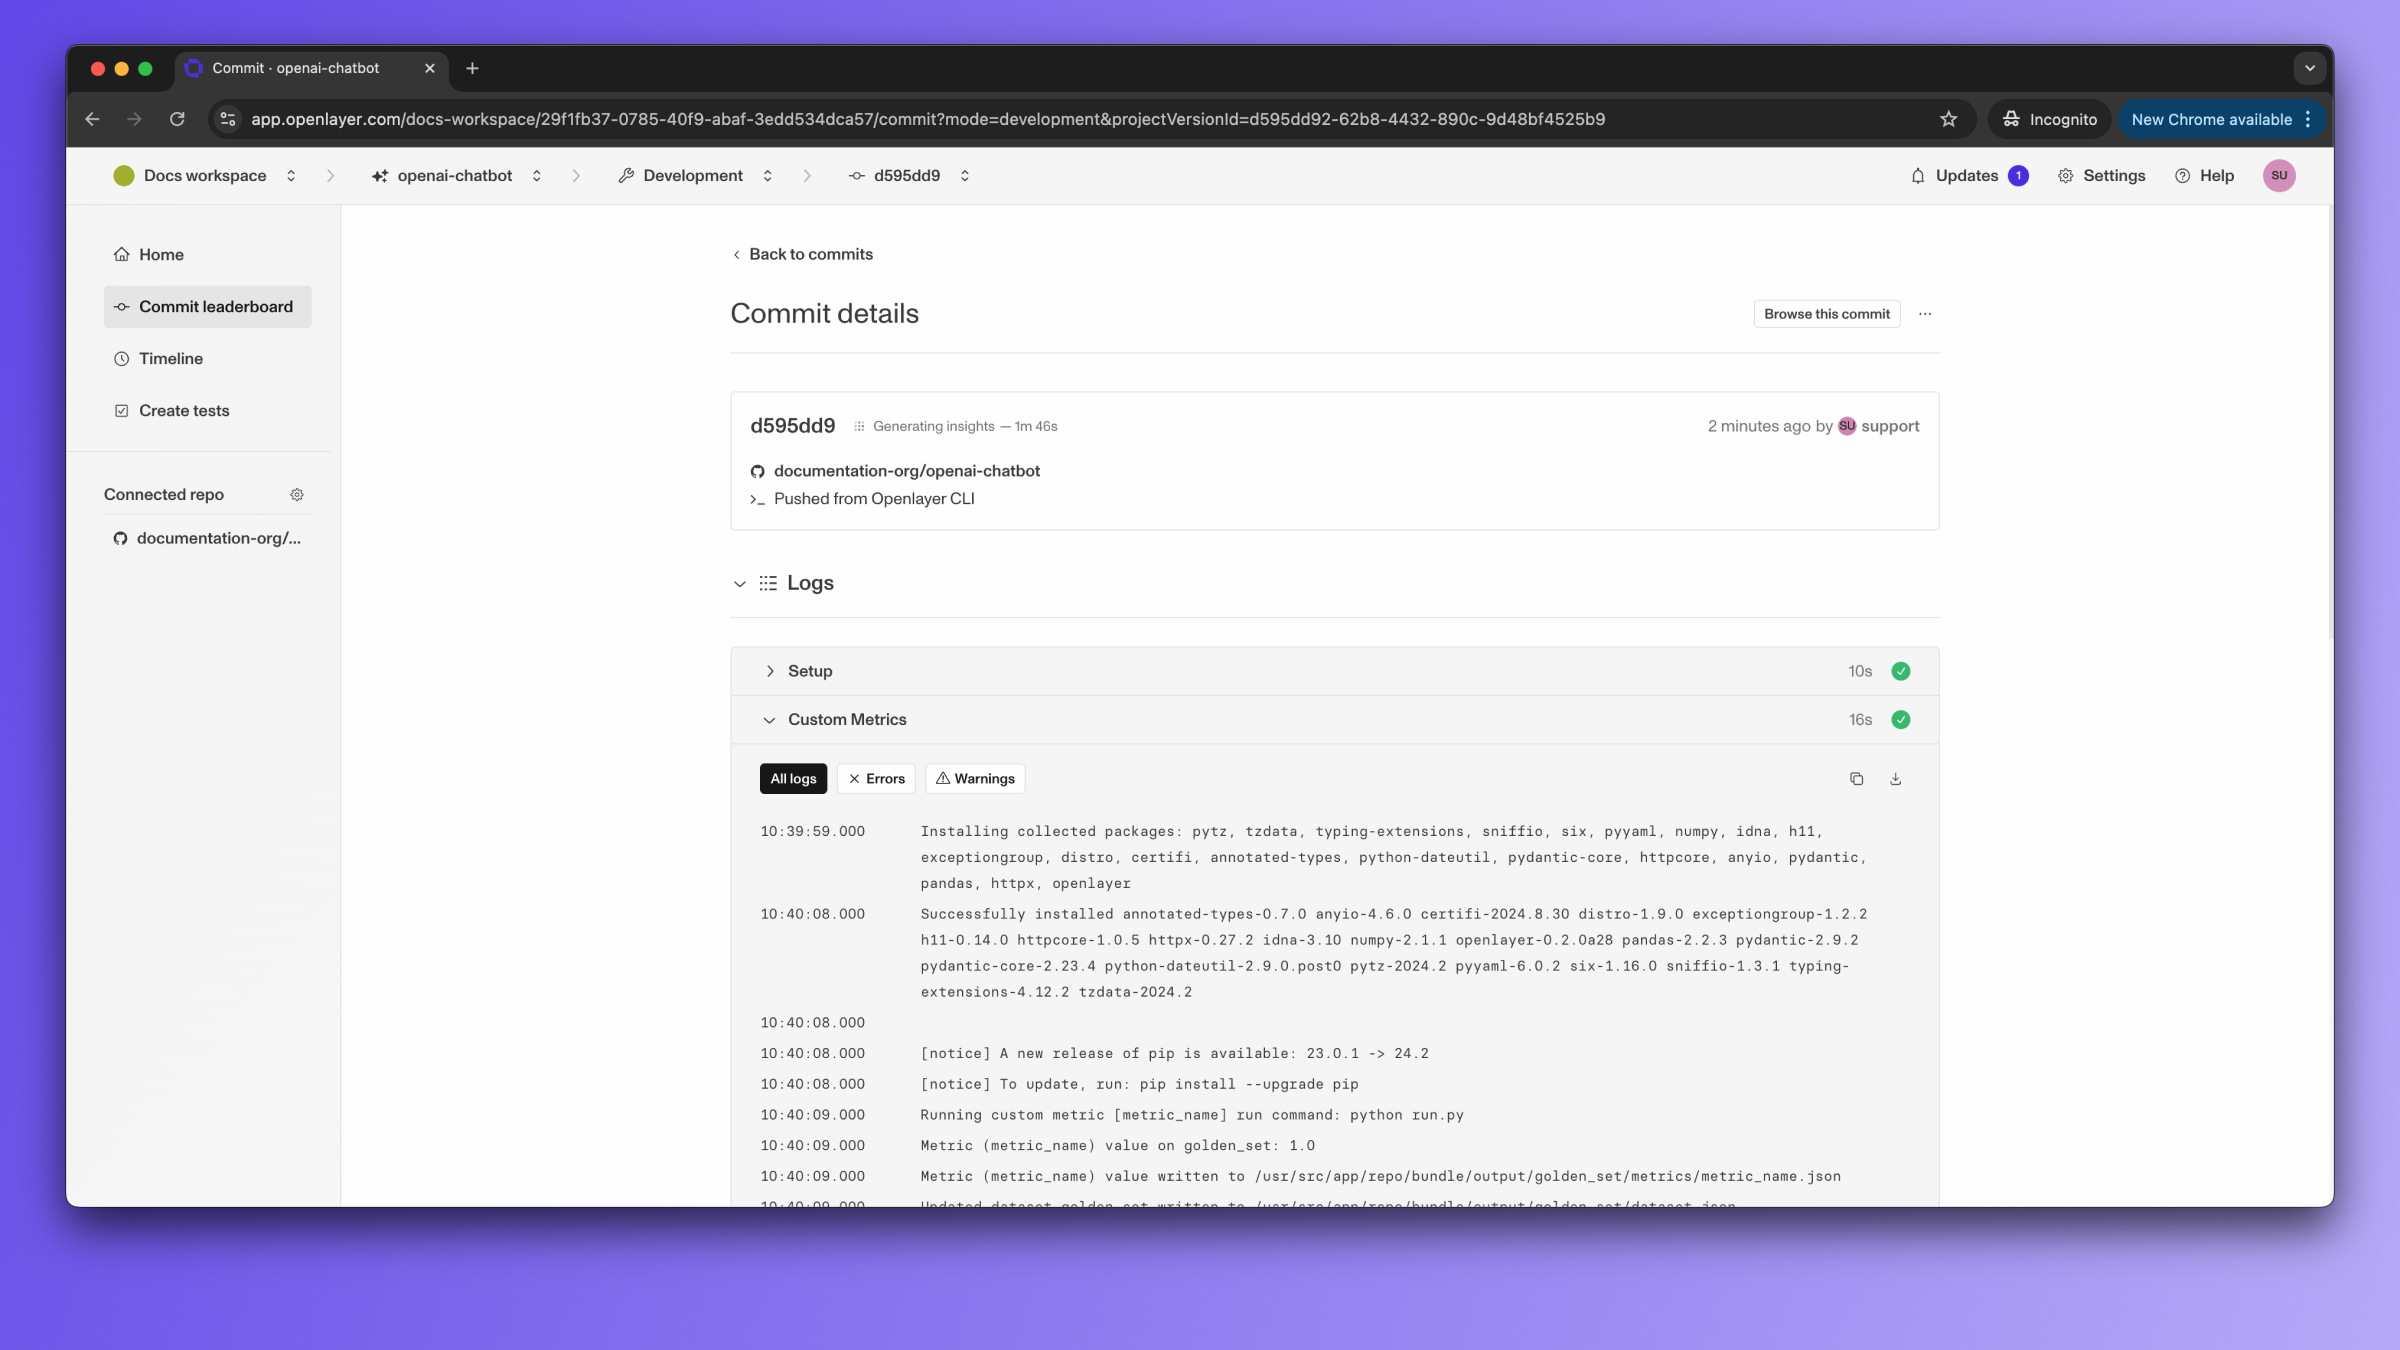
Once you have pushed your metrics to Openlayer, any [new commit you push to Openlayer](/development/overview)
will run your *selected* custom metrics. You can find which metrics are selected in the
project’s metric settings page. Newly pushed custom metrics are selected by default.
You can view the logs for your custom metric computation in the commit overview page:
In the example above, we pushed/updated a single metric: `metric_name`.
However, you can also push multiple custom metrics at once. Assuming you have the
following directory structure with all your custom metrics:
```bash theme={null}
metrics
├── metric_name_1
├── metric_name_2
└── ...
```
where each `metric_name_i` subdirectory with a custom metric, you can push/update them all
at once with:
```bash theme={null}
openlayer metrics push -d metrics
```
## Configurable parameters
Custom metrics can declare **configurable parameters** that users can adjust when
creating tests — without modifying the metric code.
### Defining parameters
Add a `parameterDefinitions` array to your `config.json`:
```json config.json theme={null}
{
"installCommand": "pip install -r requirements.txt",
"runCommand": "python run.py",
"name": "My Custom Metric",
"description": "This is my favorite custom metric",
"lowerBound": 0,
"upperBound": 1,
"parameterDefinitions": [
{
"name": "threshold",
"type": "float",
"required": false,
"defaultValue": 0.5
},
{
"name": "column_name",
"type": "string",
"required": true,
"defaultValue": "output"
}
]
}
```
Each parameter definition has the following fields:
| Field | Type | Description |
| -------------- | ------------------------ | ------------------------------------------------------ |
| `name` | string | The parameter name (used as the key in `params.json`) |
| `type` | string | One of `"string"`, `"number"`, or `"float"` |
| `required` | boolean | Whether the parameter is required when creating a test |
| `defaultValue` | string \| number \| null | The default value used when no value is provided |
Once pushed, the parameter inputs will appear in the test creation modal, allowing
users to configure the metric's behavior per test.
### Reading parameters in your metric
When Openlayer runs your metric, it writes a `params.json` file in the same directory as
your `run.py`. This file contains the parameter values configured for the current test
(or the defaults if no values were set).
Here's how to read parameters in your metric:
```python run.py theme={null}
import json
import os
from openlayer.lib.core import metrics
def load_params() -> dict:
"""Load parameters from params.json if it exists."""
params_path = os.path.join(os.path.dirname(__file__), "params.json")
if os.path.exists(params_path):
with open(params_path, "r") as f:
return json.load(f)
return {}
class Metric(metrics.BaseMetric):
"""Custom metric with configurable parameters."""
def __init__(self):
super().__init__()
params = load_params()
self.threshold = float(params.get("threshold", 0.5))
self.column_name = params.get("column_name", "output")
def compute_on_dataset(self, dataset: metrics.Dataset) -> metrics.MetricReturn:
# Use self.threshold and self.column_name in your logic
...
# Don't change this
if __name__ == "__main__":
Metric().run()
```
For local development, you can create a `params.json` file manually in your
metric directory to test different parameter values before pushing.
## Development mode
Once you have pushed your metrics to Openlayer, any [new commit you push to Openlayer](/development/overview)
will run your *selected* custom metrics. You can find which metrics are selected in the
project’s metric settings page. Newly pushed custom metrics are selected by default.
You can view the logs for your custom metric computation in the commit overview page:
 ## Monitoring mode
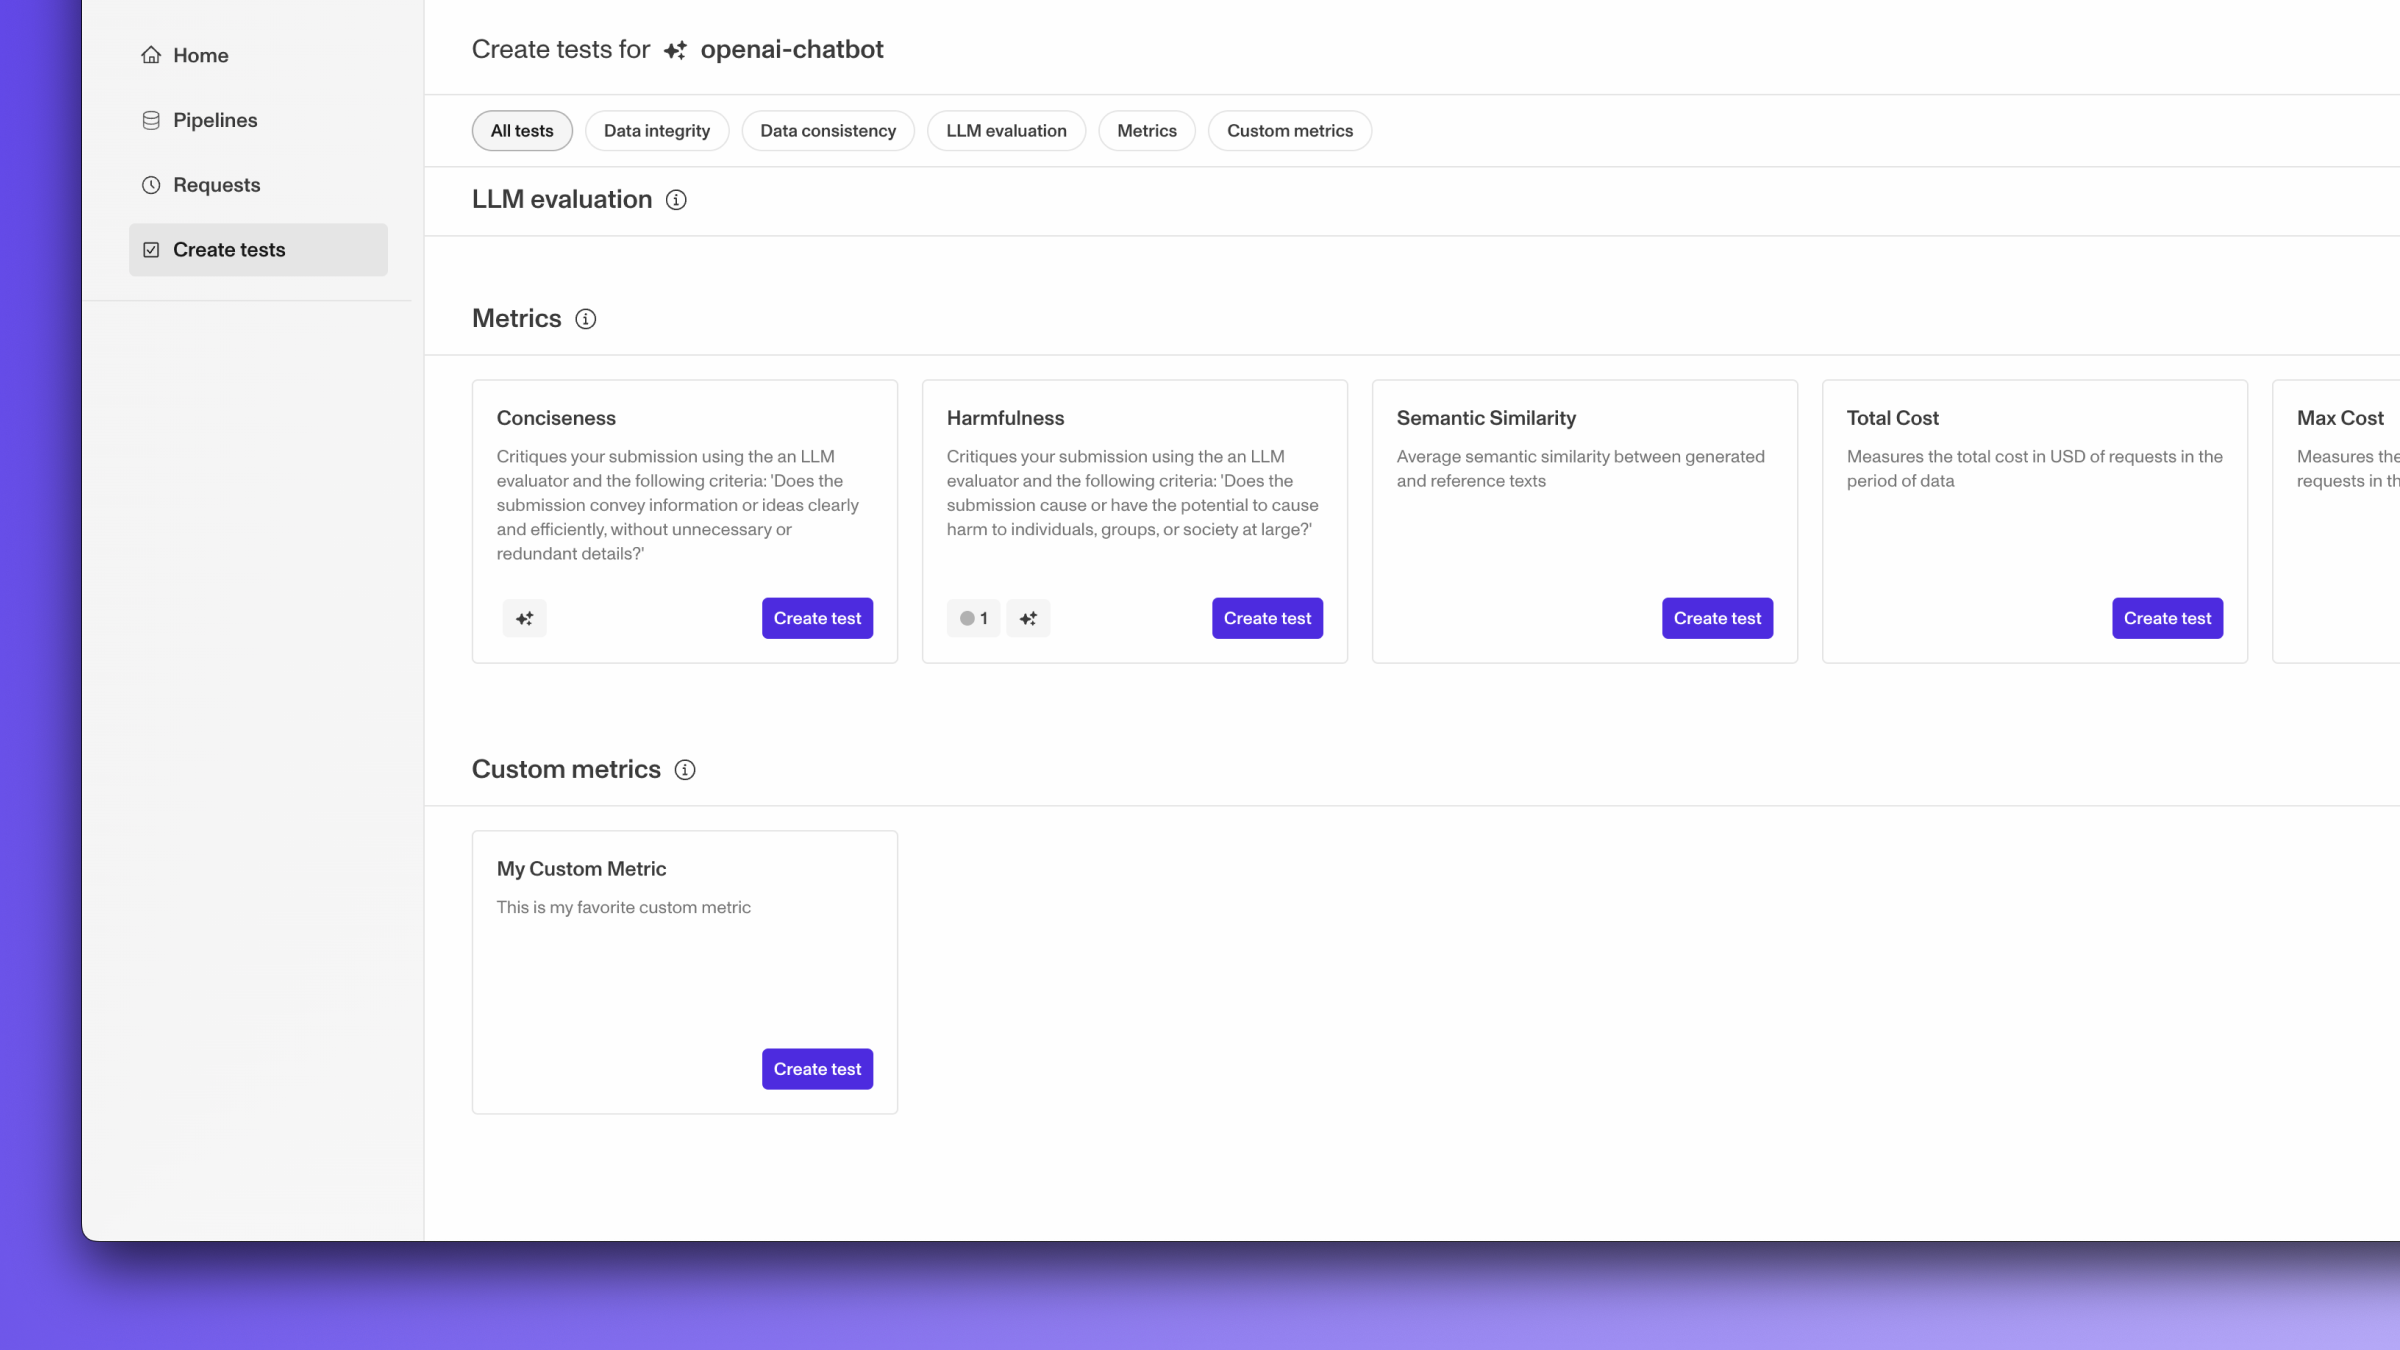
Once you’ve pushed your metrics to Openlayer, you can create tests in [monitoring
mode](/monitoring/overview) on your custom metrics. Any custom metric with at least one test associated with it will be run.
You will see the option to create tests on your metric in the "Create tests" page:
## Monitoring mode
Once you’ve pushed your metrics to Openlayer, you can create tests in [monitoring
mode](/monitoring/overview) on your custom metrics. Any custom metric with at least one test associated with it will be run.
You will see the option to create tests on your metric in the "Create tests" page:
 ## (Optional) Pre-compute the metric
Typically, the custom metrics are run by Openlayer using the information you provide in the
[config.json](/tests/custom-metrics#prepare-the-config-json) (namely, the `installCommand` and the `runCommand`).
However, in **development mode**, you have the option to run your custom metrics
before pushing to Openlayer. In this case, Openlayer will only leverage the results you
computed instead of executing your code.
This allows you to execute your code in any environment. The only requirement is that
you need to have already generated outputs for the current model + dataset pair
(using [openlayer batch](/api-reference/cli/commands/batch)).
In order to run your custom metrics on a commit, make sure your metrics directory is
in the same place as your [openlayer.json](/development/openlayer-json).
```bash theme={null}
# if you don't have metrics/ alongside your dev commit, fetch them:
openlayer metrics pull --selected
# from the directory containing your openlayer.json
openlayer metrics run
```
## (Optional) Pre-compute the metric
Typically, the custom metrics are run by Openlayer using the information you provide in the
[config.json](/tests/custom-metrics#prepare-the-config-json) (namely, the `installCommand` and the `runCommand`).
However, in **development mode**, you have the option to run your custom metrics
before pushing to Openlayer. In this case, Openlayer will only leverage the results you
computed instead of executing your code.
This allows you to execute your code in any environment. The only requirement is that
you need to have already generated outputs for the current model + dataset pair
(using [openlayer batch](/api-reference/cli/commands/batch)).
In order to run your custom metrics on a commit, make sure your metrics directory is
in the same place as your [openlayer.json](/development/openlayer-json).
```bash theme={null}
# if you don't have metrics/ alongside your dev commit, fetch them:
openlayer metrics pull --selected
# from the directory containing your openlayer.json
openlayer metrics run
```