- Authenticator App: Use an authenticator app like Google Authenticator, Authy, or 1Password to generate a time-based one-time password (TOTP).
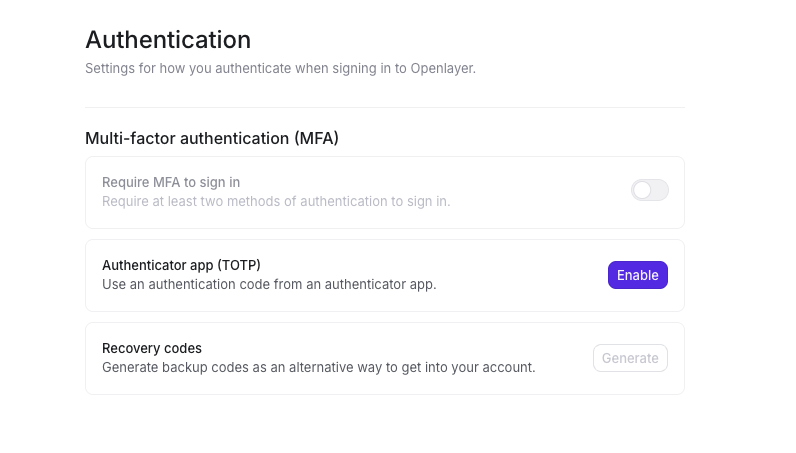
Enabling Multi-factor Authentication
1
Navigate to Account Settings
Go to Workspace settings → Account → Authentication
2
Enable the Authenticator App
In the “Authenticator app (TOTP)” section, click Enable
3
Set up your authenticator app
Follow the setup steps (see below)
4
Verify your setup
Enter the 6-digit code from your authenticator app to confirm
5
Save your recovery codes
Store the recovery codes in a safe place (see Recovery Codes section below)
Configuring an Authenticator App (TOTP)
When you enable the authenticator app, you will see a setup dialog where you can scan a QR code or enter the setup key manually, then enter the 6-digit code from your app to verify: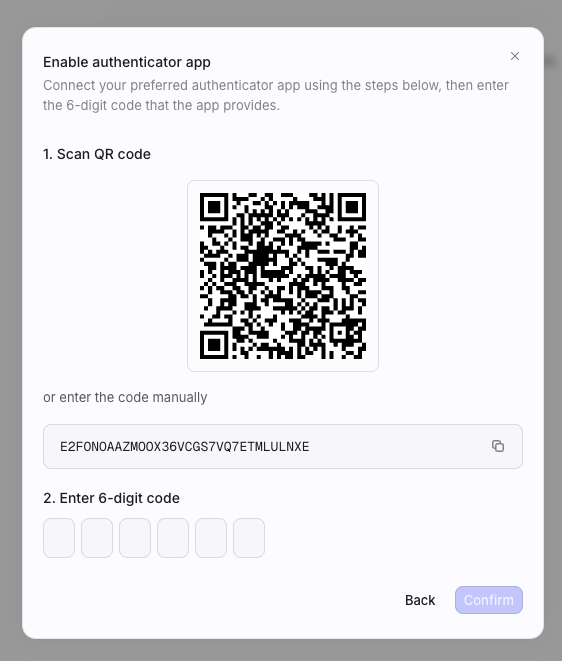
- QR code: Scan the QR code with your authenticator app (Google Authenticator, Authy, 1Password, etc.)
- Manual setup key: If you cannot scan the QR code, you can manually enter the setup key displayed on the screen (or copy it using the copy icon)
- Verification: Once added to your app, enter the 6-digit code it generates in the verification boxes and click Confirm
Signing In with MFA Enabled
When you have MFA enabled on your account:- Enter your email and password on the login page
- When prompted, enter the 6-digit code from your authenticator app, or use a recovery code if you don’t have access to your authenticator
- You will be signed in once the code is verified
Recovery Codes
After setting up multi-factor authentication, you will receive recovery codes. These codes allow you to access your account if you lose access to your authenticator app.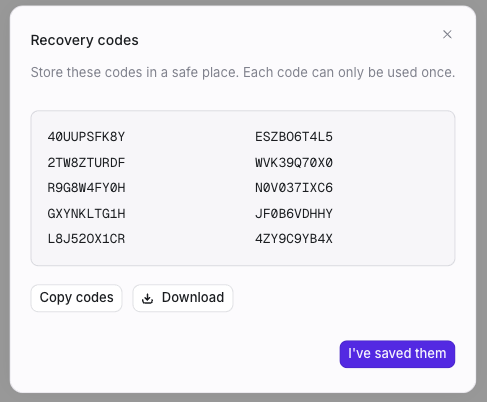
Important Notes
- Store codes securely: Save your recovery codes in a safe place (e.g., a password manager or secure note)
- One-time use: Each recovery code can only be used once
- Regenerate when needed: You can generate a new set of recovery codes at any time from Settings → Account → Authentication → Recovery codes → Generate
- Download or copy: You can download the codes as a text file or copy them to your clipboard when they are generated
Managing MFA
Regenerating Recovery Codes
If you’ve used many of your recovery codes or suspect they may have been compromised, you can generate a new set:- Go to Settings → Account → Authentication
- Click Generate in the Recovery codes section
- Save the new codes securely—your previous codes will no longer work
Enforcing Multi-factor Authentication
Workspace admins can require MFA for all members of their workspace. When enforced, members must enable MFA on their account before they can access the workspace.Prerequisites
- You must be a workspace admin
- You must have MFA enabled on your own account first before you can require it for workspace members
How to Enforce MFA for Your Workspace
1
Enable MFA on Your Account
If you haven’t already, enable MFA from Settings → Account →
Authentication
2
Navigate to Workspace Security Settings
Go to Workspace settings → Security and Privacy
3
Enable Require MFA
Toggle Require multi-factor authentication to enable
- New and existing members without MFA will be prompted to enable it before they can access the workspace
- Members who try to sign in will be redirected to the Authentication settings page to complete MFA setup
- Once MFA is enabled, they can proceed with normal sign-in (password + authenticator code or recovery code)
Frequently Asked Questions
Which authenticator apps are supported?
Which authenticator apps are supported?
Openlayer works with any TOTP-compatible authenticator app, including
Google Authenticator, Authy, 1Password, Microsoft Authenticator, and
similar apps.
What if I lose access to my authenticator app and recovery codes?
What if I lose access to my authenticator app and recovery codes?
If you’ve lost access to both your authenticator app and recovery codes, please
contact our support team at support@openlayer.com. We can help verify your identity
and assist with account recovery.
Does MFA work with SAML SSO?
Does MFA work with SAML SSO?
When using SAML SSO, MFA is typically handled by your identity provider (IdP).
Openlayer’s built-in MFA applies to email/password authentication. If your workspace
uses SAML SSO, configure MFA in your IdP settings.
Can I use the same authenticator app for multiple accounts?
Can I use the same authenticator app for multiple accounts?
Yes. Your authenticator app can store multiple accounts. When you add Openlayer,
it will appear as a separate entry (e.g., “Openlayer (your@email.com)”) alongside
your other accounts.
How do I disable MFA?
How do I disable MFA?
If you need to disable MFA on your account, contact our support team at
support@openlayer.com. You may need to verify your identity before MFA can
be disabled.